Accruent Lucernex 26.03 Release Notes
We're delivering this automatic upgrade to these environments:
-
Dedicated TRAIN: March 11, 2026
-
UAT (TRAIN): March 13, 2026
-
Production: March 27, 2026
The upgrade includes:
-
Import and reconcile rent invoices: Import a landlord PDF invoice, extract its line items, and reconcile them with payment transactions.
-
Receipt reconciliation: Improved control and accuracy when applying tenant credits and payments.
-
Cost Tracking: Automatically refresh custom list values from previously submitted Pay Apps or related purchase orders.
-
Budget-impacting values: Clear budget-impacting values when you reject or deactivate a Pay App
 Payment Application / Invoice.
 -
Work Flow Pay App actions: Apply a Work Flow step action to subsequent Pay Apps.
-
FIFO validation: Enforce FIFO validation for Pay Apps.
-
Work Flow notifications: Create and edit layouts for Workflow Notification Email forms.
-
Scheduled Job: Use your own user security when you manually run a scheduled job from a report.
-
Database schema changes: New fields added for enhancements in this release.
-
Improvements and issues fixed.
Import and reconcile a rent invoice
LUC-16566
When you receive a landlord's invoice you must reconcile the associated expenses to the invoice.
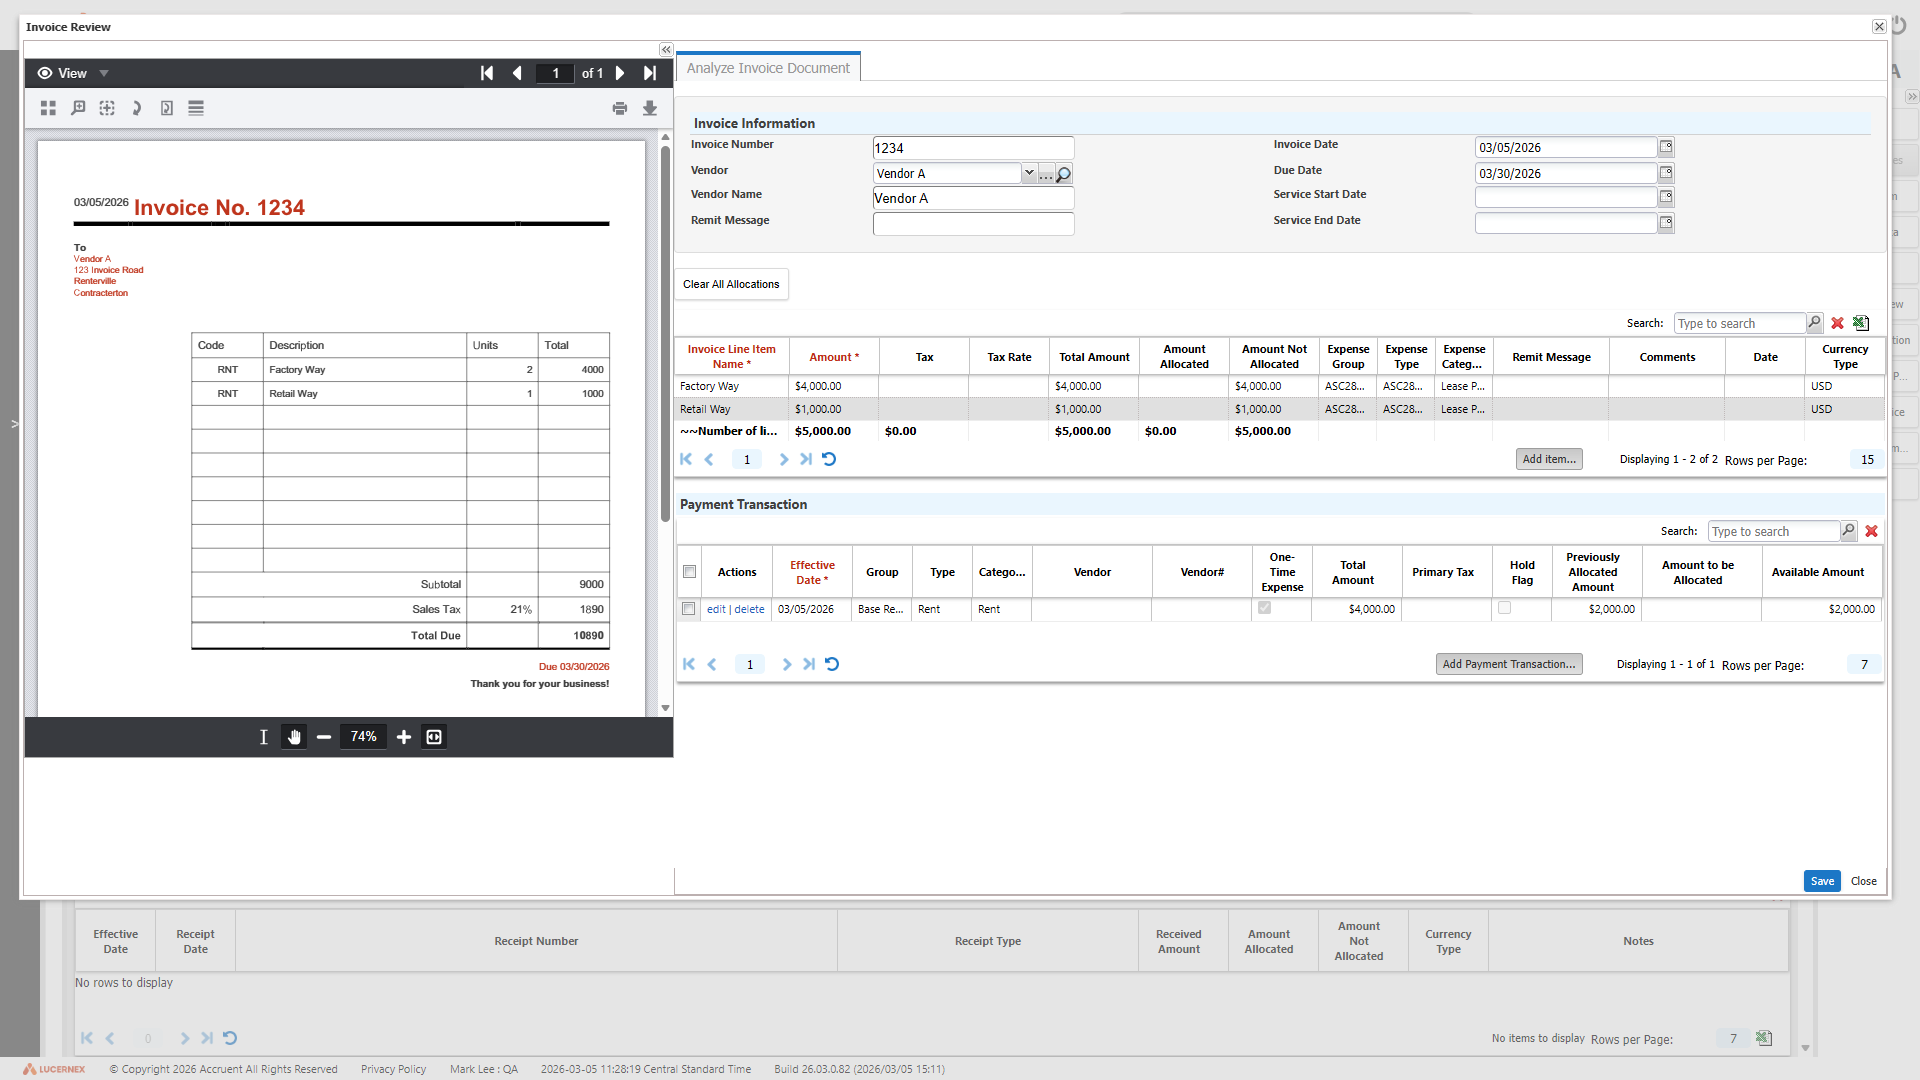
Instead of using a lengthy manual process to reconcile expense transactions, upload a PDF invoice and extract its details by using the Import Invoice option on the Contract > Payment Info > Transactions page. Lucernex automatically compares the invoice with transactions on the contract and identifies potential matches to review and verify.
To use this feature, contact Accruent Support to request that Allow LX Invoice is turned on in the Manage Company page of your firm.
If your organization uses custom layouts, you may need to recreate your layout to display the Import Invoice button.
Additionally, Lucernex supports portfolio-based invoice matching as an optional configuration. When turned on, changes made to expense group, expense type, and category mappings for an invoice line item are reused across other contracts that belong to the same portfolio. When turned off, invoice matching behavior remains contract-specific and training is applied only to the current contract.
To use this feature, contact Accruent Support and request that enablePortfolioInvoiceMatch is turned on in your firm.
-
On the Contracts module, select Payment Info > Transactions.
-
Select Import Invoice.
-
If you have not uploaded the invoice PDF on the Documents tab:
-
Select the folder to upload to.
-
Select Upload.
-
Complete the dialog that opens:
-
Description
-
File Type: Document.
-
Author: Author of the document.
-
Release Document Immediately: Select to make this document immediately available to everyone. Cleared to make the document only visible to you.
-
Send email notifications?: Select to send a notification to anyone who is a member of the folder where you are uploading the document. Add Recipients and complete the Email Title and Email message.
-
File Name: Select Choose Files and select the PDF to upload.
-
-
Select Upload.
-
-
Select the PDF and select Analyze Document.
If the invoice was previously analyzed, Analyze Document uses the stored results. To force the invoice to be reprocessed and discard previously trained values, select Clear Cache and Analyze.
The Invoice Review dialog opens. When analysis is complete, select >> to expand the Analyze Invoice Document pane to fill the screen. Select << to collapse it.
Select Previous, Next, Rotate (°), Zoom In, Zoom Out, and Reset Zoom to navigate and explore the invoice.
The Invoice Information section of the Analyze Invoice Document tab contains information extracted from the invoice and lists each invoice line item.
-
If required, edit the Invoice Information:
-
Invoice Number
-
Vendor Name
-
Due Date
-
Service Start Date
-
Service End Date
-
Remit Message
-
-
If required, edit invoice line items:
-
Double-click a field in the line item you want to edit.
-
Enter the values you want for each field.
-
Select Update.
If you make changes to invoice line items and want navigate to a different invoice, select Save to retain your edits.
-
-
If required, add additional items:
-
Select Add item.
-
Enter item details:
-
Invoice Line Item Name
-
Amount
-
Remit Message
-
Comments
-
-
Select Add.
-
-
To download the invoice line items as an Excel spreadsheet, select Download into Excel
 .
. -
If required, add transactions:
-
Select Add Payment Transaction.
-
Complete the
Add Payment Transaction form. -
Click Add.
-
-
Review invoice line items to be matched:
-
Edit line items, then select Update to apply your changes.
-
For missing line items, select Add Item and enter Invoice Line Item Name, Amount, and remaining information, then select Add.
Allocate each Invoice Line Item to a payment transaction:
-
Select the Invoice Line Item to match.
-
Select the payment transaction that matches the selected Invoice Line Item.
Only payment transactions with a matching currency are available for selection. Transactions with a different currency are excluded from the list.
Best matches are at the top of the list.
Amount Not Allocated reduces by the Total Amount of the payment transaction and Amount Allocated increases by that amount.
If the Total Amount of the payment transaction is greater than the Invoice Line Item Amount, enter the amount you want to allocate in the Partial Allocation Required dialog that opens then select OK.
-
-
Resolve discrepancies.
-
When complete, select Save.
The Confirmation Transaction Changes window opens with the transactions you selected in the Invoice Review dialog.
-
Review the items to be allocated and select Confirm & Save.
The Landlord Invoice Information section of allocated transactions is updated with the invoice line item details.
When allocation is complete for a Transaction, Is Reconciled is set to Yes and that transaction no longer displays in the Payment Transaction section of the Invoice Review window.
 to display information about that organization.
  to select the dates using the
View the invoices that are allocated to payment transactions on the new Invoices page.
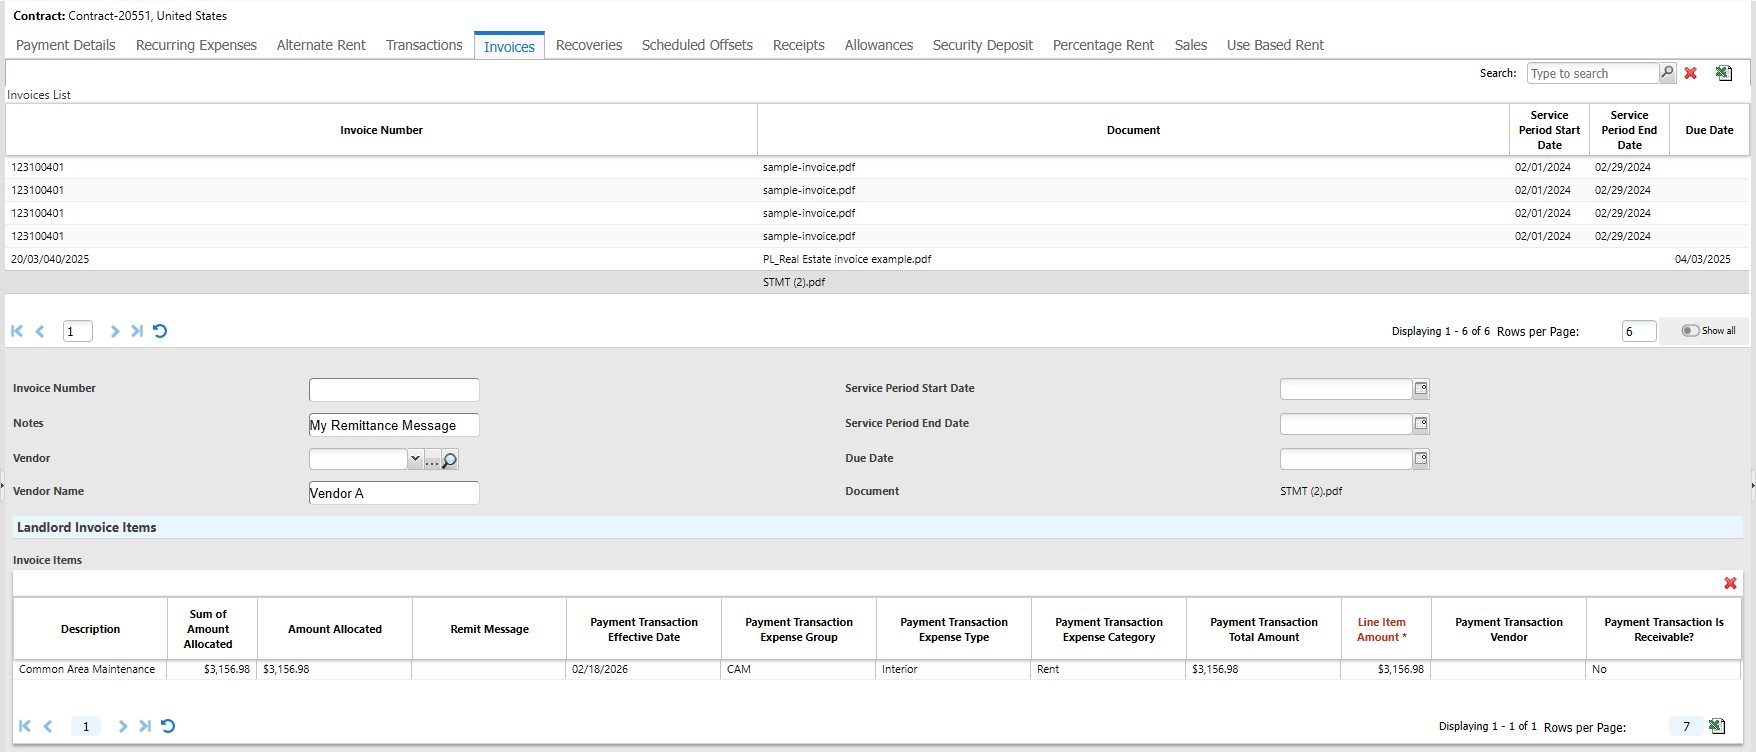
The Invoices page displays if Allow LX Invoice is turned on in the Manage Company page of your firm. The Invoices page applies to contracts in the Contracts module and does not apply to Project Management invoices. This lists landlord invoices or receipts that have been allocated to transactions using the Import Invoice dialog on the Transactions page.
Navigate to Contract > Payment Info > Invoices in the navigation pane on the left side of the page.
Select an invoice to display allocation information:
-
Invoice Number
-
Notes: The Remit Message entered on the Import Invoice dialog.
-
Vendor
-
Vendor Name
-
Service Start Date
-
Service End Date
-
Due Date
-
Document: Invoice document used to allocate payment transactions.
-
Landlord Invoice Items: Lists the invoice line items including Amount Allocated and Line Item Amount.
Once a transaction is fully allocated, Is Reconciled in the Landlord Invoice Information section of that transaction changes to Yes. The invoice is then removed from the Payment Transaction section of the Invoice Review window.
Receipt reconciliation
LUC-18151
Apply tenant credits and payments with more control and accuracy on the Reconcile Receipt dialog of the Receipts page. Reconcile credit transactions to a receipt, ensuring that the total debits and credits are balanced and that Lucernex never allocates more than the receipt amount or creates a negative total balance.
When a check amount exceeds the total of available transactions, Lucernex allows you to apply part of the check to those transactions and retain the remaining balance as a credit. This credit can be applied to future transactions until it is fully used. Lucernex also supports partial allocation of a transaction, so you can apply only part of a transaction amount to a receipt and leave the remaining balance open to be reconciled later.
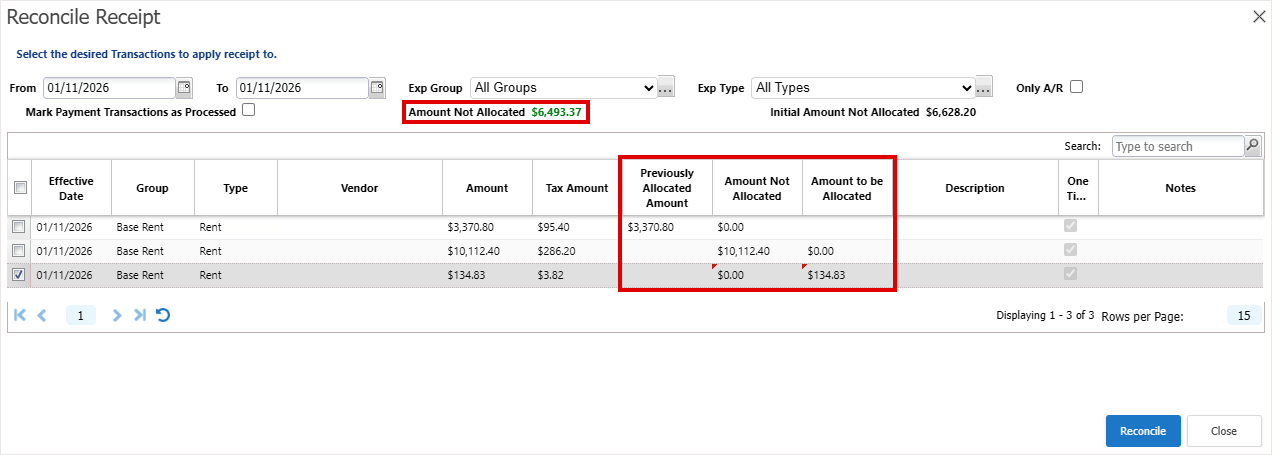
We added the Previously Allocated Amount column to indicate transaction amounts that are already allocated to a receipt.
When you select a transaction to allocate to the receipt:
-
The Amount to be Allocated column updates with the transaction amount to be applied to the receipt.
-
The Amount Not Allocated column updates to show the remaining transaction amount.
-
Amount Not Allocated at the top of the dialog updates to show the remaining receipt amount that is available to be allocated to transactions. When you select multiple transactions, Lucernex applies the receipt amount to debit transactions before applying any remaining amount to credit transactions.
These values update in real time as you change selections, and Lucernex prevents you from allocating more than the remaining receipt amount (including any applicable credits). When you select or clear transactions, Lucernex recalculates Amount To Be Allocated and Amount Not Allocated from the first selected transaction to the last one, so these amounts always reflect the correct remaining receipt balance and cannot become negative.
To use this feature, contact Accruent Support to request that enableNewReceiptReconciliation is turned on in the Manage Features page of your firm.
-
On the Contracts module, select Payment Info > Receipts.
-
Select a receipt to reconcile with transactions.
-
Select Reconcile Receipt.
-
Select the transactions to reconcile, then select Reconcile.
If a transaction is already fully allocated to the receipt, or if the total amount to credit the selected transactions is greater than the remaining receipt amount that can be allocated, an error message appears and Lucernex does not save the allocation.
Lucernex recalculates allocations from the first selected transaction to the last so that Amount To Be Allocated and Amount Not Allocated never become negative.
Auto-refresh cost tracking form custom lists
LUC-18398
Custom list values now automatically refresh when vendors open a Pay App![]() Payment Application / Invoice to submit or resubmit custom list values. To turn on this functionality, select the new Enable Auto-refresh for Fields options in the Add Layout and Edit Layout dialogs.
Payment Application / Invoice to submit or resubmit custom list values. To turn on this functionality, select the new Enable Auto-refresh for Fields options in the Add Layout and Edit Layout dialogs.
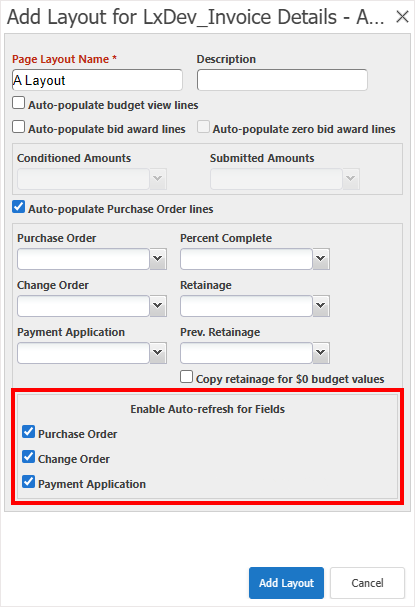
This ensures that the custom list values that reference data from previously submitted Pay Apps or related POs refresh when you create or edit Pay Apps. You no longer need to make manual corrections such as deleting and re-adding lines to display the correct information and remove stale data.
Select the new options for a custom list:
-
On the System Administrator Dashboard, click Manage Custom Lists.
-
Select + to expand the custom list then:
-
Select add layout to create a new layout.
-
Select edit to edit an existing layout.
-
-
If not already selected, select Auto-populate Purchase Order lines then select the field you want for:
-
Purchase Order
-
Change Order
-
Payment Application
-
Percent Complete
-
Retainage
-
Prev. Retainage
-
-
On each field that you want to automatically refresh, select Enable Auto-refresh for Fields.
-
Select Update Layout or Add Layout depending on whether you are editing an existing layout or adding a new one.
Numbers auto-update on Pay Apps depending on the options your Administrator chooses for your Work Flow and your scenario.
When you open a Pay App submitted with Copy budget-impacting amounts selected in the Work Flow step action, it refreshes the fields with Enable Auto-refresh for Fields selected in the associated custom list layout.
Clear budget-impacting values
LUC-18532
Automatically clear budget-impacting values when you reject or deactivate a Pay App![]() Payment Application / Invoice using the new Clear budget-impacting amounts option in the Work Flow step action of your Work Flow. This ensures:
Payment Application / Invoice using the new Clear budget-impacting amounts option in the Work Flow step action of your Work Flow. This ensures:
-
Budgets only include approved and active Pay Apps.
-
Rejected or inactive Pay Apps don’t inflate totals.
-
Manual cleanup isn’t required.
When you reject a Pay App using a Work Flow step that has Clear budget-impacting amounts selected, Lucernex now refreshes retainage values on subsequent Pay Apps so that they match the updated state of the rejected Pay App.
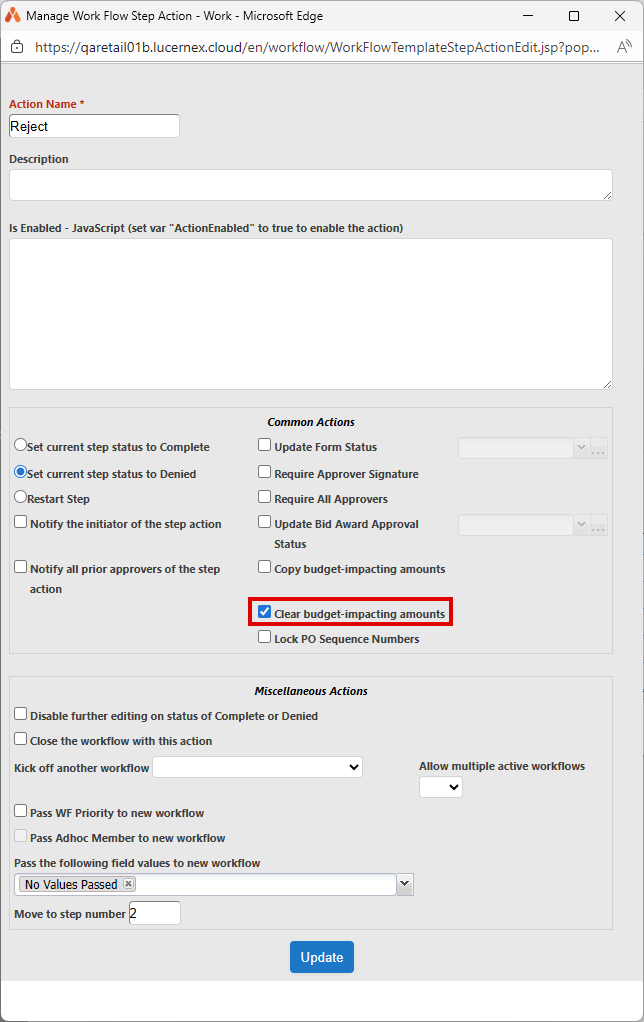
-
On the System Administrator Dashboard, select Manage Work Flows.
-
Select + to expand the Work Flow.
-
Select edit in the Actions column of the existing step you want to edit.
-
Select Add Action to add a new action or click edit in the action you want to edit.
-
In the Manage Work Flow Step Action dialog, select Clear budget-impacting amounts.
The Copy budget-impacting amounts option clears automatically. You cannot select both options at the same time.
-
Complete the form then select Add or Update.
When you reject or deactivate a Pay App with this Work Flow step, Lucernex automatically removes all budget-impacting values for that Pay App from the budget.
Work Flow Pay App actions
LUC-19122, LUC-18394
Automatically reject subsequent Pay Apps with a later creation date and send them back to the vendor when you reject a Pay App for a specific purchase order. To turn on this functionality, select the new Apply to all subsequent Pay Apps option in the Work Flow step action of your Work Flow.

-
On the Manage Work Flow page of the System Administrator Dashboard, select + to expand the Work Flow.
-
Select edit in the Actions column of the existing step you want to edit.
-
Select Add Action to add a new action or click edit in the action you want to edit.
The Manage Work Flow Step Action dialog opens.
-
Select Apply to all subsequent Pay Apps.
This option displays when the form associated with the Work Flow Step is of type Payment Application.
-
Complete the form then select Add or Update.
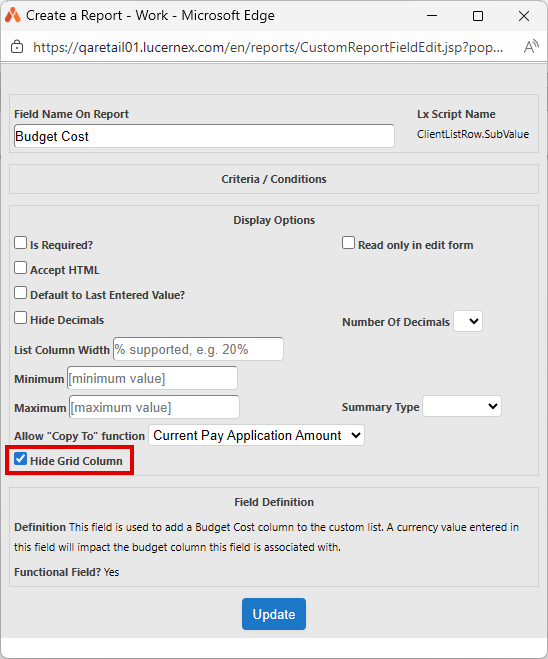
In custom lists we added the Hide Grid Column option, which enables you to hide the Budget Cost column to prevent inadvertent selection of the button that allows you to copy the amount from Payment Due to the Budget Cost manually. We recommend selecting this option if you select Clear budget-impacting amounts in your Work Flow step action. This helps prevent users from manually copying Payment Due amounts when Clear budget-impacting amounts is selected in the Work Flow.
-
On Manage Custom Lists page of the System Administrator Dashboard, select + in the custom list to expand it.
-
Select layout form in the form you want to update.
-
Scroll to Budget Cost and select three dots next to Budget Cost.
-
Select Hide Grid Column in the dialog that opens.
The option is only available for custom lists.
-
Select Update.
-
Select Save Layout.
FIFO validation for Pay App Work Flow steps
LUC-19085
Enforce FIFO validation for Pay Apps![]() Also known as an invoice. A payment application is created when you request payment for both the primary article (the purchase order) and any secondary articles (change orders). so that approvers cannot complete or approve a Work Flow step if the earlier steps are not completed or approved. If approvers attempt to complete or approve a step with the new option selected, an error displays indicating the prior step that must be approved before they can approve that step. Select the new Apply FIFO Pay App Validation option in Work Flow step actions to enforce FIFO validation.
Also known as an invoice. A payment application is created when you request payment for both the primary article (the purchase order) and any secondary articles (change orders). so that approvers cannot complete or approve a Work Flow step if the earlier steps are not completed or approved. If approvers attempt to complete or approve a step with the new option selected, an error displays indicating the prior step that must be approved before they can approve that step. Select the new Apply FIFO Pay App Validation option in Work Flow step actions to enforce FIFO validation.
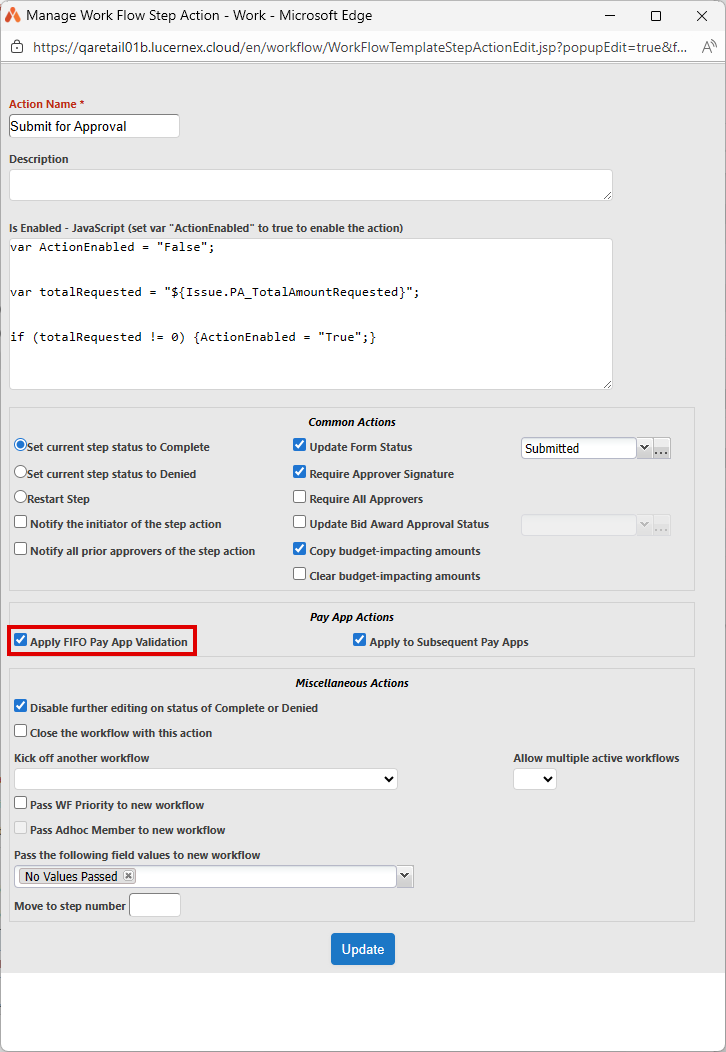
-
On the Manage Work Flow page of the System Administrator Dashboard, click + to expand the Work Flow.
-
Select edit in the Actions column of the existing step you want to edit.
-
Select Add Action to add a new action or click edit in the action you want to edit.
The Manage Work Flow Step Action dialog opens.
-
Select Apply FIFO Pay App Validation.
This option displays when the form associated with the Work Flow Step is of type Payment Application.
-
Complete the form then select Add or Update.
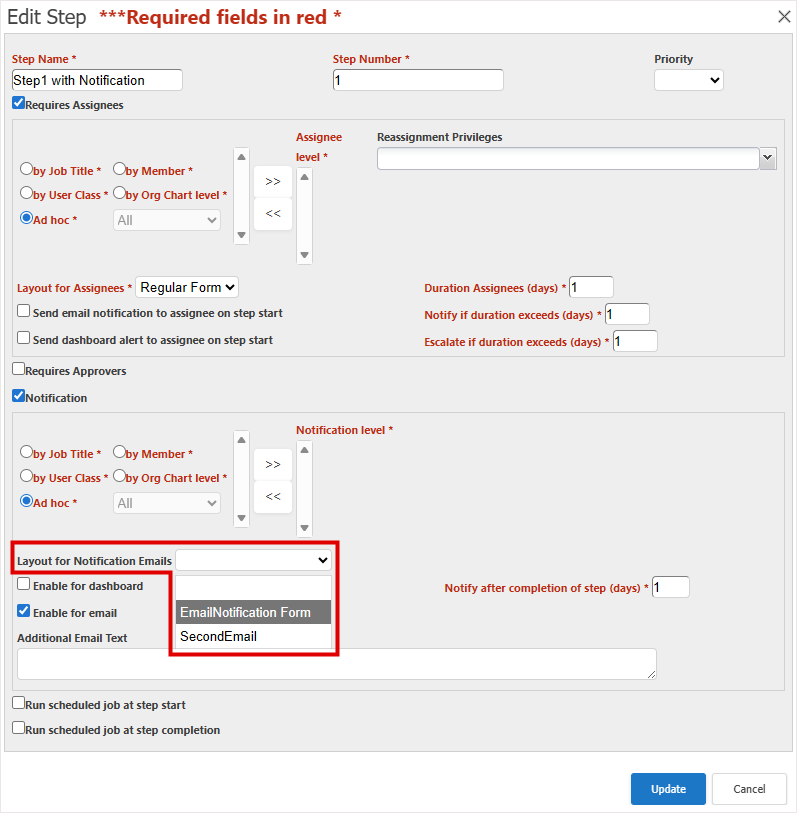
Workflow notification
LUC-18293, LUC-16197
Configure notifications for workflow step completion.
Create and edit layouts for Workflow Notification Email forms on the Manage Forms page of the System Administrator Dashboard. Select the Is Email Notification Layout? option to specify that the layout is for email notifications.
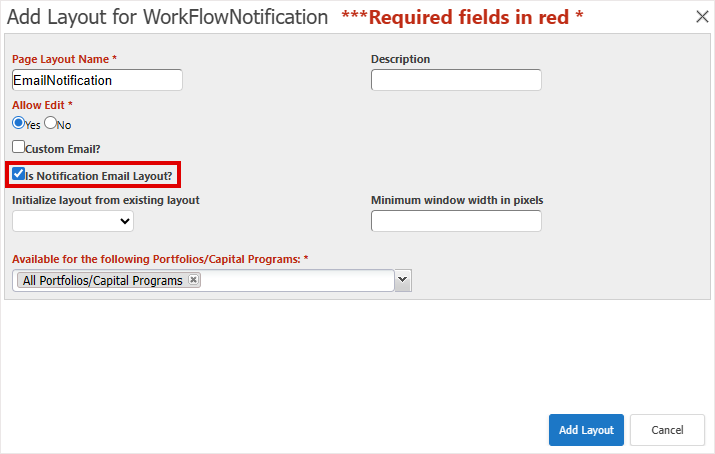
To display this option, contact Accruent Support and request that enableEnhancedWFNotification is turned on in your firm. When this is turned on, the enhanced email is sent on step completion and the default email is used on step start if Additional Email Text is included and set.
For example:
-
In System Administrator Dashboard, click Manage Forms.
-
Select Add Form Type.
-
Complete the Add Form Type dialog:
-
Name: WorkFlowNotification
-
Allow Reply: Yes
-
WORK FLOW field set?: Select. If cleared, the form is not listed in the Layout for Notification Emails list when you create or edit a Work Flow step.
-
This issue type will be available in: Select
-
Project
-
Capital Program
-
Location
-
Site
-
Facility
-
-
-
Select Add.
This adds a row to the Manage Forms table with the Name that you entered.
-
In the Actions column, click add layout in the row of the Form Type you created. For example, WorkFlowNotification.
-
Complete the Add Layout dialog.
-
Page Layout Name: Email Notification
-
Description
-
Allow Edit: Yes
-
Is Notification Email Layout?: Select
-
-
Select Add Layout.
-
Select + then Build Layout in the leftmost column of the row for the page layout you created. For example, in Email Notification click Build Layout.
-
In the window that opens, enter Work Flow Step Notification in Search, then click Search.
-
Drag Work Flow Step Notification Email [Global Layout] into + in the Edit Layout pane.
-
Make your changes.
If required add WF Step Notification Link to the layout in Available Fields > WorkFlow > Workflow Step (All).
Add other Work Flow and custom fields from Available Fields to include additional context in the email.
-
Select Save Layout.
-
If prompted, add required fields and click Save Layout.
Apply a Work Flow notification email layout
LUC-15305
When you edit or create a Work Flow step, the Layout for Notification Emails option displays when you select Notification. This option lists the forms on the Manage Forms page of the System Administrator Dashboard with Is Email Notification Layout? selected. Select the Work Flow notification email layout that you want for this Work Flow step.
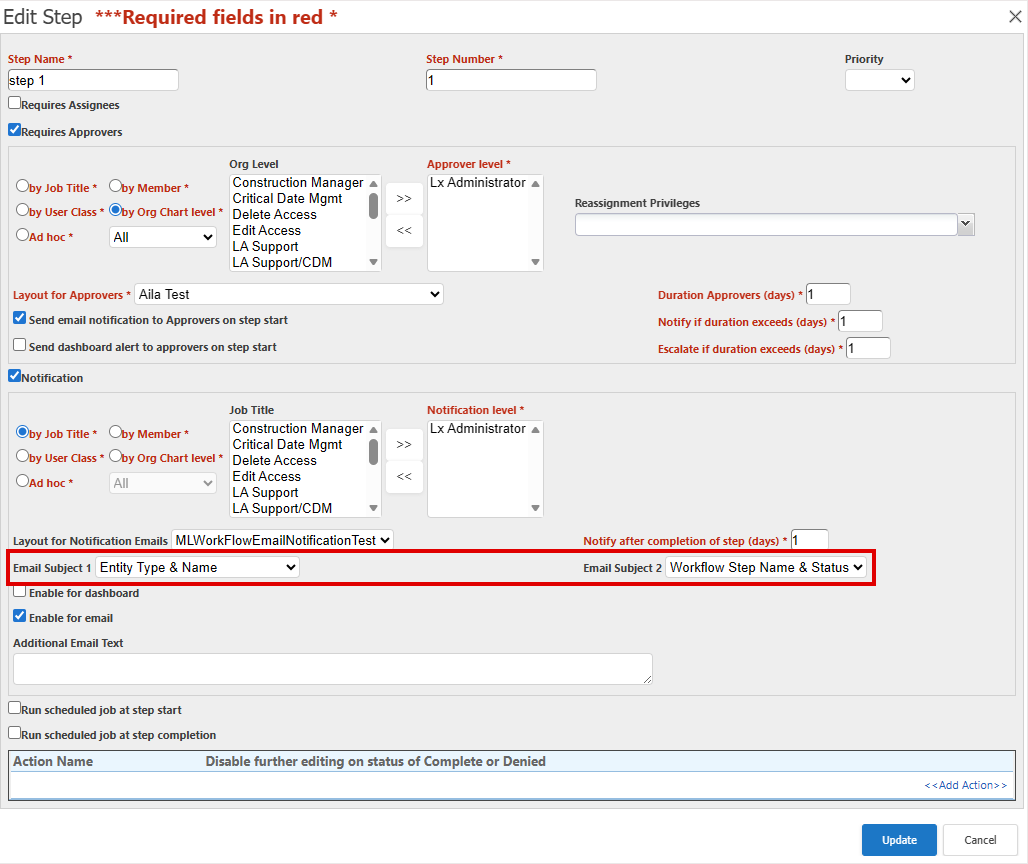
Select email subject for Work Flow notification emails
LUC-16071
When you edit or create a Work Flow step with Notification selected, specify the subject of the notification email using the new Email Subject 1 and Email Subject 2 options, making it easier for recipients to understand their tasks.
Default selection:
Email Subject 1: Entity Type & Name
Email Subject 2: Work Flow Step Name & Status
Scheduled Job
LUC-18485
Use your own user security when you manually run a scheduled job from a report and Run Scheduled Job As is not set on the Edit Scheduled Job page for that scheduled job. This ensures the output only includes data from your portfolios, matching the report preview.
If Run Scheduled Job As is set to a specific user, the job continues to run as that configured user.
This only changes jobs that you manually run in Lucernex, not jobs that run on their normal schedule.
To use this functionality, contact Accruent Support and request that enableRunJobAsCurrentUser is turned on in your firm.
Database schema changes
Benefit from new fields added to the database schema for enhancements in this release. Update your page layouts to display new fields on customized pages.
Look for  in the lower-right corner of the dialog or window to identify customized pages.
View the Data Dictionary for a full list of all fields in your firm that you can use in custom reports, including those added by your organization and those added by this release.
WFStepFullImport and WorkFlowStep fields
We added these fields to support Workflow Notification Email forms.
|
Field Name |
Type |
UI Label |
Description |
|---|---|---|---|
|
WFStepNotificationLink |
Text |
WF Step Notification Link |
A required field for Workflow Notification Email forms. This contains the link to the Work Flow action that the recipient of the email is to take. |
WorkFlowTemplateStepAction fields
We added these fields to support clearing budget-impacting values when you reject or deactivate a Pay App.
|
Field Name |
Type |
UI Label |
Description |
|---|---|---|---|
|
AutoClearAmounts |
Boolean |
Auto Clear Amounts |
Clear budget-impacting amounts option in a Work Flow Template Step Action that automatically clears budget-impacting values on the associated Work Flow step. For example, when you reject or deactivate a Pay App with that step. |
LandlordInvoice fields
We added these fields to support storing landlord invoice information.
|
Field Name |
Type |
UI Label |
Description |
|---|---|---|---|
|
AmountAllocated |
Currency |
Amount Allocated |
Amount allocated to a payment transaction. |
|
AmountNotAllocated |
Currency |
Amount Not Allocated |
Amount not allocated to a payment transaction. |
|
AssociatedDocumentID |
Document ID |
Document |
Imported invoice document associated with this invoice. |
|
CodeCurrencyTypeID |
Text |
Currency |
Currency of the Vendor's invoice. |
|
ContractID |
Contract ID |
ContractID |
ID of the Lucernex Contract associated with the invoice. |
|
CreatedByID |
Member ID |
Created By |
Lucernex member ID who imported the landlord invoice. |
|
CreatedDate |
Time |
Created Date |
Date on which the record was created. |
|
CustomerAddress |
Text |
Customer Address |
Customer address on invoice. |
|
CustomerAddressRecipient |
Text |
Customer Address Recipient |
Recipient of invoice at customer address. |
|
CustomerID |
Text |
CustomerID |
ID of customer on invoice. |
|
CustomerName |
Text |
Customer Name |
Name of customer on invoice. |
|
CustomerTaxID |
Text |
Customer Tax ID |
The company's federal tax ID. |
|
DueDate |
Date |
Due Date |
Payment due date. |
|
EmployerID |
Employer ID |
Vendor |
Vendor ID associated with this invoice. If the name matches a Vendor in Lucernex, this field is populated and VendorName is cleared. |
|
FolderID |
Folder ID |
Folder |
Folder containing the Vendor's invoice. |
|
InvoiceDate |
Date |
Invoice Date |
Date of Vendor's invoice. |
|
InvoiceNumber |
Text |
Invoice Number |
Vendor's invoice number. |
|
InvoiceTotal |
Currency |
Invoice Total |
Total of the Vendor's invoice. |
|
LxDescripLongNL |
Text |
Vendor Address |
Vendor's address on invoice. |
|
ModifiedByID |
Member ID |
Modified By |
Lucernex member ID who modified the record. |
|
ModifiedDate |
Time |
Modified Date |
Last date on which the record was modified. |
|
Notes |
Text |
Notes |
Notes about the invoice. |
|
PaymentTerm |
Text |
Payment Term |
Payment term on the invoice. |
|
ProjectEntityID |
Entity ID |
ProjectEntityID |
ID of the Lucernex project associated with this invoice. |
|
ServicePeriodEndDate |
Date |
Service Period End Date |
End Date on the imported invoice. |
|
ServicePeriodStartDate |
Date |
Service Period Start Date |
Start Date on the imported invoice. |
|
SubTotal |
Currency |
Sub Total |
Sub total of the Vendor's invoice before tax. |
|
TotalTax |
Currency |
Total Tax |
Total tax of the Vendor's invoice. |
|
VendorAddressRecipient |
Text |
Vendor Address Recipient |
Recipient address of Vendor's invoice. |
|
VendorName |
Text |
Vendor Name |
Name of the vendor in the landlord invoice. This is populated if there is no matching Vendor matches in Lucernex. |
|
VendorTaxID |
Text |
Vendor Tax ID |
The Vendor's federal tax ID. |
LandlordInvoiceItem fields
We added these fields to support allocating transactions to landlord invoices.
|
Field Name |
Type |
UI Label |
Description |
|---|---|---|---|
| AmountNotAllocated | Currency | Amount Not Allocated |
Calculated using formula: Invoice amount - AmountAllocated. |
| CodeExpenseCategoryID | Dropdown (Expense Category Code) | Expense Category | Category associated with the invoice line item. Categories are the third level of organization and are the children of types, and grandchildren of groups. Groups, types, and categories simplify reporting. |
| CodeExpenseGroupID | Dropdown (Expense Group Code) | Expense Group |
Group associated with the invoice line item. Groups are the first level of organization and are the parents of types, and grandparents of categories. Use groups, types, and categories to simplify reporting. |
| CodeExpenseTypeID | Dropdown (Expense Type Code) | Expense Type |
Type associated with account numbers in your integrated accounting system your lease accounting schedule. Select the correct type for your transaction. |
| Comments | Text | Comments | Comment on the landlord invoice item. |
| ContractID | Contract ID | ContractID |
ID of the Lucernex Contract associated with the invoice. |
| CreatedByID | Member ID | Created By |
Lucernex member ID who imported the landlord invoice. |
| CreatedDate | Time | Created Date |
Date on which the record was created. |
|
ItemDate |
Date |
Item Date |
Date of the invoice line item. |
| LandlordInvoiceID | Text | Landlord Invoice | Parent record of the invoice line item. |
| LineItemAmount | Currency | Line Item Amount | Amount of the Line Item. |
| LineItemDescription | Text | Line Item Description | Description of the Line Item. |
| LinkAmountAllocated | Text | Amount Allocated | Payment transaction amount allocated to the invoice line item. |
| ModifiedByID | Member ID | Modified By | Lucernex member ID who modified the record. |
| ModifiedDate | Time | Modified Date | Last date on which the record was modified. |
| PayTransCategory | Text | Payment Transaction Expense Category | Expense Category of the allocated payment transaction. |
| PayTransEffectiveDate | Text | Payment Transaction Effective Date | Effective Date of the allocated payment transaction. |
| PayTransExpenseGroup | Text | Payment Transaction Expense Group | Expense Group of the allocated payment transaction. |
| PayTransExpenseType | Text | Payment Transaction Expense Type | Expense Type of the allocated payment transaction. |
| PayTransIsReceivable | Text | Payment Transaction Is Receivable | Indicates whether the allocated payment transaction is an accounts receivable item or income item. |
| PayTransTotalAmount | Text | Payment Transaction Total Amount | Total amount of the payment transaction to allocate to this invoice line item. |
| PayTransVendor | Text | Payment Transaction Vendor | Vendor of the associated payment transaction. |
| ProjectEntityID | Entity ID | ProjectEntityID | Base entity system identifier for the associated project. |
| RemitMessage | Text | Remit Message | Line item remit message. |
| SequenceNumber | Number | Sequence Number | Generates a sequence number for the record. The next record created receives the next number in the sequence. |
| TaxAmount | Currency | Tax Amount | Line item tax amount. |
| TaxRate | Percentage | Tax Rate | Line item tax rate. |
| TotalAmount | Currency | Total Amount | Total amount of the line item. |
LinkLandlordInvPaymentTxn fields
We added these fields to support allocating transactions to landlord invoices.
|
Field Name |
Type |
UI Label |
Description |
|---|---|---|---|
| AllocationAmount | Currency | Allocation Amount | Amount allocated to the landlord invoice. |
| AllocationDate | Date | Allocation Date | Date on which the Allocation Amount was allocated to the landlord invoice. |
| CreatedByID | Member ID | Created By | Lucernexmember ID who allocated the amount to the landlord invoice. |
| CreatedDate | Time | Created Date | Date on which the record was created. |
| LandlordInvoiceItemID | Text | Landlord Invoice Item | Line item of the landlord invoice line item allocated to this payment transaction. |
| ModifiedByID | Member ID | Modified By |
Lucernex member ID who modified the record. |
| ModifiedDate | Time | Modified Date |
Last date on which the record was modified. |
| Notes | Text | Notes | Notes entered about the invoice. |
| PaymentTransactionID | Payment Transaction ID | Payment Transaction | ID of the payment transaction. |
| ProjectEntityID | Entity ID | ProjectEntityID |
ID of the Lucernex project associated with this record. |
| ReconciliationStatus | Text | Reconciliation Status |
For future functionality that may indicate payment transaction reconciliation status against landlord invoices. For example, Matched, Partial, Variance. |
| VarianceAmount | Currency | Variance Amount | Difference between the invoice and the payment transaction. |
| VarianceReason | Text | Variance Reason | Explanation of why there is the difference. |
PaymentTransaction fields and PaymentTransactionFullImport fields
We added these fields to support allocating transactions to landlord invoices.
|
Field Name |
Type |
UI Label |
Description |
|---|---|---|---|
| AmountInvoiced | Text | Amount Invoiced | Amount of the landlord invoice. |
| InvoiceAmountAllocated | Currency | Invoice Amount Allocated | Amount of the landlord invoice allocated to a payment transaction. |
| InvoiceAmountNotAllocated | Currency | Invoice Amount Not Allocated | Amount of the landlord invoice yet to be allocated to a payment transaction. |
| IsInvoiceReconciled | Boolean | Is Invoice Reconciled? | Indicates whether the payment transaction is fully reconciled against landlord invoices. |
Improvements and issues fixed
|
Summary |
Reference # Case |
|
|---|---|---|
|
Sign in page |
Select the updated Register for Training! link on the Sign In page to register for Accruent partner training. |
LUC-18900 |
|
You can now use XCG Caribbean Guilder instead of ANG Netherlands Antillean Guilder. |
LUC-18926 |
|
|
Work Flow notifications |
Email notifications now display basic HTML formatting and tables correctly. This applies when you enter valid HTML in Additional Email Text in a Work Flow step or import a Work Flow step. Supported tags include: <b>, <strong>, <i>, <em>, <u>, <p>, <ul>, <ol>, <li>, <table>, <tr>, <td>, <span>, <div> |
LUC-15814 |
|
Update Expense Schedule |
Apply escalation updates to existing recurring schedules even if Pay in arrears is empty by entering Escalate schedules by (%) on the Update Expense Schedule dialog. The update now saves successfully without error, and the new escalation values appear in the schedule as expected. |
LUC-18998 |