Fullscreen Image

Navigate

This section describes the ways you can navigate Lucernex and introduces you to primary functionality.

Using the Navigation Pane you can access the main pages of Lucernex. When you first sign in, the Navigation Pane is collapsed on the left side of the page.

  1. Do one of the following:

    • Click Hamburger button in the header bar, or

    • Click Arrows in the menu bar.

      The Navigation Pane opens. To close the Navigation Pane, click Hamburger button again.

      A screen shot of the Dashboard, with the Hamburger and Arrows buttons boxed in orange to make them more visible.

  2. Click the carets in the menu to navigate to the appropriate page.

    You can also right-click a page's name to open a page in a new tab.

    When you first open the Navigation Pane, it contains a menu of the modules you have access to. If you click the name of a module, you are taken to the Details > Summary page of the last record you viewed in that module. The Details > Summary page contains high-level information about the entity.

    When you expand modules in the menu, the module's sub-modules become visible. These sub-modules break the module into themed categories—for example, your lease abstract information is contained in the Abstract Info sub-module of the Contract module. When you click a sub-module in the menu, the Details page of that sub-module opens.

    If you expand the sub-modules in the menu, you can see the sections that belong to the sub-modules. Each sub-module has several sections. These sections are where you perform actions and store data relevant to your work flow.

    Pictured below is a screen shot of the Dashboard with the Navigation panel open. The user has clicked the carets in the menu to open the Contract > Payment Info section, and is about to select the Recurring Expenses page.

    Dashboard page with the Navigation Pane open.

    When you have accessed the page you want to view, you can navigate through the module using the tabs at the top of the page.

    The tabs of the Payment Info section of the Contract module.

    Additionally, some sections have sub-pages. To access these pages, select the appropriate page from the field to the left of the Actions menu on the right side of the page.

    Pictured below is the Contract > Payment Info > Recurring Expenses page. The drop-down menu is boxed in orange, to make it more visible. The drop-down menu appears to the left of the Actions menu on the right side of the page.

    Drop-down menu on Contract > Payment Info > Recurring Expenses page.

  3. To navigate to a specific entity, choose between two options:

    • To locate the entity in the Portfolio Navigation menu:

      1. Click >> on the top of the Portfolio Navigation menu.

        The Portfolio Navigation menu opens.

      2. Click the carets in the menu to navigate to the appropriate entity.

        Portfolio Navigation menu.

    • Follow the Advanced Search procedures below.

Note:

By default, when you navigate between top-level tabs in Lucernex, the system will navigate you to the last entity you viewed in the module. If the Related Entity Navigation setting is enabled, the system will prompt you to select from a list of entities related to your current entity when you navigate between modules. It is our best practice recommendation to use the Related Entity Navigation setting. Your system administrator can enable this setting on the Manage Company page.

Pictured below is the Location > Details > Summary page. The Available Entities window is open, and several leases are listed which are related to the location.

The Available Entities window.

ClosedActions Menu

The collapsible Actions menu that appears on the right side of most pages contains buttons that trigger most or all of the actions you can take on that page. To resize the Actions menu, click and drag the edge of the menu. To collapse or reopen the menu, click Arrow in the upper-right corner.

ClosedColumn Filtering

You can filter the data that appears in most tables in Lucernex. When you hover your cursor over a column header in the table, a down arrow appears.

The user is hovering their cursor over the Begin Date column, and a down arrow has appeared on the column header.

When you click the down arrow, a menu opens. In addition to sort options and the ability to show or hide columns in the table, there is a Filters menu. The Filters menu contains different filtering options depending on the type of data contained in the column.

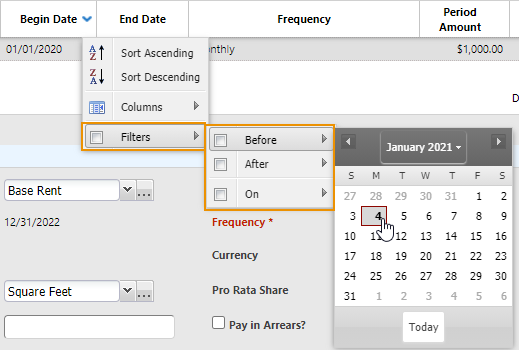
In the screen shot below, the Begin Date column is being filtered to display dates before a date picked from a date picker.

The user has clicked the down arrow on the Begin Date column, selected Filters, selected the Before filter, and is about to select January 4, 2021 from the Date Picker.

Columns which have been filtered will have a gray header. In the screen shot below, a filter has been applied to the Begin Date column.

The Begin Date column header is a light gray color, indicating a filter has been applied.

ClosedConfigured Page Indicator

Occasionally, customers will encounter issues that are a result of a customized page layout. To make it easier to troubleshoot these issues, an indicator appears on the right side of the footer if you are viewing a customized page layout. For other customizable parts of Lucernex such as the Setup Wizards and the Approve Payments window, the indicator appears in the bottom-right corner of the window.

The icon used for the indicator is a white C in a dark gray circle. If you hover your cursor over the indicator, the message, “This page has been configured” appears.

A screen shot of the footer of a page. The custom page indicator is boxed in orange, making it more visible.

ClosedDate Formatting and Date Behavior

Lucernex will automatically recognize dates entered in fields in numerical format. You can configure how dates are configured from the My Options page.

  • For example, if your system is configured to use the US MMDDYY format, January 1, 2018 would be entered as 010118, and December 31, 2018 would be entered as 123118.

  • Or, if your system is configured to use the international DDMMYY format, January 1, 2018 would be entered as 010118, and December 31, 2018 would be entered as 311218.

Dates auto-populate in the following manner:

  • Any two-digit year entered from 00 to 89 is auto-populated as 21st century (years from 2000 to 2089)

  • Any two-digit year entered from 90 to 99 is auto-populated as 20th century (years from 1990 to 1999)

ClosedEllipses Button

If you have a number of options available to you—so many that they do not fit in a field—you can click A small gray button with an ellipses on it. to open a window. All available options will be available in this window. You can then use the Table Search functionality to search for the appropriate option. When you find the option you are looking for, click the item to select it.

ClosedFiscal Calendars

The fiscal calendar you use can have an impact on your lease accounting. See the Fiscal Calendars procedures to learn how to configure your fiscal calendar.

You can also configure specific payments to occur according to English / Scottish Quarters.

ClosedMagnifying Glass Button

Occasionally, you may see a magnifying glass A small gray button with a magnifying glass on it. next to a field.

  • For drop-down menus, if you select an item from the field and then click the magnifying glass button, a window will open with more information about the item you selected.

  • For a field, if you click the magnifying glass, a window opens that contains a list of records related to that field.

ClosedSystem Close Button

When working in a window, make sure to use the system-provided Close. This will ensure that any changes that you enter are saved.