Project Cost Tracking is an enhancement to Lucernex’s cost tracking feature set. This enhancement allows you to link your purchase order (commitment), change order, and payment application (invoice) forms together. When a general contractor or vendor submits a payment application or invoice, they will only see records related to their employer. When they select a purchase order, the change order or payment application form will then auto-populate with line items from that purchase order.
Change orders are not required for Project Cost Tracking. At a minimum, you must create the Purchase Order and Payment Application record sets.
 Concepts
These concepts are used in Lucernex Project Cost Tracking.
-
Vendor: The vendor is the submitter of a form or request. A General Contractor is the most common type of vendor.
-
Purchase Order: A purchase order is also known as a commitment. The purchase order form is the primary article that starts the lifecycle financial transaction process.
For customers using a Request for Change Order (RFC) work flow, they would need to use the Purchase Order form type for the RFC. Then, the Change Order would be linked to the RFC. The RFC would be the primary article.
-
Change Order : A change order is also known as a change management article, scope of work directive, or a change request. A change order is created when something needs to be linked to the primary article, the purchase order.
-
Payment Application: A payment application is also known as an invoice. A payment application is created when the user wants to request payment for both the primary article (the purchase order) and any secondary articles (change orders).
Common Scenarios
The following list describes common scenarios that could benefit from the implementation of Project Cost Tracking.
-
Purchase Order, Change Order, Payment Application tracking
-
These are the most common scenarios and use the form types as described in this document.
-
-
Commitment to Pay App process
-
The client would create their quote, requisition, or commitments from a vendor as a Purchase Order form type.
-
Once approved, they would set up their vendor’s invoice or pay app submission as the Payment Application form type.
-
-
Change Request submission process
-
The client would direct the Vendor or Facility Manager to submit a request for a scope of work directive or potential change request (PCR) to be approved. This work flow would use the Purchase Order form type.
-
Once the PCR is approved, the invoice would be submitted as a Payment Application form type.
-
When Project Cost Tracking is configured for your system, you need to add a number of fields to these forms:
Purchase Order
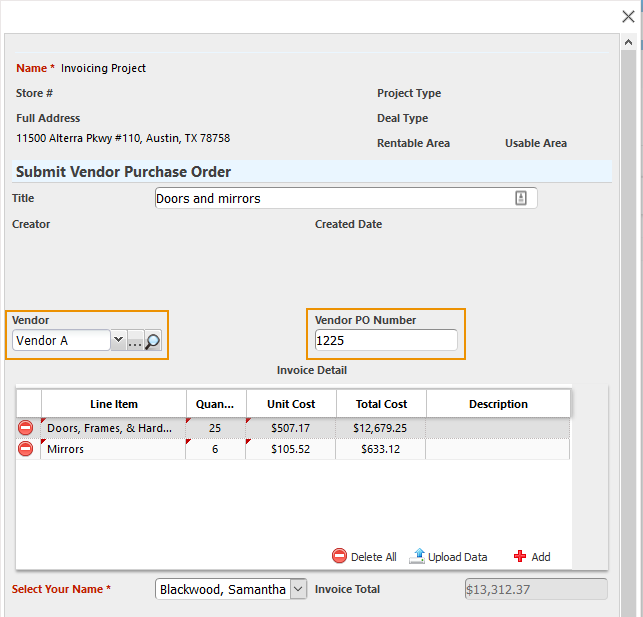
Purchase order forms now need two additional fields added to their layouts. The Vendor and Vendor PO Number fields are used to link the purchase order to a vendor and create a unique record ID for the purchase order. Vendors are only allowed to see purchase orders that are associated with their vendor ID. System Administrators can configure the Vendor PO Number to automatically populate with the next number in a sequence.
When entering a purchase order, a user will follow the same procedures they typically use. However, they will be required to select a vendor and they might be required to enter a vendor PO number, if the Vendor PO Number does not automatically populate.
Pictured below is an example purchase order form. Vendor A is selected from the Vendor field, and purchase order number 1225 is entered in the Related Purchase Order field. The user has added items to the purchase order custom list.
Change Order
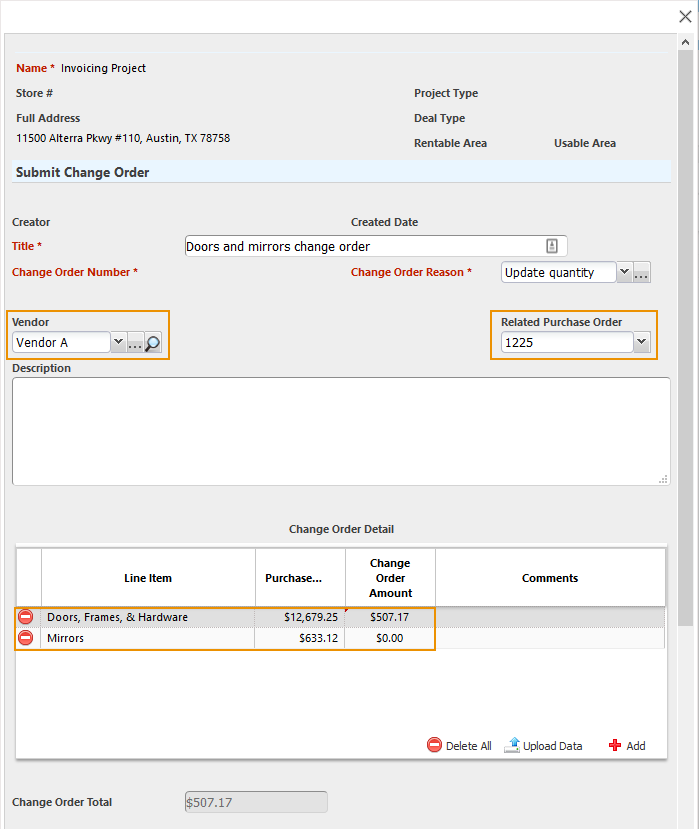
Change order forms also need two additional fields added to their layouts. The Vendor and Related Purchase Order fields are used to automatically populate the change order custom list with line items and totals entered in the original purchase order. The Related Purchase Order can be configured to only contain approved purchase orders, which is explained in more detail below. This is beneficial for customers that utilize a workflow approval process.
Change orders are not required for the feature. However, if the user wants to link a change order to an existing purchase order, they must select the vendor and the related purchase order before proceeding to follow their normal change order procedures.
Pictured below is an example change order form. Vendor A is selected from the Vendor field, and purchase order number 1225 is selected from the Related Purchase Order field. The items on the purchase order appear in the custom list.
Payment Application
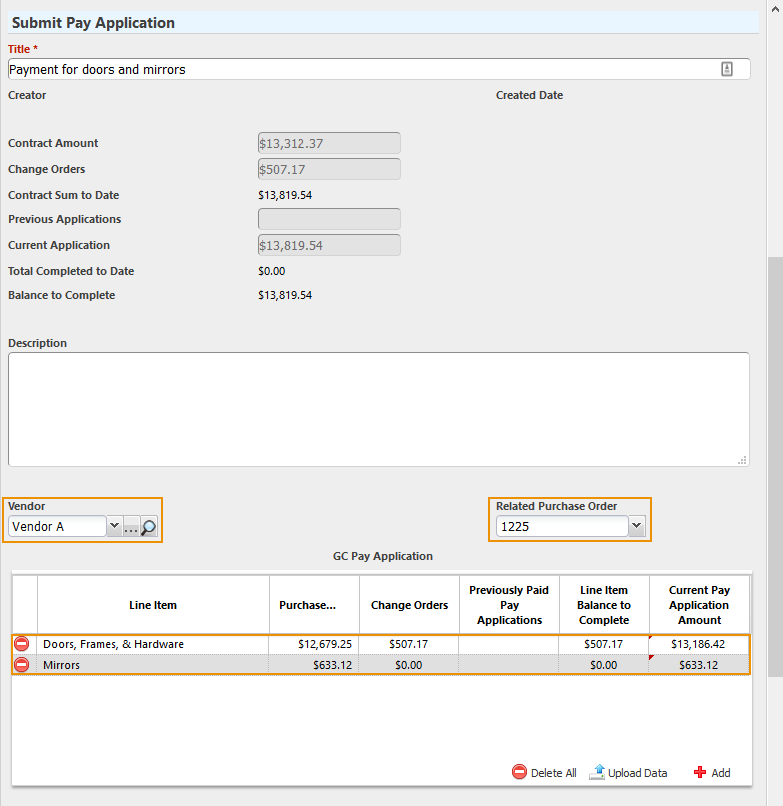
Payment application forms also need two additional fields. The Vendor and Related Purchase Order fields are used to automatically populate the payment application custom list with line items and totals entered in the original purchase order and any related change orders. The Related Purchase Order can be configured to only contain approved purchase orders, which is explained in more detail below. This is beneficial for customers that utilize a workflow approval process.
In the Payment Application Submission form, the user is required to select the vendor and the related purchase order before proceeding to follow their normal payment application procedures. Any change orders linked to the original purchase order will be automatically pulled into the custom list.
Pictured below is an example payment application form. Vendor A is selected from the Vendor field, and purchase order number 1225 is selected from the Related Purchase Order field. The items on the purchase order appear in the custom list.
Implementation
To use this enhancement, you need to create or update custom lists, forms, work flows, and user class security.
Custom List requirements
There are three steps you must take when updating your custom lists for this enhancement:
-
Add fields to be populated when the custom list is enabled.
-
Enable and configure Auto-populate Purchase Order Lines.
-
Add the required fields to your custom list layout.
To navigate to the Manage Custom Lists page:
-
Select Admin in the toolbar in the upper-right corner of the window.
The System Administrator Dashboard page opens.
-
Click Manage Custom Lists link in the Company Administration column.
The Manage Custom Lists page opens.
-
Follow a procedure below.
Add required Custom List fields
There are three fields that will need to be created for the custom lists needed for Project Cost Tracking. Not all fields are added to each custom list. The typical configuration appears in the list below:
-
Purchase Order Custom List
-
Purchase Order Amount field
-
-
Change Order Custom List
-
Purchase Order Amount field
-
Change Order Amount field
-
-
Payment Application Custom List
-
Purchase Order Amount field
-
Change Order Amount field
-
Payment Application Amount field
-
If you do not use change orders, the change order custom list and custom list field are not needed.
There are other required fields for budget-impacting custom lists.
-
Find the custom list you want to edit.
-
Click Edit Fields link in the Actions column of the record.
The Edit Fields window opens.
-
Add each field you need for your layout:
-
Purchase Order Amount: Add to Purchase Order, Change Order, and Payment Application custom lists.
-
Change Order Amount: Add to Change Order and Payment Application custom lists.
-
Pay Application Amount: Add to the Payment Application custom list.
-
Click Add Report / Form Field.
The Add Report / Form Field window opens.
-
Select Custom Field, then complete the Add Report / Form Field window:
-
Field Name
-
Integration Name: Enter the name this field should have in the database.
-
Required: Select Yes.
-
Form Field Type: Select Currency.
-
-
Select Add.
The window closes. The field appears in the Edit Fields window.
-
Edit Custom List Layout settings
Next, you must indicate which fields should pull which type of data. This setting must be configured after you have created the fields in the procedures above.
This setting should only be applied to your change order and payment application layouts.
To edit your custom list layout settings:
-
Find the custom list you want to edit.
-
Expand the custom list record by clicking the Plus button
 .
.A list of custom list layouts appears.
-
Click Edit link in the Actions column of the layout you want to configure.
The Edit Layout window opens.
-
Select Auto-populate Purchase Order Lines.
Purchase Order, Change Order, and Payment Application are active.
-
Select fields to use for:
-
Purchase Order
-
Change Order
-
Payment Application(Payment Application Custom Lists only)
-
-
In Enable Auto-refresh for Fields, select the fields that you want to automatically refresh when the associated Work Flow Step Action has Copy budget-impacting amounts or Clear budget-impacting amounts selected.
-
Click Update Layout.
The window closes. Your changes are saved.
Edit Custom List layouts
Add the new fields to your custom list layouts.
There are other required fields for budget-impacting custom lists.
To add your newly created fields to your custom list layouts:
-
Find the custom list you want to edit.
-
Expand the custom list record by clicking the Plus button
.A list of custom list layouts appears.
-
Click Layout Form link in the Actions column of the layout you want to configure.
The Layout Editor window opens.
-
Select the appropriate field to add to your layout from an available menu.
-
Repeat step 4 as necessary.
The fields added to each custom list layout appears in the list below:
-
Purchase Order Custom List Layout
-
Purchase Order Amount field
-
-
Change Order Custom List Layout
-
Purchase Order Amount field
-
Change Order Amount field
-
-
Payment Application Custom List Layout
-
Purchase Order Amount field
-
Change Order Amount field
-
Payment Application Amount field
-
-
-
Click Save Layout.
Your changes are saved.
Form requirements
Next, you must update the forms used in your Purchase Order, Change Order, and Payment Application work flows.
-
Purchase Order form type - Purchase Order set type
-
Change Order form type - Change Order set type
-
Payment Application form type - Payment Application set type
You must only have one custom list on the form layout where you first select the related purchase order. If you have more than one custom list on the form layout, your custom lists won't populate the related purchase order details.
To navigate to the Manage Forms page:
-
Select Admin in the toolbar in the upper-right corner of the window.
The System Administrator Dashboard page opens.
-
Click Manage Forms link in the Company Administration column.
The Manage Forms page opens.
-
Follow a procedure below.
Add Custom List to Form Fields
You will need to repeat these procedures for each form type. Once the custom list is added as a field to a form, any of the custom list layouts associated with the custom list can be added to any of the form layouts.
If you have already added your custom lists to your forms, you can skip these procedures.
To add a custom list to your form fields:
-
Find the form you want to edit.
-
Click Edit Fields link in the Actions column of the record.
The Edit Fields window opens.
-
Click Add Report / Form Field.
The Add Report / Form Field window opens.
-
Click Custom Field option.
-
Enter the name of your custom list in the Field Name field.
-
Enter the name this field should have in the database in the Integration Name field.
-
Select the No option for the Required setting.
-
Select Custom List from the Form Field Type field.
The Custom Lists activates.
-
Select the custom list you want to use from the Custom Lists field.
You will select the appropriate layout when you add this custom list in the Page Layout Editor.
-
Select Add.
The window closes. The field appears in the Edit Fields window.
Edit Purchase Order Form Layouts
To edit your purchase order form layouts:
-
Find the form you want to edit.
-
Expand the form record by clicking the Plus button
.A list of form layouts appears.
-
Find the appropriate form layout.
-
Click Build Layout link in the Actions column of the layout you want to edit.
The Page Layout Editor opens in a new window.
-
Open Available Fields > Forms > All in the Fields pane.
-
Drag and drop the Vendor field to one of the Plus buttons
 in the editor.
The Vendor field is added to your form.
Skip to step 9 if you already have your custom list added to the form.
-
Open Available Fields > Forms > [Form Name] > [Custom List Name] in the Fields pane.
-
Drag and drop the form layout name to one of the Plus buttons
in the editor.The custom list is added to your form.
-
Open Related Fields > Specialized Forms > PurchaseOrder in the Fields pane.
-
Drag and drop the Vendor PO Number to one of the Plus buttons
in the editor.The Vendor PO Number is added to your form.
-
To have your purchase numbers sequentially and automatically generate:
-
Click Ellipses button on the Vendor PO Number cell.
The Edit Field window opens.
-
Select the Auto populate sequentially check box.
-
Click Set Options.
The Edit Field window closes.
If you use the Auto populate sequentially check box, you should NOT use the Read Only in Edit Mode setting.
-
-
Click Save Layout.
A save message appears. Your changes are saved.
Edit Change Order Form Layouts
You must only have one custom list on the form layout where you first select the related purchase order. If you have more than one custom list on the form layout, your custom lists won't populate the related purchase order details.
To edit your change order form layouts:
-
Find the form you want to edit.
-
Expand the form record by clicking the Plus button
.A list of form layouts appears.
-
Find the appropriate form layout.
-
Click Build Layout link in the Actions column of the layout you want to edit.
The Page Layout Editor opens in a new window.
-
Open Available Fields > Forms > All in the Fields pane.
-
Drag and drop the Vendor field to one of the Plus buttons
in the editor.The Vendor field is added to your form.
Skip to step 9 if you already have your custom list added to the form.
-
Open Available Fields > Forms > [Form Name] > [Custom List Name] in the Fields pane.
-
Drag and drop the form layout name to one of the Plus buttons
in the editor.The custom list is added to your form.
-
Open Related Fields > Specialized Forms > ChangeOrder in the Fields pane.
-
Drag and drop the Related Purchase Order to one of the Plus buttons
in the editor.The Related Purchase Order is added to your form.
-
To restrict the Related Purchase Order to only display approved purchase orders:
-
Click Ellipses button on the Related Purchase Order cell.
The Edit Field window opens.
-
Select the Show Only Approved Purchase Orders check box near the bottom of the window.
-
Click Set Options.
The Edit Field window closes.
-
-
Click Save Layout.
A save message appears. Your changes are saved.
Edit Payment Application Form Layouts
You must only have one custom list on the form layout where you first select the related purchase order. If you have more than one custom list on the form layout, your custom lists won't populate the related purchase order details.
To edit your payment application form layouts:
-
Find the form you want to edit.
-
Expand the form record by clicking the Plus button
.A list of form layouts appears.
-
Find the appropriate form layout.
-
Click Build Layout link in the Actions column of the layout you want to edit.
The Page Layout Editor opens in a new window.
-
Open Available Fields > Forms > All in the Fields pane.
-
Drag and drop the Vendor field to one of the Plus buttons
in the editor.The Vendor field is added to your form.
Skip to step 9 if you already have your custom list added to the form.
-
Open Available Fields > Forms > [Form Name] > [Custom List Name] in the Fields pane.
-
Drag and drop the form layout name to one of the Plus buttons
in the editor.The custom list is added to your form.
-
Open Related Fields > Specialized Forms > PayApp in the Fields pane.
-
Drag and drop the Related Purchase Order to one of the Plus buttons
in the editor.The Related Purchase Order is added to your form.
-
To restrict the Related Purchase Order to only display approved purchase orders:
-
Click Ellipses button on the Related Purchase Order cell.
The Edit Field window opens.
-
Select the Show Only Approved Purchase Orders check box near the bottom of the window.
-
Click Set Options.
The Edit Field window closes.
-
-
Click Save Layout.
A save message appears. Your changes are saved.
Work Flow requirements
To restrict the Related Purchase Order to only display approved purchase orders, you will need to configure your Purchase Order work flow Approval step Approve action so that it sets the form status to Approved. This is not required if you do not have an approval process for initial submissions.
To update your work flow requirements:
-
Select Admin in the toolbar in the upper-right corner of the window.
The System Administrator Dashboard page opens.
-
Click Manage Work Flows link in the Company Administration column.
The Manage Work Flows page opens.
-
Find the work flow you want to edit.
-
Expand the work flow record by clicking the Plus button
.A list of work flow steps appears.
-
Find the approval work flow step.
-
Click Edit link in the Actions column of the approval step.
The Edit Step window opens.
-
Click Edit link for your approval action.
The Manage Work Flow Step Action window opens.
-
Select the Update Form Status check box.
-
Select Approved from the Update Form Status field.
-
Select Update.
The Manage Work Flow Step Action window closes.
-
Select Update.
The Edit Step window closes. Your changes are saved.
General Contractor / Vendor / Bidder User Class Security requirements
The following security settings are required for your General Contractor, Vendor, or Bidder user class to properly use Project Cost Tracking.
Review the additional security settings for your General Contractor / Vendor / Bidder user class.
Field Security
Apply these settings on the Field Security page at a minimum:
| Setting | Value |
|---|---|
|
Forms > ALL > Vendor |
Edit |
| Specialized Forms > PayApp > Related Purchase Order |
Edit |