Typically, a vendor will submit a cost using a budget custom list built into a form work flow step. After the cost is submitted, the cost goes through a review process. Once the cost has been approved, the approver will apply the cost against your budget.
This walkthrough teaches you how to create budget custom lists. For procedures related to the Manage Custom Lists page, see our Manage Custom Lists article.
Budget-impacting custom lists can only be used on a form, not a summary page.
To navigate to the Manage Custom Lists page:
-
Select Admin in the toolbar in the upper-right corner of the window.
The System Administrator Dashboard page opens.
-
Click Manage Custom Lists link in the Company Administration column.
The Manage Custom Lists page opens.
-
Follow a procedure below.
 Minimum Requirements for a Budget Custom List
At a minimum, your budget-impacting custom list must include two field types:
-
Budget (line item) – allows your vendor to add a budget line item to the custom list
-
Budget Cost – the value of this field is added to your budget. We strongly recommend that you do not allow vendors to have edit-access to this field.
We also highly recommend that you include a Cost field. This field would be used by the vendor to add their costs for the budget line item.
After you have added these fields to your custom list, you will need to build your custom list layouts. We recommend creating two custom list layouts:
-
A vendor-facing custom list layout, which will be populated by your vendor. This layout will not impact your budget.
-
An approver-facing custom list layout, which will be populated by your approver. This layout will impact your budget.
Add the Minimum Required Fields to your Budget Custom List
To add these fields to your budget custom list:
-
Click Edit Fields link in the Actions column of the custom list whose fields you want to manage.
The Edit Fields window opens.
-
Click Add Report / Form Field.
The Add Report / Form Field window opens.
-
Select Budget Line Item from the Default Name field.
-
Select Add.
The window closes. The field appears in the Edit Fields window.
-
Click Add Report / Form Field.
The Add Report / Form Field window opens.
-
Select Budget Cost from the Default Name field.
This value of this field is added to your budget. There are multiple Budget Cost fields to support the scenario where you want a multi-budget impacting custom list.
-
Select the budget type you want to associate with this column from the Budget Column Type field.
Make sure you select a budget column that is not already used by another budget cost field.
-
Select Add.
The window closes. The field appears in the Edit Fields window.
-
Repeat steps 6-8 to add additional Budget Cost fields.
Adding additional Budget Cost fields allows you to create a custom list which impacts more than one budget column at a time. A sample scenario for this functionality is if you wanted to log retainage amounts and approved change request amounts at the same time when a Vendor submits a change request.
At this point, you have added the only fields required for a budget-impacting custom list. However, we strongly recommend that you add an additional non-budget-impacting Cost field. This Cost field would be used by the vendor to add their costs for each budget line item. The reason we recommend you create a cost field is that you do not want your vendors to be able to add costs to your budget without your approval.
-
Click Add Report / Form Field.
The Add Report / Form Field window opens.
-
Select the Custom Field option.
The Standard Field fields deactivate, and the Custom Field fields activate.
-
Enter Cost in the Field Name field.
The name of this field can be whatever you want it to be—the purpose of this field is for general contractors to enter a currency value for review without impacting your budget.
If you will have multiple Budget Cost fields in your custom list layout, we recommend creating descriptive names for your Cost and Budget Cost fields. For example, you might have a Cost field called "Retainage Amount" and a Budget Cost called "Approved Retainage Amount".
-
Enter the name this field should have in the database in the Integration Name field.
-
Select the No option for the Required setting.
-
Select Currency from the Form Field Type field.
-
Select Add.
The window closes. The field appears in the Edit Fields window.
-
If you are going to create a multi-budget impacting custom list, repeat steps 10-16 to add additional non-budget impacting Cost fields for your vendor-facing custom list layout.
This will allow your vendors to break down the costs into categories that can be easily copied into the budget-impacting columns using the Auto Copy To functionality.
-
Click Finished.
The Edit Fields window closes.
-
Follow the Build your Budget Custom List Layouts procedures below.
Build your Budget Custom List Layouts
The reason you build two layouts is that your vendors and your approvers need access to different items in the custom list.
Configure Line Items to Auto-Populate
There is a setting available for budget custom lists that triggers them to auto-populate with line items from your budget template. This functionality saves users time by eliminating the need to manually populate the custom list. There are two requirements for enabling this functionality: you must select the Auto-populate budget view lines check box on the custom list layout, and you must select a budget view for your budget line item field.
Downloaded custom list spreadsheets will not contain the auto-populated line items. Additionally, if a budget view is associated with multiple budget templates, this functionality will not work.
To use the auto-populate functionality:
-
Click Expand button
 next to the custom list to which you want to apply this functionality.
The row expands.
-
Click Edit link in the Actions column for the layout you want to edit.
The Edit item window opens.
-
Click Auto-populate budget lines check box.
-
Click Update Layout.
The window closes.
-
Follow the Build your Vendor-Facing Custom List Layout procedures below.
-
Follow the Build your Approver-Facing Custom List Layout procedures below.
Configure Columns to Auto-Copy into Budget-Impacting Column
You can configure a workflow step action to automatically copy budget-impacting values into a custom list in the next step of the workflow. This feature works together with the Copy To functionality for custom lists. Values will automatically copy if the following conditions are met:
-
The Source field is in the same custom list as the Destination field.
The Source field does not have to be in the same layout as the Destination field.
-
The Source field must be in a layout that is on a workflow step which meets one of two conditions:
-
The Source field and the Destination field must BOTH be in one or more layouts on one or more workflow steps, OR
-
The Destination field must be in a layout on a workflow step that occurs AFTER the workflow step that contains the Source field.
-
To configure your budget amounts to automatically get copied into the next step of a workflow:
-
Click Expand button
next to the custom list to which you want to apply this functionality.The row expands.
-
Click Layout Form link for the custom list layout you want to customize.
The custom list layout opens in a new window.
-
Click Ellipses next to the label for the column you want to customize.
The field configuration options open in a new window.
-
Select the budget-impacting column that the values should be copied to from the Allow “Copy To” function field.
The destination column needs to be in the same layout as the originator column.
-
Select Update.
The window closes.
-
Click Save Layout.
The configuration is saved.
-
Select Admin in the toolbar in the upper-right corner of the window.
The System Administrator Dashboard page opens.
-
Click Manage Work Flows link in the Company Administration column.
The Manage Work Flows page opens.
-
Find the workflow that contains the form with your budget-impacting custom list.
-
Click Expand button
next to the workflow to expand the steps. -
Click Edit link for the form step that contains the custom list whose values you want to copy into the next step.
-
Click Edit link for the workflow step action that should allow the values to be copied.
For example, this might be the Approve action on the workflow step.
-
Select the Copy budget-impacting amounts check box.
-
Select Update.
The window closes.
-
Select Update.
The window closes. Now when the user takes that action on the workflow step, the custom list column you configured will automatically copy its value to the destination column you specified in step 4.
Build your Vendor-Facing Custom List Layout
To build your vendor-facing custom list layout:
-
Click Add Layout link in the Actions column of the custom list whose layout you want to build.
The Add Layout for [Custom List] window opens.
-
Enter a name for the layout in the Page Layout Name field.
We recommend that you use a name that describes the layout's purpose, such as Vendor Invoice Custom List Layout.
-
Enter a description of the custom list in the Description field.
Add descriptions to every template, layout, or field you create in Lucernex, so future administrators understand the purpose and context of each item.
-
Click Add Layout.
The Add Layout for [Custom List] window closes. The layout record appears below your custom list record.
-
Click Layout Form link in the Actions column of the layout you want to build.
A pop-up window opens.
-
Select the Budget field from the first field in the layout editor.
Once you select the field, it will appear in your layout. This field is used to select the line item when entering values in the custom list.
-
Click
 on the Budget field label.
 A pop-up window opens.
-
Enter Line Item in the Field Name on Report field.
We recommend doing this because the default label is not clear.
-
Select the Is Required? check box.
-
Select the budget view for your vendor from the Use this Budget View field.
-
Select Update.
The window closes.
-
Select the Cost field from the second field in the layout editor.
Once you select the field, it will appear in your layout. This field is used by the vendor to enter the cost of the line item into the custom list. This field does not impact your budget.
-
Click
on the Cost field label. A pop-up window opens.
-
Select the Is Required? check box.
-
Select the number of decimals you want the column to display from the Number of Decimals field.
-
Select Update.
The window closes.
-
Repeat steps 12-16 for any additional Cost fields.
-
Add any additional fields you want to add to the custom list.
We strongly recommend you DO NOT add the Budget Cost field to your vendor-facing custom list.
-
Click Save Layout.
The window closes. Your changes are saved.
Build your Approver-Facing Custom List Layout
To build your approver-facing custom list layout:
-
Click Add Layout link in the Actions column of the custom list whose layout you want to build.
The Add Layout for [Custom List] window opens.
-
Enter a name for the layout in the Page Layout Name field.
We recommend that you use a name that describes the layout's purpose, such as Invoice Approver Custom List Layout.
-
Enter a description of the custom list in the Description field.
Add descriptions to every template, layout, or field you create in Lucernex, so future administrators understand the purpose and context of each item.
-
Click Add Layout.
The Add Layout for [Custom List] window closes. The layout record appears below your custom list record.
-
Click Layout Form link in the Actions column of the layout you want to build.
A pop-up window opens.
-
Select the Budget field from the first menu in the layout editor.
Once you select the field, it will appear in your layout. This field is used to select the line item when entering values in the custom list.
-
Click
on the Budget field label. A pop-up window opens.
-
Enter Line Item in the Field Name on Report field.
We recommend doing this because the default label is not clear.
-
Select the Read only in edit form check box.
The reason you need to select this check box is because you should not allow your approvers to be able to change anything submitted by the vendor. They should only be able to approve or deny an invoice. If they want to make changes to the invoice, they should ask the vendor to resubmit the invoice.
-
Select Update.
The window closes.
-
Select the Cost field from the next menu in the layout editor.
Once you select the field, it will appear in your layout. This field is used by the vendor to enter the cost of the line item into the custom list. This field does not impact your budget.
-
Click
on the Cost field label. A pop-up window opens.
If there are multiple cost fields in this layout, ensure that each has a distinct label in the Field Name on Report field.
-
Select the Read only in edit form check box.
The reason you need to select this check box is because you should not allow your approvers to be able to change anything submitted by the vendor. They should only be able to approve or deny an invoice. If they want to make changes to the invoice, they should ask the vendor to resubmit the invoice.
-
Select the number of decimals you want the column to display from the Number of Decimals field.
-
Select Update.
The window closes.
-
Repeat steps 11-15 for any additional cost fields.
-
Select the Budget Cost field from the next menu in the layout editor.
Once you select the field, it will appear in your layout. This field is used by the approver to validate the approved budget-impacting amount.
-
Click
on the Budget Cost field label. A pop-up window opens.
-
Enter a label for the budget cost in the Field Name on Report field.
If you will have multiple budget-impacting columns in this layout, descriptive labels are important. For example, if the corresponding Cost field is called "Retainage Amount", you could call the Budget Cost "Approved Retainage Amount".
-
Select the Is Required? check box.
-
Select the number of decimals you want the column to display from the Number of Decimals field.
-
Select the Cost column whose value you want the approver to copy into the Budget Cost column from the Allow "Copy To" function field.
The Copy To function allows your approver to copy the value of the Cost column you specify into the Budget Cost column. Using this functionality decreases the risk of errors when populating a custom list. For example, if your custom list includes quantity and a unit cost column, you could apply the Copy To setting to the math field used to calculate the subtotal.
When the Copy To function is enabled, a
 appears on the header of the budget column. Clicking this allows the user to copy the values from the specified column to the column they are working with.
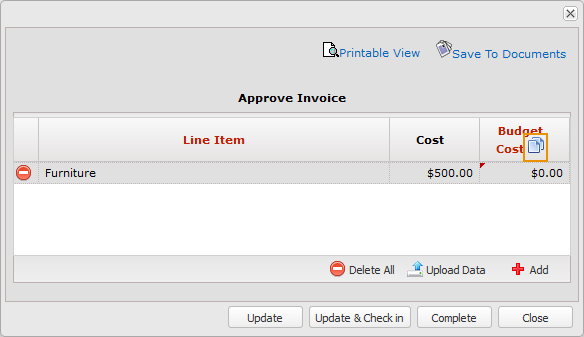
Lucernex then asks the user if they are sure they want to copy the values from the Cost column to the Budget Cost column.
You can also configure the values to auto-copy when an action is taken on a workflow step.
-
Select Update.
The window closes.
-
Repeat steps 17-23 for any additional Budget Cost fields.
-
Add any additional fields you want to add to the custom list.
-
Click Save Layout.
The window closes.Your changes are saved.
Optional Budget Custom List Fields
The following fields are beneficial—but not required—to have in custom lists.
Budget Snapshot Value
A Budget Snapshot Value is used to capture the current values of the line items in a budget column. For example:
-
James, a system administrator, adds an Approved Budget Snapshot Value to a custom list.
-
James adds the custom list to his Facilities Invoice form.
-
Scott opens the form and selects the Lawn Care budget line item from the custom list.
-
The Approved Budget Snapshot Value pre-populates with the current approved value of the Lawn Care line item in James’ budget, which is $1,500. 00.
-
Scott submits an invoice for $175. 00 using the Facilities Invoice form.
This field type can be imported and exported, and it is meant to be used in conjunction with the Cannot Exceed type.
To add a budget snapshot value field to your budget custom list:
-
Click Edit Fields link in the Actions column of the custom list whose fields you want to manage.
The Edit Fields window opens.
-
Click Add Report / Form Field.
The Add Report / Form Field window opens.
-
Select the Custom Field option.
-
Enter the field name in the Field Name field.
-
Enter the name this field should have in the database in the Integration Name field.
-
Select Budget Snapshot Value from the Form Field Type field.
The Budget Column Type becomes editable.
-
Select the budget type whose values you want to appear in the budget snapshot from the Budget Column Type field.
-
Select Add.
The window closes. The field appears in the Edit Fields window.
Cannot Exceed
A Cannot Exceed allows you to specify that the value of a field in one column of a budget cannot exceed the value of another field. For example, if a vendor or general contractor attempts to save a value for a line item on an invoice that exceeds the remaining balance of that line item, the system will not allow the value to save.
If a user attempts to save a form where a field value exceeds the cannot exceed value of another field, a warning will appear when the user attempts to save the form. The warning reads, Failed to save [Form name]: [Field 1] amount cannot exceed field [Field 2] [Value of Field 1 > Value of Field 2].
This field type is meant to be used in conjunction with the Budget Snapshot Value type.
To add a cannot exceed field to your budget custom list:
-
Click Edit Fields link in the Actions column of the custom list whose fields you want to manage.
The Edit Fields window opens.
-
Click Add Report / Form Field.
The Add Report / Form Field window opens.
-
Select the Custom Field option.
-
Enter the field name in the Field Name field.
-
Enter the name this field should have in the database in the Integration Name field.
-
If this field should be required, select the Yes option for the Required setting.
-
Select Currency from the Form Field Type field.
The optional Cannot Exceed becomes editable.
-
Select the field that this field's value cannot exceed from the Cannot Exceed field.
-
Select Add.
The window closes. The field appears in the Edit Fields window.