Edit and Build a Report Definition
When you save a new report definition, you are taken to the Report Definition Edit page. Additional tabs become available when the new report definition is opened in Edit mode (Report Definition Editor, Reports, and Security). When the Report Definition Editor tab becomes available, you can begin adding data fields to your report definition, as well as apply security settings to the report definition.
Report Definition Edit can also be reached from the menu bar and the toolbar (if you're already on a Report Definitions module page).
To reach the Report Definitions Edit page from the menu bar, follow these steps.
-
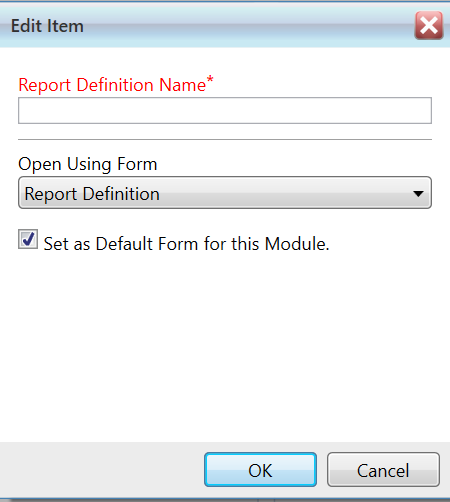
Go to Reports > Edit.
-
In the pop-up window, enter the Report Definition Name of the record you want to edit.
-
Click OK.
The report definition opens in the Report Definitions Edit page.
To reach the Report Definitions Edit page from the toolbar, if you're already on a Report Definitions module page, follow these steps.
-
In the Edit field in the toolbar, enter the Name of the report definition you want to edit.
-
Click Load.
If found, the report definition opens in the Report Definition Edit page.

Once you're on the Report Definitions Edit page, you can modify the report definition.
Specific Edits
Delete a label/data field
To delete a particular label or field from a report, whether it is the title, column, or data field, click the gear icon that exists on the right side of the respective field, and then click the Delete option.
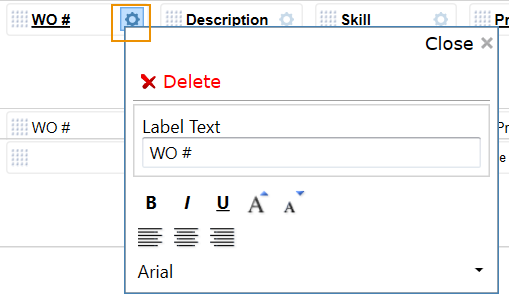
Insert and edit a label field
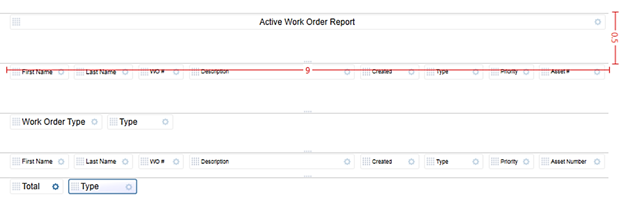
To insert a label field to a report, such as a title, column, group, or information field, expand the Available Fields section in the elements pane and then drag the label field to the appropriate position on the report using the move handle (the square arrangement of dots on the left side of the field).
To edit the label field, such as the name and formatting, click the gear icon that exists on the right side of the field and make the preferred changes.
Resize a field
On occasion, resizing fields on a report provides a greater use of the limited space on a page (portrait or landscape). When a report is first created, all columns are provided with equidistant spacing, regardless of the amount of information in any particular column. This can result in columns with great detail being confined and using too many lines to display the information.
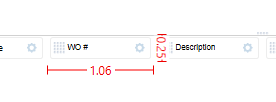
To resize the height or length of a particular field, hover the cursor over either the bottom or right edge of the field until the typical cursor shape toggles to a two-directional arrow (vertically for height changes and laterally for length changes). Left-click and hold to control the sizing of the field.
When you left-click to resize the field, you will see red measuring elements appear, providing the specific sizes of the field being affected.
Field resizes are strictly mouse-controlled actions. There is no current option to enter or otherwise automate a particular field size (vertical or lateral).
Additionally, in regards to reports with column labels and column data, resizing a column label field does not automatically resize its data field counterpart. For example, resizing the WO # column label field does not change the current size of the WO # data field.
In order to preserve the orientation between the label and data fields, the data field will need to be manually resized, as well.
By resizing the fields to better match the corresponding data, the report can be manipulated to provide a more efficient appearance.
Resize Sections in Page Layout
As groupings are added to standard reports, adjusting the space between the various report sections (Report Header, Page Header, Group Header, Detail section) may improve the overall appearance of the report.
To adjust the spacing between report sections, hover the mouse over the move handles (4 dots) until the typical cursor shape toggles to a two-directional arrow, and then left-click and drag the section line upward or downward, as preferred.
When you left-click to adjust the section(s), you will see red measuring elements appear, providing the specific sizes of the section being affected.
Next Steps:
Once the report definition has been opened in Edit mode, you can modify any of the fields on the Main tab, and you can perform any of these actions: