About the Report Layout Editor
Before we get started with showing you how to build a Standard or Template report definition, let's take a tour of the Report Layout Editor. The Report Layout tab is only available in Report Definition Edit.
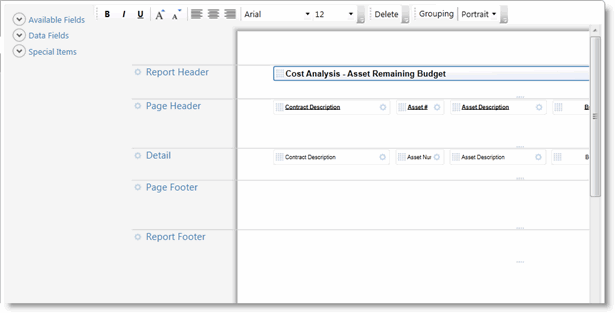
When you click the Report Layout tab, you will see a screen similar to this:
Elements Pane
This area contains three element lists from which you can select items to add to your report definition.
-
Available Fields – Contains a label field and an Image field. The Image field can be used to insert a logo or other image. See Add an Image.
-
Data Fields – Contains the fields in the data source linked to the report definition. If this is a Template-type report definition, there is no linked data source, and the list is blank.
-
Special Items – Contains non-data elements like Page Number and Page Count that you can add to the report. See Special Items below.
Formatting Toolbar

The toolbar allows you to format selected items in the Page Layout area, as well as set general options for the report, like the page orientation.
From right to left, the buttons are:
|
Button |
Function |
|---|---|
|
Bold / Italic / Underline |
These buttons format the selected text's style. |
|
Grow Font / Shrink Font |
Clicke or the other to increase the select text's font size or decrease the font size. |
|
Left Align / Center / Right Align |
These buttons change the text's alignment. |
|
Font / Font Size |
Use these drop-down menus to select the text's font type and font point size. |
|
Delete Item |
This button deletes the selected element. |
|
Group |
Click this button to open the Group |
|
Page Orientation |
Use this drop-down menu to set the page orientation to Portrait (default) or Landscape. |
|
Paper Size |
Use this drop-down menu to select the paper size. Letter size is the default. |
|
Zoom |
Use this drop-down menu to resize the onscreen page layout. |
Page Layout
This area shows an exact layout of how the report will look when it is generated. You can rearrange and resize fields, labels, and columns here. You can also specify whether a group of elements (like the Page Footer) is set to Auto Arrange or Visible.
Auto Arrange = TMS automatically resizes and arranges elements and fields when new elements/fields are added. Remove the check mark from this option to move or rearrange these items manually.
Visible = This element will appear on the report. To hide a set of elements or fields, remove the check mark from them.
Group and Sort
If you want to group and sort your data by a field on the report, you can do so by clicking the Grouping button in the toolbar. This opens the Grouping dialog box.
See the Group and Sort topic for steps on defining a field group.
Special Items
The Special Items list in the elements pane (see above) allows you to add non-data fields to your report that generate only when the report is run.
| Special Item | What it does |
|---|---|
| Template Report Title |
This special item is for Template-type report definitions. It generates a title for the report based on user-entry. |
| Page Count | This shows a count of the number of pages in the report. |
| Page Number | This shows the number of the page. |
| Page X of Y | This shows the number of the page, out of the total page count. |
| Print Date/Time | This is the date and time the report was printed. |
Next Steps:
Now that you are familiar with the editor and the tools available to you, you're ready to use the editor in Report Definition Edit.