The Lucernex / vx Maintain integration provides an integrated workplace management solution that includes strong facility, project, and lease management modules. The integration aims to break down silos that are common in organizations. Organizational silos often make accessing data across teams challenging and time-consuming. As a result, work often becomes disconnected, manual, inefficient, and prone to mistakes.
This integration provides visibility into your portfolio and assists you in refining your management processes. By integrating Lucernex and vx Maintain, we are able to deliver the value of having the data you need in a single solution. With this integration, you will be able to see key lease and capital project data in vx Maintain and asset information in Lucernex.
This article walks through key features and workflows included in the Lucernex / vx Maintain integration.
 Products included
Lucernex is a best-in class, fully integrated portfolio lifecycle management solution that is backed by robust workflow and forms engines. Lucernex provides prolific data collection and regulatory compliance support. It can scale to thousands of concurrent projects, and can be used to monitor progress and costs across your portfolio.
vx Maintain is a best-in-class facility and asset management solution which can help you reduce waste across your maintenance life-cycle. vx Maintain helps you maximize the efficiency of your staff, maximize the up time of your assets and facilities, and meet your compliance commitments. vx Maintain also provides data-driven performance analysis and asset management, and supports responsive business processes.
Overview
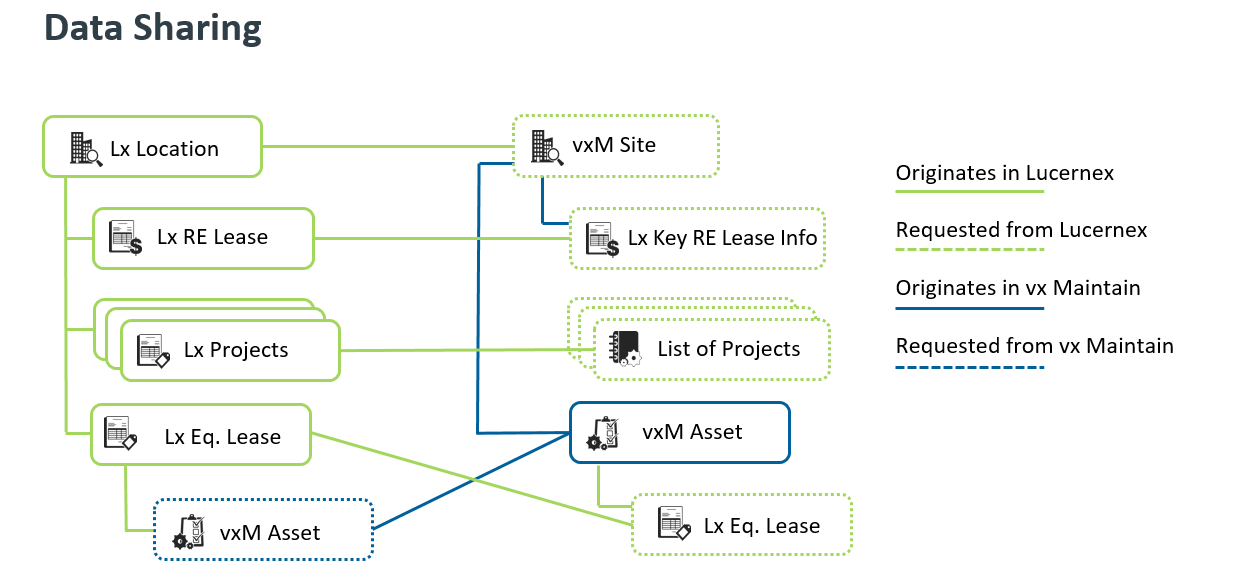
In this integration, Lucernex is viewed as a the source of truth for all location, contract, and capital project data, and vx Maintain is the source of truth for all asset data. When a Location is created in Lucernex, a corresponding Site is created in vx Maintain. Your lease administrators and project managers can then create and manage contracts and capital projects associated with the location in Lucernex. The data associated with the location, contracts, and capital projects is read-only in vx Maintain.
Any assets associated with a location in Lucernex are created and managed in vx Maintain. These can include both leased and non-leased assets; however, you will only add leased assets to Lucernex. For example, in an office, you may lease a HVAC unit and own a refrigerator that is used in the break room. Both of these assets would be serviced using vx Maintain, but you would only add the HVAC unit to Lucernex because the HVAC unit is associated with an equipment contract.
Pictured below is the Data Sharing model for the Lx / vx Maintain integration. Location, lease, project, and equipment lease data originate in Lucernex and are requested by vx Maintain. Asset data originates in vx Maintain and is requested by Lucernex.
Key integration features
After implementation of the Lucernex / vx Maintain integration, the following features will be available:
-
Locations created in Lucernex will be pulled via API into vx Maintain. These locations will exist as sites in vx Maintain.
-
To learn how to create a location in Lucernex, see the Create a location in Lucernex section below.
-
-
Assets associated with a site in vx Maintain can be pulled by a Lucernex user and associated with an equipment contract.
-
To learn how to associate an asset from vx Maintain with an equipment contract in Lucernex, see the Add a vx Maintain asset to an equipment contract section below.
-
-
vx Maintain users can see Lucernex capital project, contract, and equipment contract information from the Site List page.
-
To learn how to view Lucernex capital project, contract, and equipment contract information from the Site List page, see the View site lease and capital project information from the Site List section below.
-
-
vx Maintain users can see Lucernex contract responsibility information from the Create Work Order page.
-
To learn how to view Lucernex contract responsibility information from the Create Work Order page, see the View responsibility information from the Create Work Order page section below.
-
The following functionality is NOT available at this time:
-
Cross-product reporting is not supported.
-
Single sign-on is not supported.
-
Assets already associated with an equipment contract are not filtered out from the Find Equipment window.
Cross-product navigation
In order for a user to access information from Lucernex in vx Maintain or from vx Maintain in Lucernex:
-
The user must have an account on both products.
-
All existing security requirements apply from both Lucernex and vx Maintain.
-
For applicable Lucernex permissions, see the Minimum user security settings - Lucernex section below.
-
For applicable vx Maintain permissions, see the Minimum user security settings - vx Maintain section below.
-
-
vx Maintain users must have the External Information setting applied to their user role.
To learn how to apply the External Information setting, see the Enable the External Information setting on a user role section below.
Product documentation
To view user guides, click the question mark icon then User Guides in the upper-right corner of the page.
Contact Accruent Support if you have questions about the Lucernex / vx Maintain integration.
Lucernex
As mentioned above, in this integration Lucernex is viewed as a the source of truth for all location, contract, and capital project data. When a Location is created in Lucernex, a corresponding Site is created in vx Maintain. Your lease administrators and project managers can then create and manage contracts and capital projects associated with the location in Lucernex.
Every 15 minutes vx Maintain queries Lucernex for new and updated data.
Minimum user security settings - Lucernex
In order to view, create, edit, or delete data in Lucernex, an individual meet the following three criteria at a minimum:
-
The individual must have a user account created by their system administrator.
A member is any Lucernex user with a unique login ID and password. Before a member can have access to any part of a portfolio, you must first set up that member in your firm. This must only be done once for each Member.
To learn how to create a member, see the Add a Person procedures on the Manage Members / Contacts Tab page.
-
The individual must have the appropriate permissions to view, create, edit, or delete the data they want to access.
Permissions are controlled by the user class of the member. The Member’s User Class determines which folders, documents, pages, fields, and actions within the portfolio that member may access.
To learn how to create and manage user classes, see the Manage Security section.
-
The individual must meet one of two criteria:
-
They must have direct membership to a specific entity or entities.
Assigning a member to an entity gives them to access that particular entity. The member’s user class security settings determine what the member can see and do on the entity.
-
OR they must be a portfolio / program member and have appropriate user class security settings.
You can add or Remove an individual Member from selected entities on the Manage Membership Tab.
-
Flor’s user class has the View setting for the Default access to Contracts for Portfolio Members security setting.
-
Flor is a member of the Orchid portfolio and is not a member of any individual entities.
-
The Orchid portfolio has 4 projects, 10 facilities, and 10 contracts.
-
This means that Flor can view 10 contracts in Lucernex.
-
A Lease Admin adds a contract to the Orchid portfolio, meaning there are now 11 contracts in the portfolio.
-
Flor can now view 11 contracts in Lucernex.
If you have questions about when membership should be managed on individual entities, please contact your Professional Services team or Support.
A member must be a member at the entity-level if they need to receive any type of entity-level notification.
-
-
View-only user
We recommend that you create a user class for employees who need view-only access to data.
The table below lists security items related to the Lucernex / vx Maintain integration. The table lists the minimum settings required to view data related to the integration. You may decide to give greater or fewer permissions than the ones listed in this section.
You can assume that any security setting not explicitly mentioned in this section is set to No Access.
|
Tab |
Security Item |
Setting |
|---|---|---|
|
Page Access |
Capital Project |
View |
| Page Access |
Capital Project > Details |
View |
| Page Access |
Capital Project > Details > Summary* |
View |
| Page Access |
Capital Project > Details > Documents |
View |
| Page Access |
Contract |
View |
| Page Access |
Contract > Details |
View |
| Page Access |
Contract > Details > Summary* |
View |
| Page Access |
Contract > Details > Documents |
View |
| Page Access |
Contract > Abstract Info |
View |
| Page Access |
Contract > Abstract Info > Covenants |
View |
| Page Access |
Contract > Abstract Info > Key Dates |
View |
| Page Access |
Contract > Abstract Info > Responsibilities |
View |
| Page Access |
Equipment Contract |
View |
| Page Access |
Equipment Contract > Details |
View |
| Page Access |
Equipment Contract > Details > Summary* |
View |
| Page Access |
Equipment Contract > Details > Documents |
View |
| Page Access |
Equipment Contract > Abstract Info |
View |
| Page Access |
Equipment Contract > Abstract Info > Covenants |
View |
| Page Access |
Equipment Contract > Abstract Info > Key Dates |
View |
| Page Access |
Equipment Contract > Abstract Info > Responsibilities |
View |
| Page Access |
List Layouts** |
View |
| Page Access |
Sub-pages** |
View |
|
Actions |
Default access to Capital Projects for Program Members*** |
View |
| Actions |
Default access to Contracts for Portfolio Members *** |
View |
| Actions |
Default access to Equipment Contracts for Portfolio Members*** |
View |
| Actions |
Default access to Locations for Portfolio Members *** |
View |
|
Field Security |
Contract**** |
View |
| Field Security |
Equipment / Assets**** |
View |
| Field Security |
Equipment / Assets > General Information**** |
View |
*If your organization has created custom summary pages, open this folder and select the appropriate permissions for each summary page.
*The default summary pages typically contain payment information. Determine whether you want your view-only users to see this information. If you do not want them to see this information, you can revoke their view-access from the Field Security page.
**Users will only have access to list layouts and sub pages whose parent entity they have access to view, edit, or delete. This is because the List Layouts and Sub Pages page security settings are subordinate to the entity-level page access security settings.
***If you set the Default access for portfolio / program members for [EntityType] settings to View and add the person as a member to a portfolio or program, the users will have view-access to all entities of that entity type in the portfolio, assuming they have the appropriate page access.
****Users will only have access to fields whose parent entity they have access to view, edit, or delete. This is because the Field Security security settings are subordinate to the entity-level page access security settings. If there are specific fields you do not want users to view, find them within the folder structure and set them to No Access.
Data hierarchy
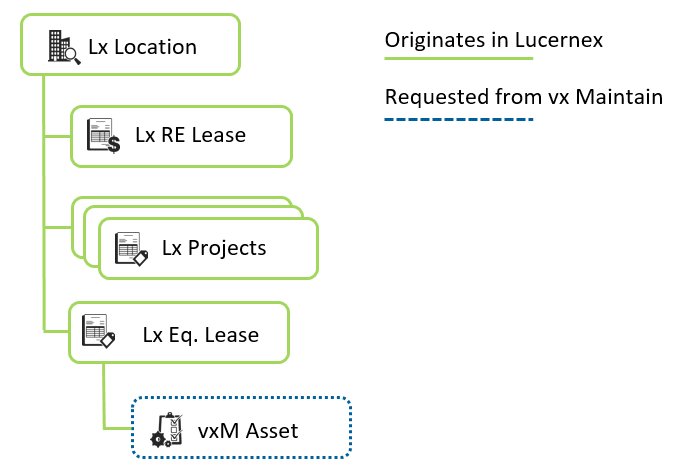
Lucernex is divided into several modules which have parent / child and sibling / sibling relationships. The highest module in the hierarchy is the Portfolio. In Lucernex, a Portfolio is the umbrella entity in the system that all other entities belong to. Your organization can use a portfolio for a brand, geographical area, or for any other system of classification.
The second level of the data hierarchy in Lucernex is the Location. The Location module is used to house physical information about locations in your portfolio, information about competitors, and your sales tax rate. Locations are parents to several other entity types, such as facilities, capital projects, leases, and equipment leases.
A capital project is a project which endeavors to modify an existing location. Capital projects are created and managed in the Capital Project module. Capital projects differ from projects, which are used when opening a new location. In this integration, project information is pulled from the Capital Project module.
The Contract module is used to manage your real estate leases, and the Equipment Contract module is used to manage your equipment leases. These two modules are very similar in function, with the key difference being that equipment contracts have another layer of functionality: assets. In this integration, assets will be created in vx Maintain and associated with an equipment contract.
The image below displays the Lucernex-half of the data hierarchy in the Lucernex / vx Maintain integration. Location, lease, project, and equipment lease data originate in Lucernex, and Lucernex requests asset data from vx Maintain. For the full diagram, see the Overview section above.
Add Lucernex to Verisae Integration Summary Page to Lucernex
Adam Bednar on the Professional Services team has created a Location Summary page that lists Location information that flows from Lucernex to vx Maintain. This page is used by clients to verify that all necessary fields have been completed. To , Use the Import Best Practice Templates page to add this page to your firm.
Integration-specific procedures
This section contains procedures that are specific to the integration in the Lucernex application.
Create a location in Lucernex
Depending upon how your firm is configured, the Location Setup Wizard may have additional fields that are required. These procedures describe the minimum settings required in the Location Setup Wizard for the Lucernex / vx Maintain integration to function properly.
Every quarter of an hour, vx Maintain queries Lucernex for new or updated data.
To create a location in the Lucernex / vx Maintain integration:
-
Sign into Lucernex.
-
Do one of the following:
-
To open the Location Setup Wizard from the Summary page of the Location module:
-
Navigate to Location > Details > Summary.
Use the links in the Navigation Pane on the leftmost side of the page.
-
Click Add Location.
This displays in the Actions menu on the right side of the page.
The first step of the Location Setup Wizard opens.
-
-
To open the Location Setup Wizard from the Tools menu:
-
Click Tools in the toolbar in the upper-right corner of the window.
A menu opens.

-
Select Setup Wizards from the menu.
The Setup Wizard window opens.
-
Select the Location option.
-
Select the portfolio you want this location to belong to from the field that appears above the entity options.
-
Click Next.
The first step of the Location Setup Wizard opens.
-
-
-
Complete the following required fields:
-
Portfolio : Select the portfolio that this location belongs to from this field.
In Lucernex, a Portfolio is the umbrella entity in the system that all other entities belong to. Your organization can use a portfolio for a brand, geographical area, or for any other system of classification.
-
Status : Select the status of the location from this field. The Lucenex Location status must be marked as Active for the location to be active in vx Maintain.
-
Name : Enter the name of the location in this field.
-
Region : Select the region that this location belongs to from this field. Regions are subcategories that belong to your portfolio's organizational chart.
-
Longitude
-
Latitude
Automatically populate the latitude and longitude of your location
To have the system automatically calculate the location's latitude and longitude:
-
Populate as much address information as you can in the provided Address fields.
-
Click Geocode button
 to the right of either the Longitude or Latitude fields.
 The Geo Location Candidates window opens.
-
Click the appropriate address in the Address table.
A dialog opens, asking you to confirm your choice.
-
Click Yes.
The dialog box and the window close. The Longitude and Latitude fields are populated.
-
-
City
-
State
-
Zip
-
Country
-
Time Zone
-
-
Click Next.
The Folder Set-up page of the Location Setup Wizard opens.
-
Select the folder template you want to use for your location from the Location folder template field.
-
Click Next.
The Assign Members page of the Location Setup Wizard opens.
Assigning a member allows that member to access specific folders, documents, pages, fields, and actions within the location. A member is any Lucernex user with a unique login ID and password. Before a member can have access to any part of a location, you must first set up that member in your firm. This must only be done once for each Member.
Once a Lucernex user is set up as a Member of your Firm, they must be added to each location and assigned user classes. The Member’s User Class determines which folders, documents, pages, fields, and actions within the location that member may access.
-
To learn how to set up and configure members in your firm, see the Minimum user security settings section above.
-
To assign members to a location:
-
Click Assign Members.
A new page opens.
-
Do one of the following:
-
To add all members in the system, click Add all members in the upper left corner of the Members NOT Assigned table.
All members currently configured in your system are added to the Current / Proposed member (s) field.
-
To search for a specific member to add to your location:
-
Enter the name of the member you want to assign in the Search at the upper right corner of the Members NOT Assigned table.
-
Click Search.
The members meeting your search criteria appear.
-
Click
 next to the member you want to add.
 The member is added to the Current / Proposed member (s) field.
-
-
-
If you need to remove a member from the Current / Proposed member (s) field:
-
Select the member you want to remove.
Press and hold CTRL on your keyboard to select multiple values.
-
Click Remove Selected below the Current / Proposed member (s) field.
The member is removed from the Current / Proposed member (s) field.
-
-
Once you are satisfied with your list, click Update members to [Location Name].
-
Click Finish Assigning Members at the bottom-right corner of the Location Setup Wizard.
The Assign Members page opens. The members you assigned appear in the Managers and Members already assigned using Org Chart table.
-
-
Click Next.
The Schedule Set-up page of the Location Setup Wizard opens.
-
If you want to apply a schedule template to your location:
-
Select the template you want to use from the field.
-
Enter the start date of your schedule in the Start On field.
Select Calendar
 to open the date picker.
 -
Enter the end date of your schedule in the End On field.
Select Calendar
to open the date picker.
-
-
Click Finish.
The Location Setup Wizard closes. Your location is now saved in the system.
Add a vx Maintain asset to an equipment contract
The Find Equipment window does not filter out assets that have already been added to an equipment contract.
The Find Equipment window will display all assets associated with a location. Only add leased assets to your equipment contract.
To add an asset to an equipment contract:
-
Sign into Lucernex.
-
Navigate to Equipment Contract > Details > Summary.
Use the links in the Navigation Pane on the leftmost side of the page.
-
Click Edit.
This displays in the Actions menu on the right side of the page.
The page becomes editable.
-
Scroll down to the Assets table.
-
Click Find Equipment.
The Find Equipment window opens.
When the Find Equipment window first opens, it will not populate with any asset data. This is because there is a potential for a significant number of assets.
-
Do one of the following:
-
Type the name of the location the asset is associated with in Location.
-
Type the name of the asset in Asset.
You must type the FULL name of the location or the asset EXACTLY as it appears in the system, including capital letters.
-
-
Click Search button to the right of Asset.
The window populates with the assets that meet your search criteria.
Once the user requests equipment information in Lucernex, Lucernex will call Mulesoft. Mulesoft will then call vx Maintain for equipment information. vx Maintain will deliver the equipment information to Mulesoft, which is then delivered to the user in Lucernex.
The Find Equipment window does not filter out assets that have already been added to an equipment contract.
-
Select the check box to the left of each asset you want to add to the equipment contract.
You can also select the check box in the Select column header to select all assets in the table.
-
Click Add Selected Assets.
Lucernex begins to add the assets to your equipment contract. Once the assets have been added, the window closes. The assets appear in the Assets table.
Create a new Asset in vx Maintain
You can quickly access the page used to create a new asset from the Find Equipment window.
To access the Equipment Detail page in vx Maintain from Lucernex:
-
Sign into Lucernex.
-
Navigate to Equipment Contract > Details > Summary.
Use the links in the Navigation Pane on the leftmost side of the page.
-
Click Edit.
This displays in the Actions menu on the right side of the page.
The page becomes editable.
-
Scroll down to the Assets table.
-
Click Find Equipment.
The Find Equipment window opens.
-
Click Create Asset.
A new tab opens. Your browser will prompt you to Sign in to vx Maintain. When you log in to vx Maintain, the Site List page opens. Follow the Create Assets / Equipment in vx Maintain procedures below to continue the process of creating a new asset in vx Maintain.
vx Maintain
As mentioned above, once a location is created in Lucernex, vx Maintain will automatically create and update a corresponding site record. These records are updated every quarter of an hour. Once the site record is created in vx Maintain, you can view contract and capital project data associated with the site. Additionally, you can also create assets associated with the site in vx Maintain. These assets will include both leased and non-leased equipment; however, you will only add leased assets to Lucernex.
For example, in an office, you may lease a HVAC unit and own a refrigerator that is used in the break room. Both of these assets would be serviced using vx Maintain, but you would only add the HVAC unit to Lucernex because the HVAC unit is associated with an equipment contract.
Minimum user security settings - vx Maintain
In order to view, create, edit, or delete data in vx Maintain, an individual meet the following three criteria at a minimum:
-
The individual must have a user account created by an administrator.
Client users are typically created by client administrators, while provider users are either created by Accruent Support or a provider administrator. A user must have a unique user name and password.
-
The individual must have a role assigned to their user account.
A user's role controls their security rights. Roles are defined by Verisae admins and are associated with clients. Roles control view-access to all pages in the application as well as add / edit / delete permissions. There are separate resources for both the workspace and the mobile dashboard.
-
The user account must have a client filter, a provider filter, a location filter, or some combination of one or more filters.
-
Client filters limit user access to the data of one or more clients.
-
Provider filters limit user access to the data of the provider they work for.
For example, a maintenance company contracted by a grocery store.
-
Location filters limit user access to the data of their assigned location.
-
Enable integration settings on a user role
To quickly find settings on the Role Detail page:
-
Press the CTRL and F keys on your keyboard.
-
Enter the name of the setting in the Find field that opens.
-
Press the Enter key on your keyboard.
Your computer navigates you to the setting.
-
Repeat steps 2-3 to find other relevant settings.
You will need to enable these settings for both workspace and mobile users.
To enable the External Information setting on a user role:
-
Sign in to vx Maintain.
-
Select Roles from the Verisae in the toolbar at the top of the page.
The Roles page opens.
-
Select the role you want to edit from the Roles table.
The Role Detail page opens.
-
Scroll down to the Sites Tab Resources table.
-
Select the View check box for the Sites > Assets > External Information setting.
This setting appears below the Assigned Systems setting and above the Systems setting.
-
Select the View check box for the Sites > Sites > External Information setting.
This setting appears below the Site Space Detail setting and above the Schematics & Photos setting.
-
Scroll down to the External Resources table.
-
Select the View check box for the Lucernex setting.
This setting appears in the External Resources table.
-
Click Save in the lower-right corner of the page.
The Roles page opens. Your changes are saved..
-
Repeat steps 3 - 9 for any additional roles to which you want to give the External Information setting.
Enable integration settings for mobile roles
To quickly find settings on the Mobile Role Detail page:
-
Press the CTRL and F keys on your keyboard.
-
Enter the name of the setting in the Find field that opens.
-
Press the Enter key on your keyboard.
Your computer navigates you to the setting.
-
Repeat steps 2-3 to find other relevant settings.
You do not need to enable these settings for user roles that will not be using the Mobile Dashboard.
If users will be accessing the vx Maintain Mobile Dashboard, you will also need to enable some settings on the Mobile Role Detail page for their role.
To enable integration settings for a role that will be using the Mobile Dashboard:
-
Sign in to vx Maintain.
-
Select Roles from the Verisae in the toolbar at the top of the page.
The Roles page opens.
-
Select the role you want to edit from the Roles table.
The Role Detail page opens.
-
Click Mobile Role Detail link in the Roles menu.
-
Scroll to the Site Information Resources table.
-
Select the View check box for the Site Information> Site List > Assets > External Information setting.
-
Select the View check box for the Site Information> Site List > External Information setting.
-
Click Save in the lower-right corner of the page.
The Roles page opens. Your changes are saved..
-
Repeat steps 3 - 8 for any additional roles.
Data hierarchy
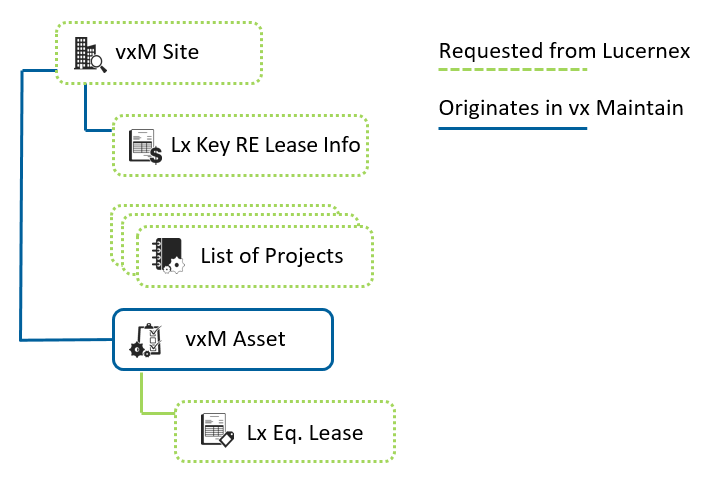
A Site is the highest level entity in vx Maintain. A site is the physical location, building, address, or campus. In this integration, sites in vx Maintain have a 1-1 ratio with locations created in Lucernex. Lucernex is the single source of truth for site data. A site is often broken down into smaller subcategories. Each site can have one or more floor levels, and each floor level can have one or more departments or spaces.
A Department can be used to break down a site into more manageable sections. Departments are often used to categorize sites into subsections that have a common functional theme. A common example of how the department function is used in vx Maintain is the departments of a grocery store. For example, you could break a grocery store into dairy, produce, meat, and bakery departments. You also have the option of associating one or more spaces with a department.
A Space is another method of breaking down a site. Spaces have physical boundaries that relate to the floor plan of the site. For example, a space in a hotel could be a hotel room or conference room. vx Maintain also allows users to create basic schedules related to spaces. Most clients will create one space in vx Maintain per floor plan space. When creating a space, you have the option of associating the space with a department.
You can also associate equipment with a site. Equipment can be broken down into four levels of categorization: category, sub category, asset type, and asset. An example of how this categorization could be applied is as follows:
-
Category : HVAC
-
Sub Category: Furnaces
-
Asset Type: 10-ton air handling unit
-
Asset : model # FN0032771
In this integration, vx Maintain is considered the single source of truth for asset data.
The image below displays the vx Maintain-half of the data hierarchy in the Lucernex / vx Maintain integration. Location, lease, project, and equipment lease data are requested by vx Maintain from Lucernex, and asset data originates in vx Maintain. For the full diagram, see the Overview section above.
Integration-specific procedures
This section contains procedures that are specific to the integration in the vx Maintain application.
Create assets / equipment in vx Maintain
To create assets / equipment in vx Maintain:
-
Sign in to vx Maintain.
-
Select Sites from the Sites field in the toolbar at the top of the page.
The Site List page opens.
-
Select the appropriate site from the Site List table.
The Site Equipment page opens.
-
Click New at the bottom-left corner of the Site Equipment table.
The Equipment Detail page opens.
-
Click Search button to the right of the Equipment Type field.
The Equipment Type window opens.
-
Select the equipment type from the Equipment Type table.
The selected equipment type row will have an orange background color.
-
Click Select.
The window closes. The equipment type appears as selected in the Equipment Type field.
-
Enter the model name of the equipment in the Model field.
-
Select the floor where the equipment is located from the Floor Level field.
-
Click Search button to the right of the Department field.
The Department window opens.
-
Select the department from the Department table.
The selected department row will have an orange background color.
To learn more about departments, see the Data hierarchy section above.
-
Click Select.
The window closes. The department appears as selected in the Department field.
-
Enter any details about the location in Location Details.
-
Enter the Verisae tag number in Verisae Tag Number.
Verisae Tag Number is used to notate the bar code number associated with the asset. This code can be provided by the Verisae team, or it can be generated using your own bar code system.
-
Enter the serial number of the equipment in Serial #.
-
Click Search button to the right of Supplier.
The Supplier window opens.
-
Select the supplier from the Supplier table.
The selected supplier row will have an orange background color.
-
Click Select.
The window closes. The supplier appears as selected in Supplier.
-
Select the condition of the equipment from Asset Condition.
Example conditions include Like New, Used, and Needs Replacement.
-
Enter any comments about the equipment in Comment.
-
Select the status of the equipment from Status.
The value of Status is configurable with internally-defined status values. Examples include in-service, sold, scrapped, or in storage.
-
Select the operational status of the equipment from Operational Status.
The value of Operational Status corresponds with whether the asset is functional or non-functional.
-
Click Search button to the right of Parent.
The Equipment window opens.
-
Select the parent equipment from the Equipment table.
The selected equipment row will have an orange background color.
Assets can be split into sub-assets for the purposes of allocating repairs and replacements. For example, the parent asset could be an HVAC unit, while its child asset could be a compressor or condenser coil.
-
Click Select.
The window closes. The equipment appears as selected in Parent.
-
Click Save.
The system returns you to the Site Equipment page. The equipment you created appears in the Site Equipment table.
Once the user requests equipment information in Lucernex, Lucernex will call Mulesoft. Mulesoft will then call vx Maintain for equipment information. vx Maintain will deliver the equipment information to Mulesoft, which is then delivered to the user in Lucernex.
View site lease and capital project information from the Site List
To view lease and capital project information from the Site List page:
-
Sign in to vx Maintain.
-
Select Sites from the Sites field in the toolbar at the top of the page.
The Site List page opens.
-
Select the appropriate site from Site List.
The Site Equipment page opens. New options appear in the Sites menu.
-
Click External Information in the Sites menu.
The External Information page opens.
-
Select one of two options from the field:
-
Show Project Information
-
Show Lease Information
-
-
Select Submit.
-
If you selected Show Project Information, a list of capital projects appears on the page. The name of each project is hyperlinked. Clicking the hyperlink will open the project in Lucernex.
-
If you selected Show Lease Information, a list of contracts and equipment contracts appears on the page. The contract names and responsibility categories are hyperlinked. Clicking the hyperlinks will open the contract, equipment contract, or responsibility in Lucernex.
-
View responsibility information from the Create Work Order page
To view site responsibility information in vx Maintain from the Create Work Order page of the Mobile Dashboard:
-
Sign in to vx Maintain.
-
Open your Dashboard.
You can access your Dashboard by clicking the menu to the left of the Accruent logo in the upper-left corner of the page.
After clicking the Menu button, a link to the Dashboard appears.
-
Click Create Work tile.
The Create Work Order page opens.
-
Select the site from the Site field.
vx Maintain loads a new section labeled External Information. This section contains an expanding section labeled Lease Information.
-
Click Expand button
 to the left of the Lease Information section.
 One or more additional expanding sections will appear in the External Information section. These expanding sections have the label General, and they contain information related to contracts and equipment contracts on the site.
-
Expand the General expanding sections in the Lease Information section.
The General sections open and contain basic information about the associated contracts.
-
The name of the contract or equipment contract is hyperlinked. This hyperlink will take you to the contract or equipment contract in Lucernex.
-
In each General section there is a Responsibilities section. This section lists the responsibilities associated with the contract or equipment contract.
-
-
Expand the Responsibilities expanding section to view the lease responsibilities.
-
To view a responsibility on a contract or equipment contract in Lucernex, click the hyperlinked responsibility name in the Category column.
Lucernex opens to the responsibility in a new tab.