Schedules - Common Page
These are generic procedures that are common across all or multiple areas of Lucernex. As such, these procedures do not call out specific navigation to the page.
The Schedules sub-module allows you to track and manage schedule tasks for your entity. Your administrator may create schedule templates for you to use, or you might create schedules on an ad hoc basis. If you are consistently creating the same tasks, it would be better to have your administrator create a template. Templates also allow for simpler reporting.
On the Schedule page of the Program module you can switch between the program schedule and a list of the schedules for capital projects in the program. See the Programs Only: Project Rollup page section below for more information.
To navigate to the Schedules page of an entity:
-
Navigate to Entity > Details > Schedule.
Use the links in the Navigation Pane on the leftmost side of the page.
Schedules are available in almost every Lucernex module as a third-level tab under the Details sub-tab.
-
Follow a procedure below.
 Programs Only: Project Rollup page
Use the Program module to group and manage capital projects. You can view your schedules and budgets from a high-level for:HVAC upgradesStore refreshesSignage updatesParking lot re-stripes You can switch between the program schedule and a list of the schedules for capital projects in the program.
To view capital project schedules:
-
Select Project Rollup from the field to the left of the Actions menu on the right side of the page.
The Project Rollup page opens.
-
Expand the appropriate region, sub region, and market in the Name column of the list view.
A list of capital projects appears.
Formatting of Schedule Tasks
The formatting of a schedule task indicates information about the scheduled task's status.
Color
-
Green: Forecast/actual is before baseline
-
Blue: Forecast/actual is the same as baseline
-
Red: Forecast/actual is after the baseline
Styling
-
Bold: Task status is Complete
-
Italics: Task status is Not Begun
Create Empty Schedule
If an appropriate schedule template is not available, you can choose to create a schedule on an ad hoc basis.
If you are consistently creating the same tasks, it would be better to create a template. Templates also allow for simpler reporting. To apply an existing schedule template to a schedule, follow the Apply Template procedures below.
To create an empty schedule:
-
Navigate to Entity > Details > Schedule.
Use the links in the Navigation Pane on the leftmost side of the page.
Schedules are available in almost every Lucernex module as a third-level tab under the Details sub-tab.
A message that reads No Schedule Information Found appears on the page.
-
Click Create Empty Schedule.
A new schedule is created. The schedule has one root group and one task. To populate and configure your schedule, see the Task Menu and Edit Task procedures.
Schedule Toolbar
The Schedule Toolbar contains several buttons that trigger actions you can take in both the Spreadsheet and Gantt view of your schedule. This toolbar appears below the third-level tabs on the Schedule page.
The following table describes each in the Schedule Toolbar and its function.
|
Button |
Description |
|---|---|

|
Previous Timespan: Jumps back in time in the schedule. |

|
Next Timespan: Jumps forward in time in the schedule. |

|
Collapse All: Collapses all groups in the schedule. |

|
Expand All: Expands all groups in the schedule. |

|
Zoom Out: Zooms out to see less detail in the Gantt chart view. |

|
Zoom In: Zooms in closer to see more detail in the Gantt chart view. |

|
Zoom to Fit: Zooms so you can easily see the months and weeks in the Gantt chart view. |

|
Highlight Critical Path: Highlights tasks that have relationships with no slack time. |

|
Save Changes: Saves changes made to the schedule. |
Milestones
Milestones give you a high-level view of project schedule tasks or items that move project status forward. A milestone has a one-to-one ratio with the schedule task that triggers it, and it will not appear in a schedule if the task is associated with is not in the schedule template.
A milestone appears in your schedule with a blue diamond icon  . Milestones cannot be edited, but when the milestone's precursor task is completed, the milestone will also be marked as complete.
To learn how to configure milestones, see the Manage Milestone Timeline page.
Toggle Baseline Task Bars
Using the Toggle Baseline Task Bars tool you can visually compare the difference between your baseline dates and forecast dates. Your Baseline Dates are the assumed dates of the task based on the date selected when the schedule was applied to the entity. Baseline dates are also impacted by the configuration of your schedule template, including lead / lag days and task durations. Your Forecast Dates are the actual dates the schedule tasks took place.
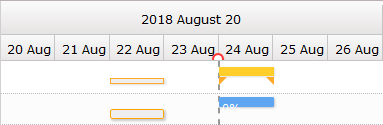
When the Toggle Baseline Task Bars tool is enabled, your baseline dates appear as a white bar with an orange border, while your forecast dates appear as colored bars. If your baseline and forecast dates are the same, the forecast date bar will appear above the baseline date bar. If your forecast date occurs after the baseline date, the two bars will still appear in the same row, but they will fall in different places on the schedule.
To enable the Toggle Baseline Task Bars tool, click Toggle Baseline Task Bars in the upper-right corner of the Schedule pane.
Your baseline dates appear on the schedule as a white bar with a orange border. Your forecast dates appear as colored bars on the schedule.
In the screen shot below, the actual (forecast) dates occurred two days after the baseline dates. The baseline dates appear as a white bar on the left, while the actual (forecast) dates appear as colored bars on the right.
Task Menu
The Task menu allows you to quickly perform several task actions.
Task Information
To open the Task Information window:
-
Right-click the task whose information you want to view.
The Task menu opens.
-
Select Task Information.
The Task Information window opens.
-
See the Edit Task procedures below for more information about the actions you can take in this window.
Delete task(s)
You will not be able to recover a task once it has been deleted.
To delete a task from your schedule:
-
Right-click the task you want to delete.
-
Select Delete task(s).
The task is deleted.
Add
The Add option in the Task menu gives you several possible actions to take.
To use the Add option:
-
Right-click the task you want to work with.
-
Select one of the following options:
-
Task Above: A new task appears above the selected task.
-
Task Below: A new task appears below the selected task.
-
Sub-Task: The selected task becomes a sub-group, and a new task is added to the new sub-group.
-
Successor: A new successor task is added below the selected task. You can view the task relationship by double-clicking either task and selecting either the Predecessors or Successors tab.
-
Predecessor: A new predecessor task is added above the selected task. You can view the task relationship by double-clicking either task and selecting either the Predecessors or Successors tab.
-
-
Follow the Edit Task procedures to configure the new task.
Delete dependency
These procedures can be performed for both predecessor or successor tasks.
To delete the dependency between two tasks:
-
Right-click the task whose dependency you want to delete.
-
Select Delete dependency.
The dependency is deleted.
Edit Task
The Editing Task window allows you to enter a wide range of data about a task. The expanding sections below will explain the actions you can take in this window.
To edit a task:
-
Double-click the task.
A window opens with several tabs for editing the task.
-
Follow a procedure below.
-
Click Save
.
General Tab
To make changes to dates or the status of a task:
-
Follow the Edit Task procedures above.
-
Select the General tab.
-
Make changes to any of the following fields:
-
Status: Select from one of the following options in the Status field:
-
Canceled: The task is marked as Canceled. The Forecast / Actual Start and Forecast / Actual End dates update, and the Forecast / Actual Duration changes to 0 days.
If the task is in a chain with dependent successors, you must cancel those tasks before you can cancel this task.
-
Completed: The task is marked as Completed. The Percent Complete changes to 100% and the Forecast/Actual End date field changes to today's date.
If you manually change the value of the Percent Complete to 100%, the step Status automatically changes to Completed.
-
In-process: The task is marked as In-process. The Forecast / Actual Start and Forecast / Actual End dates update, and the Percent Complete changes to 99% by default. You can change the value in the Percent Complete to whatever value is appropriate.
If you manually change the value of the Percent Complete to less than 100%, the step Status automatically changes to In-Process.
-
Not begun: The task is marked as Not begun. The Percent Complete changes to 0%.
If you manually change the value of the Percent Complete to 0%, the step Status automatically changes to Not Begun.
-
-
Percent Complete: Enter the percentage level of completion for this task.
-
If you enter 0%, the task status will change to Not begun.
-
If you enter 1% - 99%, the task status will change to In-process.
-
If you enter 100%, the task status will change to Completed.
-
-
Forecast / Actual Duration: Enter the number of days this task is predicted to take.
Entering a value in this field automatically changes the value in the Forecast / Actual End date field.
Keep the following information in mind about duration:
-
Duration refers to working days only.
-
A Duration of 1 day means that the task ends on the same day that it was started.
-
Tasks cannot have a duration of 0.
-
-
End Weekday: If the task should end on a particular weekday, select the weekday from this field.
If you use this field, the Forecast / Actual End date field will not be editable. The system will automatically calculate the value for the Forecast / Actual End date using the Forecast / Actual Start and End Weekday.
-
Baseline Start: This field automatically populates with the assumed begin date of the task based on the date selected when the schedule was applied to the entity. Baseline dates are also impacted by the configuration of your schedule template, including lead / lag days and task durations.
-
Baseline End: This field automatically populates with the assumed end date of the task based on the date selected when the schedule was applied to the entity. Baseline dates are also impacted by the configuration of your schedule template, including lead / lag days and task durations.
-
Projected Start: Enter the start date you are aiming for in this field.
You can think of your projected dates as your goal dates.
-
Projected End: Enter the end date you are aiming for in this field.
You can think of your projected dates as your goal dates.
-
Forecast / Actual Start: Enter the actual start date in this field.
-
Forecast / Actual End: Enter the actual end date in this field.
If you selected a value from the End Weekday field, this field will not be editable.
-
-
Click OK.
The window closes. Your changes are saved.
Predecessors Tab
For many end users, this tab will serve simply to provide information about task predecessors. However, it can be used to add or remove predecessors.
If you have a predecessor on a task and you do not complete the predecessor by the forecast / actual end date, the forecast / actual start date of the successor task will automatically increment until the predecessor is completed. Any lag time between the end date of one task and the start date of another task will be used prior to incrementing.
Once a template has been applied, only forecast / actual dates will auto-adjust. Baseline and projected dates must be manually adjusted.
Add a Predecessor to a Task
To add a predecessor to a task:
-
Follow the Edit Task procedures above.
-
Select the Predecessors tab.
-
Click Add New in the upper-left corner of the Predecessors table.
A new row appears in the grid.
-
Select the predecessor task name from the Task Name field.
-
Select the relationship type from Type.
The relationship types are:
-
Start-to-Start: The start date of the successor task is dependent upon the start date of the predecessor task.
For example, if two tasks had a start-to-start relationship and a lag time of 2 days, the predecessor's start date would be 2 days before the successor's scheduled start date.
-
Finish-to-Start: The start date of the successor task is dependent upon the finish date of the predecessor task.
For example, if two tasks had a finish-to-start relationship and a lag time of 2 days, the predecessor's finish date would be 2 days before the successor's scheduled start date.
-
Finish-to-Finish: The finish date of the successor task is dependent upon the finish date of the predecessor task.
For example, if two tasks had a finish-to-finish relationship and a lag time of 2 days, the predecessor's finish date would be 2 days before the successor's scheduled finish date.
-
-
Enter the number of lead / lag days between the two tasks in the Lead / Lag Days field.
Lead time is an overlap between two tasks that are linked by a dependency. For example, if a task can start when its predecessor is not finished, you can specify a lead time in terms of days for the successor task.
Lag time is a delay between two tasks that are linked by a dependency. Adding lag time—also known as float or a buffer—is a way to add time to a task, and specifies that the successor task cannot begin until that number of days after predecessor completion. It can then be adjusted by the user to remove the slack when the schedule needs to be crashed.
-
Click outside of the predecessor row.
-
Repeat steps 3 - 7 to add another predecessor.
-
Click OK.
The window closes. Your changes are saved.
Remove a Predecessor from a Task
To remove a predecessor from a task:
-
Follow the Edit Task procedures above.
-
Select the Predecessors tab.
-
Select the predecessor you want to remove.
-
Click Remove in the upper-left corner of the Predecessors table.
The predecessor is removed.
Successors Tab
For many end users, this tab will serve simply to provide information about task successors. However, it can be used to add or remove successors.
Add a Successor to a Task
To add a successor to a task:
-
Follow the Edit Task procedures above.
-
Select the Successors tab.
-
Click Add New in the upper-left corner of the Predecessors table.
A new row appears in the grid.
-
Select the successor task name from the Task Name field.
-
Select the relationship type from the Type field.
The relationship types are:
-
Start-to-Start: The start date of the successor task is dependent upon the start date of the predecessor task.
For example, if two tasks had a start-to-start relationship and a lag time of 2 days, the predecessor's start date would be 2 days before the successor's scheduled start date.
-
Finish-to-Start: The start date of the successor task is dependent upon the finish date of the predecessor task.
For example, if two tasks had a finish-to-start relationship and a lag time of 2 days, the predecessor's finish date would be 2 days before the successor's scheduled start date.
-
Finish-to-Finish: The finish date of the successor task is dependent upon the finish date of the predecessor task.
For example, if two tasks had a finish-to-finish relationship and a lag time of 2 days, the predecessor's finish date would be 2 days before the successor's scheduled finish date.
-
-
Enter the number of lead / lag days between the two tasks in the Lead / Lag Days field.
Lead time is an overlap between two tasks that are linked by a dependency. For example, if a task can start when its predecessor is not finished, you can specify a lead time in terms of days for the successor task.
Lag time is a delay between two tasks that are linked by a dependency. Adding lag time—also known as float or a buffer—is a way to add time to a task, and specifies that the successor task cannot begin until that number of days after predecessor completion. It can then be adjusted by the user to remove the slack when the schedule needs to be crashed.
-
Click outside of the successor row.
-
Repeat steps 3 - 7 to add another successor.
-
Click OK.
The window closes.Your changes are saved.
Remove a Successor from a Task
To remove a successor from a task:
-
Follow the Edit Task procedures above.
-
Select the Successors tab.
-
Select the successor you want to remove.
-
Click Remove in the upper-left corner of the Successors table.
The successor is removed.
Assignees Tab
For many end users, this tab will serve simply to provide information about task assignees. However, it can be used to add or remove assignees.
Add an Assignee
To add an assignee to a task:
-
Follow the Edit Task procedures above.
-
Select the Assignees tab.
-
Click Add New in the upper-left corner of the Assignees table.
A new row appears in the grid. The row is a field.
-
Select the appropriate assignee from the Assignee Name field.
-
Repeat steps 3 - 4 to add additional assignees.
-
Click OK.
The window closes. Your changes are saved.
Remove an Assignee
To remove an assignee from a task:
-
Follow the Edit Task procedures above.
-
Select the Assignees tab.
-
Select the assignee you want to remove.
-
Click Remove in the upper-left corner of the Assignees table.
The assignee is removed.
Comments Tab
To add comments to a task:
-
Follow the Edit Task procedures above.
-
Select the Comments tab.
-
Enter your comments in the field.
You can use the buttons in the toolbar below the tabs to format your comment text.
-
Click OK.
The window closes. Your changes are saved.
Documents Tab
The Documents tab is where you manage the documents associated with a schedule task.
Add a Document to a Task
To add documents to a task:
-
Follow the Edit Task procedures above.
-
Select the Documents tab.
-
Click Add in the lower-right corner of the Document table.
A field appears.
-
Click the field.
The Documents window opens.
-
Attach a document:
-
Click Add Document.
-
In the Documents window, select a document:
-
Select an existing document:
-
Use the folder tree to navigate to the folder where the document is saved, then select the document.
-
Click Select Document.
-
-
-
-
Click Save Documents.
The window refreshes. The documents are saved to the task.
Download a Document from a Task
To download a document from a task:
-
Follow the Edit Task procedures above.
-
Select the Documents tab.
-
Click Download
 next to the document you want to download.
A download dialog box opens, asking if you want to open or save the file.
-
Choose whether you want to open or save the file.
Remove a Document from a Task
To remove a document from a task:
-
Follow the Edit Task procedures above.
-
Select the Documents tab.
The documents attached to your task appear in the Document table.
-
Click Delete
 next to the document you want to remove.
A dialog opens, asking you to confirm your choice.
-
Select Yes.
The document is removed from the Document table.
-
Click Save Documents.
The window refreshes. Your changes are saved.
Notifications Tab
For many end users, this tab will serve simply to provide information about task notifications. However, it can be used to add, edit, or remove notifications. You can add multiple notifications to the same task. Notification emails do not go out immediately - they will be sent out the night they are scheduled.
If you enter 0 in the Notification Days field, the notification will be sent out the same day that the alert conditions are met.
Add a Notification
To add a notification:
-
Follow the Edit Task procedures above.
-
Select the Notifications tab.
The notifications associated with the task appear in the Notifications table.
-
Click < < Add Notify > > link at the bottom-right corner of the Notifications table.
A window opens.
-
Enter a name for the notification in the Notification Name field.
-
Select the type of alert from the Alert Type field.
The alert type options are:
-
Before Task Complete Notification: Select this alert type if you would like to send a notification X days before the forecast actual completion date.
-
After Task Complete Notification: Select this alert type if you would like to send a notification X days after the forecast actual completion date.
-
Projected End Date Change Notification
-
-
Enter the number of days before or after the task completion date a notification should be sent in the Notification Days field.
Notification days should be entered as a positive number.
This field is used specifically for the Before Task Complete Notification and After Task Complete Notification alert types.
If you are using the Projected End Date Change Notification or Forecast End Date Change Notification alert types, enter a 0 in the Notification Days field.
-
Select or clear the following check boxes:
-
Send email to Notification Members: Select this check box if you would like the notification to be sent as an email.
-
Send alert to Notification Members: Select this check box if you would like the notification to be sent as a Dashboard alert.
-
-
Select the recipient name from the Project Members field.
Press and hold CTRL on your keyboard to select multiple values.
-
Click > > to move values from the Project Members to the Notification Members field.
To remove selections from the Notification Members field, select the recipient name from the Project Members and click < <.
-
Enter the notification message in the Notification Message field.
-
Select Update.
The window closes. The notification appears in the Notifications table.
-
Repeat steps 3 - 11 to add another notification.
-
Click OK.
The window closes.
-
Click Save Notifications below the Notifications table.
Your changes are saved.
Edit a Notification
To edit a notification:
-
Follow the Edit Task procedures above.
-
Select the Notifications tab.
The notifications associated with the task appear in the Notifications table.
-
Click Edit.
The link appears next to the notification you want to edit.
A window opens.
-
Make your changes.
-
Select Update.
The window closes.
-
Click Save Notifications below the Notifications table.
Your changes are saved.
Remove a Notification
To remove a notification:
-
Follow the Edit Task procedures above.
-
Select the Notifications tab.
The notifications associated with the task appear in the Notifications table.
-
Click Delete.
The link appears next to the notification you want to delete.
A dialog opens, asking you to confirm your choice.
-
Select Yes.
The notification is deleted. It no longer appears in the Notifications table.
Complete Task
To complete a task:
-
Double-click the step.
A window opens with several tabs for editing the step.
-
Select Completed from the Status on the General tab.
Once Completed is selected, the Percent Complete changes to 100% and the Forecast/Actual End date field changes to today's date.
-
Click OK.
The window closes. The status of the task changes to Completed.
Toggle Between Spreadsheet and Gantt View
There are two ways to view a schedule in Lucernex: Spreadsheet view and Gantt view. By default, your schedule will open in Gantt view. Gantt view has two parts: a Spreadsheet pane on the left and a Gantt Chart pane on the right. The size of the panes is adjustable. Spreadsheet view displays only the contents of the Spreadsheet pane.
Toggle Spreadsheet View
To toggle Spreadsheet view, click Spreadsheet.
This displays in the Actions menu on the right side of the page.The schedule changes to Spreadsheet view.
Toggle Gantt View
To toggle Gantt view, click Gantt.
This displays in the Actions menu on the right side of the page.The schedule changes to Gantt view. The schedule now has a Spreadsheet pane on the left, and a Gantt Chart pane on the right.
Crash Schedule
Crashing a schedule means to adjust the dates in your schedule en masse to accommodate scenarios where your team may be working on holidays or on weekends. This might happen if your project is behind schedule. When you no longer need to work weekends or holidays, you can use the same procedures to un-crash the schedule.
If you are going to work holidays, you must have a holiday calendar loaded into the system.
Your administrator has the ability to apply a default holiday calendar and enable the Work Weekends setting at the Firm-level and the Portfolio-level. However, the system will honor the default schedule information in this order: Schedule tab on the entity, Portfolio Summary page, Manage Company page.
To crash or un-crash your schedule:
-
Click Crash Schedule.
This displays in the Actions menu on the right side of the page.The Crash Schedule window opens.
-
If you are going to be working holidays, select the appropriate holiday calendar from the Use Calendar field.
-
Select or clear the following check boxes:
-
Work Holidays
-
Work Weekends
-
Auto adjust Forecast dates for current day: Clear if Forecast End Date should not slip when a task is completed late.
-
-
Select Update.
The window closes. Your schedule is updated.
Apply Template
You can apply multiple templates to a schedule. If a single template is applied more than once to the same entity, tasks that have a status of In Progress, Complete, or Canceled will not be altered.
Tasks and groups will be displayed in chronological order and are not grouped by template.
Keep the following important information in mind when applying a template:
-
If two tasks from different templates have the same name, they will be treated as the same task.
-
If you re-apply a template that contains a task you deleted, that task will be re-added to your schedule.
-
If there is a predecessor-successor relationship between tasks in two separate templates, the template with the predecessor task must be applied first.
To apply a schedule template:
-
Click Apply Template.
This displays in the Actions menu on the right side of the page.The Apply Schedule Template window opens. If someone has applied a template to this entity in the past, the window will display information about which template was applied, when it was applied, and who it was applied by.
-
Select the schedule template you want to apply from the Schedule Template field.
-
Do one of the following:
-
If you want to apply the template according to a start date:
-
Select Start On.
-
Enter the start date of the schedule in Start On.
Select Calendar
 to open the date picker.
-
-
If you want to apply the template according to an end date:
-
Select Finish On.
-
Enter the end date of the schedule in Finish On.
Select Calendar
to open the date picker.
-
-
-
Click Append Schedule Template.
The window closes. The schedule template is applied.
Import / Export MS Project
Delete Schedule
To delete a schedule:
-
Click Delete Schedule.
This displays in the Actions menu on the right side of the page.A dialog opens, asking you to confirm your choice.
-
Select Yes.
The schedule is deleted. It no longer appears on the Schedule page.
Full Screen
To view the schedule in full screen:
-
Click Full Screen.
This displays in the Actions menu on the right side of the page.The schedule opens in full screen.
-
Click your browser Back to return to the Schedules page.