About the TMS Report Designer Interface
In this topic, we'll discuss the interface for the TMS Report Designer. The interface in the TMS Report Designer is based on a "ribbon" design, similar to that which you will find in a current version of Microsoft Office. Note that the C1 button (seen below) is the same as the File menu you might see in another Windows application.

Design Group

From left to right:
-
-
Preview - Allows you to preview how your report will look.
-
Paste, Cut, Copy, and Delete - Allow you to copy/cut and paste objects, or just delete them.
-
Undo and Redo - Allow you to undo actions and redo an action for which you selected Undo.
-
-
Font Buttons
-
Font and Size drop-down menus - Allow you to select a text font and a specific size.
You can also increase or decrease the font size incrementally by clicking the large A and small A buttons next to the Size drop-down menu.
-
Bold, Italic, and Underline - Allows you to change the type format.
-
Right Align, Center, Left Align, and Justified - Allow you to set the orientation of the text.
-
Font Color and Background Color drop-down menus - Allow you to set the color of the font or the color of the font/cell's background.
-
-
Data Buttons
-
Sorting and grouping - Opens the Sorting and Grouping window, where you can choose fields to sort by or group, and how to treat the sorted or grouped data.
-
Data Source - Allows you to view the current data source or select a new data source.
-
Report Info - Opens the Report Information window, where you can specify general information about the report, such as Title and Author.
-

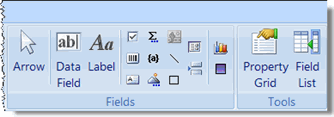
From left to right:
-
Fields Buttons
-
Arrow - Changes the mouse cursor to the arrow for selecting objects.
-
Data Field - Allows you to add a new data field.
-
Element buttons - Allow you to add elements to your report, such as a check box, calculated field, or page break.
-
Add Chart Field (top) and Add Gradient Field (bottom) - Allow you to add a chart or a gradient field to the report.
-
-
Tools Buttons
-
Property Grid - Switches the tab in the pane on the left side of the screen to the Properties tab, where you can view all of the properties for a selected element.
-
Field List - Switches the tab in the pane on the left side of the screen to the Fields tab, where you can view a list of the fields used on a selected Sub Report from the Reports tab.
-

Arrange Group
From left to right:
-
Edit Buttons - These buttons are the same as those described in the Design Group list above.
-
AutoFormat Buttons
-
Styles - Opens the Report Style Editor window, where you can select pre-defined styles from the library or create new styles.
-
Apply Style - Allows you to apply the selected style to a selected area on the report.
-
As Table Row - Allows you to format a selected area on the report as a table row.
-
-
Grid Buttons
-
Snap to Grid - Snaps elements to a point on the grid when you drag and drop them.
-
Show Grid - Allows you to show or hide the grid lines in the editor.
-
Grid Properties - Opens the Properties window, where you can set the behavior and look of items related to the grid.
-
-
Control Alignment buttons - Allow you to set the alignment for the selected control.

From left to right:
-
Position Buttons
-
Bring to Front - Allows you to bring the selected object to the front of another object.
-
Send to Back - Allows you to send the selected object behind other objects.
-
Horizontal and Vertical buttons - Allow you to set the horizontal and vertical spacing of the selected object.
-
-
Page Setup

From left to right:
-
Edit Buttons - These buttons are the same as those described in the Design Group list above.
-
Page Layout Buttons
-
Portrait - Allows you to specify that the report should print in a Portrait format.
This is the default setting for the page orientation.
-
Landscape - Allows you to specify that the report should print in a Landscape format.
-
Page Setup - Opens the Page Setup window, where you can specify the Paper Size and Source, as well as the orientation and margins.
-
Now that we've described the interface and buttons, you're ready to create your report in the TMS Report Designer.
