Time & Materials
Time & Materials contracts are used to support service arrangements where bulk payments are used to cover service costs at predefined sites and service categories. Follow the directions below to setup a new Time & Materials contract.
- To start, choose Time & Materials Contract from the Contract Types menu. This is located in Service Providers > (Select the relevant service provider) > Contracts > Time & Materials Contracts.
- Select the "New" button to create a new contract.
- Complete all required fields in the Contract Detail section, then select "Save."
- Add Sites to the Contract under the Sites Covered in Contract tab.
- Define the standard charges to be applied to invoices covered under this contract by using the Contract Charges tab.
- Choose the categories and subcategories that will be included in your comprehensive contract by using the Categories Covered in Contract tab.
Contract Detail
After a contract type has been selected, users must complete and save the contract detail section. Once the contract has been saved, additional tabs will appear for users to add additional information about the contract.
Contract Detail Fields and Descriptions
| Field | Type | Description |
| Client | Chooser | Allows the user to choose the client for this contract, and, typically, there will be only one client available, to which the active user belongs |
| Organization for Contract | Chooser | Allows the user to select an optional Organization for the contract from a chooser |
| Rate Only | drop-down selector |
Required drop-down selector menu with the options of Yes or No. If No is selected, the following fields appear and become available at the bottom of the page: Contract Start Date, Contract End Date, and Auto-Renew Contract. |
| Contract Reference # | Free text | Used to capture the reference number that may be used to identify the contract. This value will appear on invoices covered under the contract. |
| Contract Description | Free text | Free text field that may be used to describe the terms of the contract |
| Rate Schedules | drop-down selector | Required drop-down selector menu with various options of pre-defined schedules. Use the "View" button to view the selected schedule in a pop-up. Select the "Close" button to return to the form. |
|
Included |
Free text | Field to define services that are included in the contract. This field will appear at the top of an invoice, if the service is covered by the contract. |
| NOT Included | Free text | Field to define services that are excluded from the contract. This field will appear at the top of an invoice, if the service is covered by the contract. |
| Currency | drop-down selector | Field to define the currency of the contract. This field will only appear if service providers are allowed to invoice in foreign currency. |
| Permission to Work Required | drop-down selector |
The choices for this field are Yes or No.
|
| Contract Start Date | Date chooser | Use the calendar chooser to enter the contract start date |
| Contract End Date | Date chooser | Use the calendar chooser to enter the contract end date; once a contract is past the end date, it will automatically be set to a status of inactive |
| Auto-Renew Contract | drop-down selector |
The choices for this field are Yes or No.
|
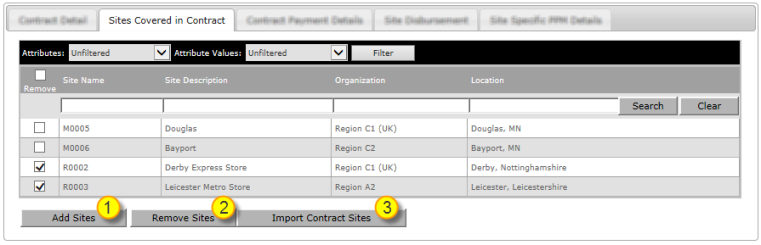
The Sites Covered in Contract tab
To add sites to a contract, click on the Sites Covered in Contract tab on the Contract Detail screen.
Sites can be added by selecting the "Add Sites" button (#1 in the screenshot below), which generates the Select Sites pop-up for users to choose which sites to include in the contract.
To remove sites from a contract, tick the boxes that appear on the left-hand side of the page. Once a box has been selected, the "Remove Sites" button (#2) will become available at the bottom of the screen. There is also an uploader that is available by selecting the "Import Contract Sites" button (#3). This will allow users to upload sites from a .csv file, instead of manually adding sites.
Contract Charges
The Contract Charges tab is used for defining the standard charges that will be applied to invoices covered under the contract. Once a contract has been set up using Contract Charges, the labor rates, trip charges, and travel charges will automatically appear on the invoice and cannot be edited. None of the fields that appear in Contract Charges are required fields. If contractual agreements with service providers do not have either call-out fees, travel charges, or labor rates, they can simply be excluded from Contract Charges.
Contract Charges functionality explained:
| Functionality | Description |
| Travel Charges |
The Travel Charges section is used to define the hourly charge and/or mileage charge that will appear on invoices covered under the contract. These rates will appear on the invoice and cannot be edited by the provider. The provider will be able to indicate miles traveled and/or hours spent on the invoice. |
| Contract Rates |
The Contract Rates section is used to define the Standard Rate, Standard Trip, Seasonal Rate, Seasonal Trip, Flat Rate and Flat Rate Threshold for the contract based on the rate schedule. |
The fields Flat Rate and Flat Rate Threshold appear on the Contract Charges tab for all rates (contract and custom).
|
Field |
Description |
|
Flat Rate |
Defines the charge that will appear on the invoice for all work completed unless the Flat Rate Threshold is exceeded on the invoice. The Flat Rate should never be smaller than the trip charge if defined |
|
Flat Rate Threshold |
Required field if a value is entered in the corresponding Flat Rate field. |
The Flat Rate and Flat Rate Threshold columns appear when the Use Flat Rate Threshold drop-down selector on the Client Profile is set to Yes.
Navigate to Admin > Client Configuration Attributes > Client Profile > EAM Contract Settings. On this page, under the Time and Materials Settings, a Use Flat Rate Threshold drop-down selector has been added.
When multiple rates apply, the Flat Rate and Flat Rate Threshold of the rate at which the provider starts work is applied on the invoice. If Job Complete occurs without start action, the Flat Rate and Flat Rate Threshold for the Rate Schedule in effect upon completing the work is applied on the invoice.
The Custom Rates section is used to create a customized rate if needed. You can specify the rate schedule (Holiday, Week Day, Weekend or Weekend OT) , Rate Charge, Trip Charge, Flat Rate and Flat Rate Threshold for the customized rate.
The Rate Builder table can be used to specify the different criteria that are considered when determining the custom rate.
Categories Covered in Contract
Use this page to define the categories, subcategories, and problem types covered under this contract.
-
Click Add categories.
-
Select the category (with appropriate corresponding subcategories and problem types) check box on the left for each category you want to add to the contract.
-
Click Save.
Remove categories by selecting them on the left and clicking Remove categories.
Fields on this page are editable. To make updates, enter category and/or SLA values and click Update SLAs.
For each category and subcategory included in the contract, the SLA values defined here supersede the SLA values defined in the Asset Category administration space (Sites > Organizations > (Select the HQ organization) > Admin > Asset Categories).