Comprehensive
Comprehensive PPM contracts are used to support service arrangements where bulk payments are used to cover costs for scheduled, auto-generated work orders. Follow the directions below to setup a new comprehensive PPM contract.
- To start, choose Comprehensive PPM Contract from the Contract Types menu. This is located at the following navigation: Service Providers tab > (Select the relevant service provider) > Contracts > PPM Contracts - Comprehensive.
- Select the "New" button to create a new contract.
- Complete all required fields in the Contract Detail section, then select "Save." (The Contract Detail tab requires that users complete a PPM Template before the contract can be saved.)
- Add Sites to the Contract under the Sites Covered in Contract tab.
- Choose the payment frequency for comprehensive payment work orders by using the Contract Payment Details tab.
- To disburse payments by site, complete the required fields in the Site Disbursement tab.
- Use the Site Specific PPM Details tab to manage the start dates, next run dates, and site-specific PPM preview periods.
Contract Detail
Now that a contract type has been selected, users must complete and save the Contract Detail section. Once the contract has been saved, additional tabs will appear for users to add additional information about the contract.
Contract Detail is the first tab that will appear when creating a new contract.
| Field | Type | Description |
| Client | Chooser | Allows the user to choose the client for this contract, and, typically, there will be only one client available, to which the active user belongs |
| Contract Reference # | Free text | Used to capture the reference number that may be used to identify the contract; this value will appear on invoices covered under the contract |
| PPM Name | Free text | Appears as the work order name in smart tables and must be unique per service provider |
| PPM Description | Free text | Free-text field that may be used to describe the terms of the contract |
| PPM Contract Detail | Drop-Down Selector |
Required Drop-Down Selector field with options of either Time & Materials or Comprehensive. This selection will determine whether or not comprehensive payment options (including site disbursement and contract payment) are available If Time & Materials is selected here, the PPM contract will become a Time & Materials PPM Contract, even if the user is setting the contract up as a CPPM Contract or Comprehensive PPM Contract. The contract would move to the Time & Materials PPM Contract table (Service Providers tab > (Select the provider) > Contracts > PPM Contracts - Time & Materials). |
| PPM Charges Unit | Drop-Down Selector |
This field will only be populated when Time & Materials is selected in the PPM Contract Detail section, and it includes the following options:
|
| Price Per ... (above) | Numeric, Price |
This field will become available when Time & Materials has been selected in the PPM Contract Detail section and the PPM Charges Unit is either Work Order or Asset This field controls the rate that will apply to the PPM Charges Unit (either asset or work order), and, on the invoice, this amount will be charged on the PPM Charges block on the invoice |
| Reference Time & Materials Contract | Drop-Down Selector |
The four options for this field are:
When No is selected, the contract will not reference an existing time and materials contract. When option 2, 3, or 4 is selected, an additional field will appear, called Referenced Time & Materials Contract. Users will then have an opportunity to choose a time and materials contract to reference. By selecting a contract to reference, the contract values (labor rate, trip charge, mileage, etc.) and/or schedule will be enforced on invoices covered by the comprehensive contract. |
| Referenced Time & Materials Contract | Chooser |
This field will only be visible if the user has chosen to reference a time & materials contract option in the Reference Time & Materials Contract field. Once visible, this field is a non-required field. The chooser for this field will list all the time & materials contracts defined for the given client. |
| PPM Template | Chooser |
Use the magnifying glass at the end of the field to select a pre-defined template (if no templates are defined, the user must firstly create a template). Once the PPM Template is selected, select the "View" button for a summary of template details. Note: PPM Templates are used to define the scope of work (asset categories, activities, etc.) and scheduling for PPM work orders. |
| Category | Read-only | Automatically populates once a PPM Template has been selected |
| Subcategory | Read-only | Automatically populates once a PPM Template has been selected |
| Asset Type | Read-only | Automatically populates once a PPM Template has been selected |
| Location | Read-only | Automatically populates once a PPM Template has been selected |
| PPM Type | Drop-Down Selector |
Required Drop-Down Selector field that offers a way to categorize PPMs and includes the following options:
|
| Compliance Category | Drop-Down Selector |
Client-defined value, which is set up at the following navigation: Sites tab > Organizations > (Select the HQ Org) > Admin > Compliance Categories |
| Document Required per Asset | Drop-Down Selector |
Options for this field are Yes or No.
|
| Scheduling Method | Read-only | Automatically populates once aPPM Template has been selected |
| PPM Preview Behavior | Drop-Down Selector |
The two options for this field are Count Forward and Count Backward
For example, if the next run date is February 1st, the scheduling method is count forward, and the PPM Preview Period is 5 days, the PPM will open to a status of PPM Preview on February 1st and then be released to the contractor five days later. If count backward is selected, the PPM will open to a status of PPM Preview five days before the next Run Date, and the work order will be released to the contractor on the next run date. |
| PPM Preview Option | Drop-Down Selector |
The two options for this field are Site Specific Preview Periods or Contract Preview Periods
|
| PPM Preview Period (days) | Numeric | The PPM Preview Period is the number of days a PPM will be available in a status of PPM Preview before it is released to the service provider. Work orders in a status of PPM Preview cannot be actioned by the service provider. For a list of work orders in a status of PPM Preview, navigate to: Service tab > Preview Work Orders. |
| SLA Options | Read-only | Automatically populates once a PPM Template has been selected |
| Fix SLA | Numeric |
Fix SLA (Service Level Agreement) is a required value that is used to define the number of days that it should take a service provider to complete the service. If work orders are not completed within the SLA, the work order will appear on the Action List The title of this field will change depending on whether Months or Days was selected on the PPM template. Additionally, this field will automatically populate based on the Fix SLA indicated on the PPM template. |
| Auto-Advance (days) | Numeric |
Optional field that allows the user to specify the number of days (with a maximum of three digits) before the PPM Work Order is advanced. The status in which the PPM will end up depends on the status in which it is in before it gets auto-advanced, as described below:
|
| Contract Start Date | Date chooser | Use the calendar chooser to enter the contract start date |
| Contract End Date | Date chooser | Use the calendar chooser to enter the contract end date; once a contract is past the end date, it will automatically be set to a status of inactive |
| Permission to Work Required | Drop-Down Selector |
The options for this field are Yes or No.
This field is configurable by client. It will only appear if the client uses vx Suite's Permission to Work functionality |
| Enforce Asset Indication | Drop-Down Selector |
The options for this field are Yes or No.
|
| Auto-Renew Contract | Drop-Down Selector |
The options for this field are Yes or No.
|
| Open To | Drop-Down Selector |
Defines in which status the PPM Work Order should be opened, with the following options: Pend. Accept, Pend Prov Notif, or Assigned |
| Account Code | Chooser |
Auto-populated field that shows the applied account code based on the detail in the PPM Template. This can be amended by selecting an alternative code using the magnifying glass at the end of this field. |
|
Default Accrual Amount |
Numeric, Price |
For accrual reporting, users can enter the default accrual amount for the PPM work order |
Sites Covered in Contract
To add sites to a contract, click on the Sites Covered in Contract tab on the Contract Detail screen.
Sites can be added by selecting the "Add Sites" button (#1 in the screenshot below), which generates the Select Sites pop-up for users to choose which sites to include in the contract.
To remove sites from a contract, tick the boxes that appear on the left-hand side of the page. Once a box has been selected, the "Remove Sites" button (#2) will become available at the bottom of the screen. There is also an uploader that is available by selecting the "Import Contract Sites" button (#3). This will allow users to upload sites from a .csv file, instead of manually adding sites.
| # | Functionality | Description |
| 1 | Add Sites | generates the Select Sites pop-up for users to choose which sites to include in the contract. |
| 2 | Remove Sites | generates the Select Sites pop-up for users to choose which sites to remove from the contract. |
| 3 | Import Contract Sites |
allow you to upload sites from a .csv file, instead of manually adding sites. |
Contract Payment Details
The Contract Payment Details tab is used for defining the details of periodic payments that will be distributed to service providers for comprehensive service agreements.
Contract Payment Details tab, functionality explained below:
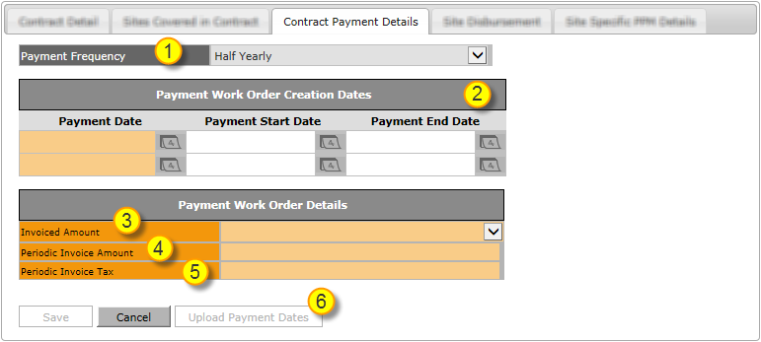
The following functionality in this tab may be located in the screenshot above by the corresponding number:
| # | Functionality | Description | |
| 1 |
Payment Frequency |
Specifies the frequency of the payments made against the contract. The following frequencies are available:
|
|
| 2 | Payment Work Order Creation Dates |
Lists the dates of invoice creation for the contracts in question. The number of required fields in this section will depend upon the selected Payment Frequency option, as explained above.
|
|
| 3 | Invoiced Amount |
Determines the amount that is distributed in comprehensive payments, with the following options:
|
|
| 4 | Periodic Invoice Amount | Defines the amount that will be paid on comprehensive payment invoices | |
| 5 | Periodic Invoice Tax | Defines the amount of tax that will be paid on comprehensive payment invoices | |
| 6 | Upload Payment Dates |
For users that have many dates to upload (e.g., when monthly payments have been setup), a .csv uploader pop-up is available to upload payment dates after selecting this button NOTE: The required fields for the uploader are Payment Date, Payment Start Date, and Payment End Date. |
Site Disbursement
The Site Disbursement tab provides users with a method for defining site-specific disbursement amounts that will appear on the scheduled comprehensive payments. These payments move through vx Suite with a work order priority of COMP Contract Payment.
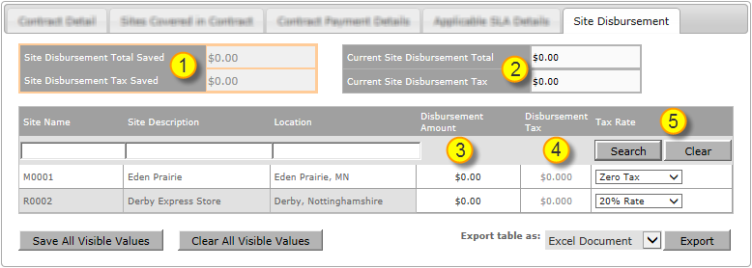
Sites that were selected in the Sites Covered in Contract tab will appear in the Site Disbursement tab.
The following functionality in this tab may be located in the screenshot above by the corresponding number:
| # | Functionality | Description |
| 1 |
Site Disbursement Saved Block |
Read-only field that will display the sum ofDisbursement AmountandDisbursement Tax, that have been saved on this page |
| 2 |
Current Site Disbursement Block |
Read-only field that will automatically sum disbursement amounts and tax amounts that appear on this page and will update in real-time as the user makes changes to the page |
| 3 | Disbursement Amount | Defines the amount that will be allocated to each site on the scheduled comprehensive payment for this contract |
| 4 | Disbursement Tax | Defines the amount of tax that will be allocated to each site on the scheduled comprehensive payment for this contract |
| 5 | Tax Rate | Dropdowns will populate based on the location of the site, and, depending on the country, there may be many tax rates available |
Site Specific PPM Details
The Site Specific PPM Details tab allows users to make site-specific updates to the PPM work order schedule: Start Date, Next Run Date and PPM Preview Period.
The sites that appear in the Site Specific PPM Details tab (shown here) are chosen in the Sites Covered in Contract tab:
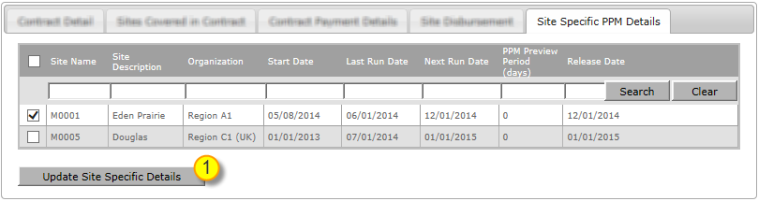
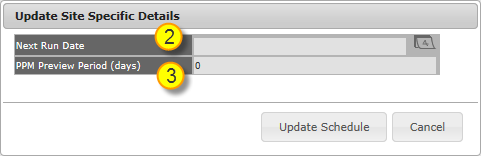
Once the "Update Site Specific Details" button is selected (as shown above), the Update Site Specific Details pop-up will appear:
The following functionality in this tab may be located in the screenshots above by the corresponding number:
| # | Functionality | Description |
| 1 |
Update Site Specific Details |
To update the details of one or many sites, select each site and then hit the "Update Site Specific Details" button, which will generate the Update Site Specific Details pop-up to appear |
| 2 |
Next Run Date |
Defines the next date that a PPM work order will generate for the chosen site(s) Interrupting a PPM schedule with Next Run DateDuring setup, if Interval has been selected in the PPM template and the user sets a new Next Run Date, the interval-based schedule will resume as usual after the next run date. If annual or one of many monthly scheduling options has been selected, the schedule will continue as scheduled after the Next Run Date. If Specified Date was selected in the PPM template, the creation dates will proceed as scheduled after the Next Run Date. |
| 3 | PPM Preview Period |
This option will appear when Site Specific Preview Periods is selected in the PPM Preview Option field that appears on the Contract Detail tab; using this field, users can define a PPM Preview Period (in days) for each site Work orders that are in a status of PPM Preview cannot yet be actioned by a service provider. The PPM Preview Period is the number of days that a PPM will reside in PPM Preview before moving into an actionable status. |
| 4 |
PPM Start Date (not shown in screenshot) |
If a contract is new and no PPMs have been generated yet, the pop-up shown here will ask for a PPM Start Date instead of a Next Run Date |