Report Functions
Insert Page Breaks
The section after which the page should break must be visible to properly operate. To insert page breaks, follow these steps.
-
Select the section where the report should break (usually a footer section).
-
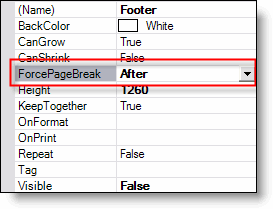
In the Properties pane, change ForcePageBreak to After.
Change Field Values
Place the VBScript into the OnPrint property (in the Properties Window) of the section where displayed. In this example, the value of the HrsCost field is adjusted based on the value of another field, LocationCode, within the Footer section of the report.
If LocationCodeCtl=441 Then
HrsCstCtl.Text=TotalHoursCtl*23
Else HrsCstCtl.Text=HrstCstCtl
End If
If Field6=440 Then
HrsCstCtl.Text=TotalHoursCtl*23
Else HrsCstCtl.Text=HrstCstCtl
End If
Show and Hide Sections, Fields, Sub reports
To hide a report section based on the value of a field, first make sure the section name doesn't contain spaces (AssetHeader not Asset Header). In this example, we want to hide the Asset section if there is no asset assigned to the work order. In the OnPrint property of the section involved (AssetHeader), place the following VBScript code:
if idasset<0 Or idasset=null then
assetheader.visible=false
else
assetheader.visible=true
end if
We recommend that you place the actual field (IDAsset) in the WONumber Header and hide it, as with any field you use for evaluation only. The format of the syntax is important. The same VBScript in the following format won't work:
if idasset<0 Or idasset=null then
assetheader.visible=false
else assetheader.visible=true
end if
Because all the ID fields are numeric, the evaluation should be for a numeric value (If IDAsset>=0 Then...) and quotes aren't needed.
Renumber Pages
There are times when you might want to start the page numbers at one for each new group. Follow these steps.
-
In the report Properties Window, in the OnOpen property, click the button with the ellipsis (...).
The VBScript Editor pop-up window opens.
-
Type in the following VBScript:
TempAcct=AccountCode
Change Acct to whatever represents the field and AccountCode is the field the grouping is based upon.
-
In the Designer Window, select the Details section.
-
In the Properties Window, in the OnFormat property, type in this VBScript:
If TempAcct<>AccountCode Then
[Page]=1
End If
-
Make sure that ForcePageBreak is After the GroupFooter.
-
Make sure that the Page field is in the PageFooter.
Group by Dates
Group by Month of DateAvailable doesn't provide you with the means to group data by part of a date field (for example, C1ReportDesigner ascending).
To do this, you need to include the following SQL syntax into the data source.
DatePart(Year, DateAvailable) As Sort1,
DatePart(Month, DateAvailable) AS Sort2
This provides the numeric values for the Year and the Month. In the Report Designer, create two groups:
-
Year - use Sort1 Ascending, no Header, no Footer
-
Month - use Sort2 Ascending, Header
-
Place the date field (click the Add Data Field button) in the Header of the Sort2 section.
This sorts the data in ascending order for each year (hidden) and each month (shown).