Use Custom Field Masks
Field masks are typically used to constrain field input or apply formatting to field input. For example, you might want to apply a mask to or constrain the values entered in phone numbers or social security codes. Field masks can only be applied via the module defaults pages, and only to custom text fields.
To use a custom field mask, follow these steps;
-
From the Setup menu, select [Module] > Defaults, where [Module] is the name of the module whose defaults you want to access.
The Defaults Editor window opens.
-
In the left pane, expand the Custom Fields node.
-
Select the custom field to which you want to apply a mask.
-
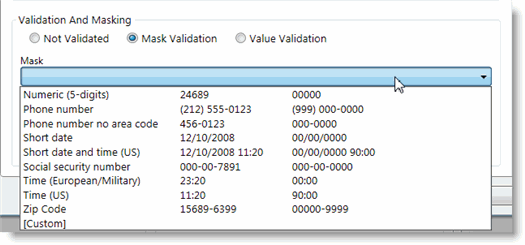
In the Validation and Masking area, select the Mask Validation option.
If the Validation and Masking options are not displayed, you have selected a standard TMS field. You can only apply a mask to a custom field.
-
From the Mask drop-down menu, select from one of the following options:

The list displays the available mask types and an example of how the mask formats a value. When you select a mask type, values are automatically entered in the Mask and Preview fields. If you select Custom, you must specify the formatting in the Mask field and a sample will display in the Preview field.
For example, to create a custom Order Tracking Number field that should be 2 digits, followed by a hyphen, followed by 4 more digits, you could enter 00-0000 in the Mask field. In the Preview field, this format would display as __-____.
-
Click OK to apply your mask to the custom field.
To see the field mask in action, place this field on a custom form using the Form Designer, save the form, and exit the Form Designer. Then, open a page in the module and select the custom form. The custom field will display a suggestion on how the field should be populated:


As a value is entered into this field, it will be formatted in the manner specified by the field mask.

