Create a Form Based On Another Form
You can create a new form based on an existing form to simplify the process of creating similar forms.
In this example, you will create a form for your technicians to submit assets or equipment into TMS that is based on the standard ts (TMS Enterprise) form. The difference you need in the new form are:
-
Your organization refers to assets as equipment.
-
You need to add a field that contains Warnings/Instructions.
-
Your form does not need to contain the Skill/Trade field.
-
Your form needs the Location and Location Description to be required fields.
To create this form and make all of these changes, follow the steps in the following sections:
To create the form, follow these steps:
-
From the Setup Menu, select Custom Forms > New.
The New Form dialog box appears.
-
From the Module drop-down menu, select Assets.
-
In the Form Name field, enter a name for the form.
In this example, enter Facilities
Equipment Record.
-
From the Segment drop-down menu, select the appropriate segment.
-
From the Based On drop-down menu, select the form you want to base you new form on
In this example, you will create a form base on the Assets (TMS Enterprise) form.
-
Click Continue.
-
Click OK.
Now that your form is created, you can make the necessary modifications to it.
You need to add a Warnings/Instructions field to your form. To add a field and change the label, follow these steps:
-
Verify that your new form is open in Edit mode and the Main tab is displayed.
-
On the right side of the page, under Groups/Fields, expand the Additional Info field group.
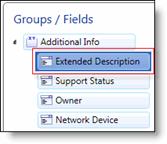
-
Drag and drop the Extended Description field into the left zone in the desired location.
-
Right-click the Extended Description field.
-
Select More Properties.
The Properties Editor window opens.
-
In the Custom Label field change the name of the label.
In this example, change Extended Description to Warnings/Instructions.
-
Click Apply.
-
Click Save.
-
Click OK.
Your form does not need the Skill/Trade field, so you will remove it. To remove the unneeded field, follow these steps:
-
Right-click the Skill/Trade field.
-
Select Remove.
-
Click Save.
-
Click OK.
Since knowing the location is important to your organization, you can make the Location and Location Description fields required. This will force users to enter values in these fields before saving. To make fields required, follow these steps:
-
Right-click the Location field.
-
Select Toggle Required.
-
Right-click the Location Description field.
-
Select Toggle Required
-
Click Save.
-
Click OK.
Since your team does not use the word asset, you want to change references to asset to equipment. To change field, labels, follow these steps:
-
Right-click the Asset Number field.
-
Select More Properties.
The Properties Editor window opens.
-
In the Custom Label field change the name of the label.
In this example, you will change Asset Number to Equipment ID.
-
Click Apply.
-
Right-click the Asset # Info field.
-
Select
More Properties.
The Properties Editor window opens.
-
In the Custom Label field change the name of the label.
In this example, you will change Asset # Info to Equipment Info.
-
Click Apply.
-
Click Save.
-
Click OK.