Set Up TMS to Manage Projects
Before you begin to use TMS to manage projects, you have to complete some initial setup in the application. You will need to create specific Work Order Type Codes and custom field labels. It’s important that you complete the items in the order provided. You should complete all of the work in the Setup menu before creating your parent project work order in TMS.
Create the new Work Order Type Code
To create a new Work Order Type Code, follow these steps.
-
In the TMS application, go to Setup > Work Orders > Codes.
-
Select the appropriate Segment. For example, if the Facilities department has its own segment, and only the Facilities department plans to use TMS to manage projects, you would create the new code in the Facilities segment.
-
From the Code List drop-down menu select Type Codes.
-
Click New. The Code Setup box opens.
-
Enter a Code. For the purposes of this tutorial, we’ll use the code CPR.
-
Enter a Description. We’ll use Capital Projects to match up with our CPR code.
-
Click Save. Your new Work Order Type Code is added to the list.
Set up Custom Fields
To set up Custom Fields, follow these steps.
-
Setup > General > Custom Fields.
-
Click New. The Create Custom Field screen opens.
-
Enter the Field Name for your first custom field. For example, you could use CP1.
-
Enter the Description. For example, Capital Project ID.
-
For Control Type, select Textbox.
-
For Data Type, select String.
-
Enter 20 for the Max Length, or enter a number that is big enough to hold your project numbers.
-
Select the Work Orders Module from the Add Module to Field dropdown.
-
Click Another. Repeat steps 1 through 9 above so that you have a total of five new custom fields. The five custom fields that you need to add (CP1 through CP5) should have the properties described in the table below. After adding CP5, click Save instead of Another.
| Field Name | Description | Control Type | Data Type | Max Length | Modules |
|---|---|---|---|---|---|
| CP1 | Capital Project ID | Textbox | String | 20 | Work Orders |
| CP2 | Approved Budget | Textbox | Decimal Number | N/A | Work Orders |
| CP3 | Project Review Date | Calendar and Time | Date | N/A | Work Orders |
| CP4 | Actual Start Date | Calendar | Date | N/A | Work Orders |
| CP5 | Vendor Bid | Textbox | Decimal Number | N/A | Work Orders |
Add the Custom Fields to a Work Order Custom Form
Now that your custom forms have been created, it is time to add them to the custom form that you will use to create, edit, and query for your project work orders. You might have the custom "Capital Projects Work Order Form" created for you by TMS, or you might have created your own form to manage projects. Regardless, this form must live in the Work Orders Module and in the segment in which you are working.
We aren’t going to describe how to create a custom form here. If you need help creating a new custom form, see the Setup module topics.
To add custom fields CP1 through CP5 to your custom Work Order form, follow these steps.
-
Setup > Custom Forms > Work Orders > Capital Projects Work Order Form (or your equivalent).
Your form opens in the Form Designer – Edit screen.
-
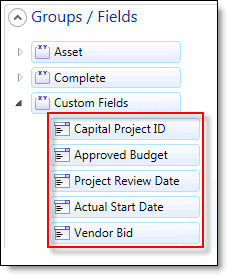
Under Groups/Fields, expand Custom Fields.
If you followed the steps in the "Setting up Custom Fields" section above, then your four new custom fields will be available to you.

-
Drag and drop the five custom fields onto the form.
The screen shot below shows the five project management fields on a tab on a custom form. Notice that we changed the field group name from "Custom Fields" to "Project Management Fields."

-
Click Save to save your form.
Change Field Names
There are three existing fields – Available After, Needed Before, and Completion Date – that we are going to change to help us manage projects. The Available After and Needed Before fields are contained in the Schedule Group of fields in the Work Order Module. The Completion Date field is contained in the Complete Group of fields. If these fields aren’t part of your custom form, then you will have to add them.
We’ll assume that you are still in the Form Designer – Edit screen, and that the Available After, Needed Before, and Completion Date fields are present on your custom Work Order form. We’re going to change Available After to "Scheduled Start Date", Needed Before to "Scheduled Completion Date", and Completion Date to "Actual Completion Date."
To change field names, follow these steps.
-
Right-click the Available After field.
-
Select More Properties… .
-
In the Properties Editor, change the Custom Label from Available After to Scheduled Start Date.

-
Click Apply.
-
Repeat the steps above to change the Needed Before field label to "Scheduled Completion Date" and the Completion Date field label to "Actual Completion Date."
-
Click Save to save the form.
At this point, all of the set up work in TMS is complete. In the sections below, you’ll begin to use the Work Orders Module to manage your project starting with creating a Parent Project Summary work order.
