Use Asset Transfer
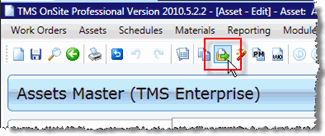
The Asset Transfer wizard is reached by clicking on the Asset Transfer button on the Asset Edit screen.
In order to perform the procedures below, you must have Admin permissions for the Asset Edit screen. If you do not have Admin permissions, the Asset Transfer button will appear disabled in the Asset Edit toolbar, and you'll be unable to access the Asset Transfer wizard.
-
Retreive the asset you want to transfer, either by going to Assets > Edit, or Assets > Query and performing a query for the asset to transfer.
-
When you have reached the Asset Edit screen, click the Asset Transfer button to start the wizard.
-
On the welcome screen, click Next.
-
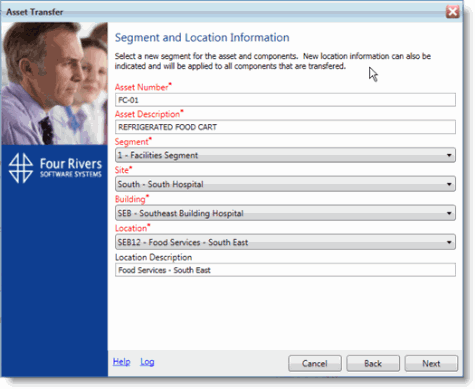
On the Segment and Location Information screen, begin by selecting a new Segment for this asset to be transferred to.
-
All of the fields on this screen can be edited. If necessary, change the Asset Number, Asset Description, then update the location information.
-
When you're done on this screen, click Next to proceed.
-
On the Select Asset Components Options screen, if there are components on this asset record, you will be told how many there are and asked how you would like to handle PM schedules and active work orders for the asset's components. If there are no asset components, this screen will be blank.
-
Click Next.
-
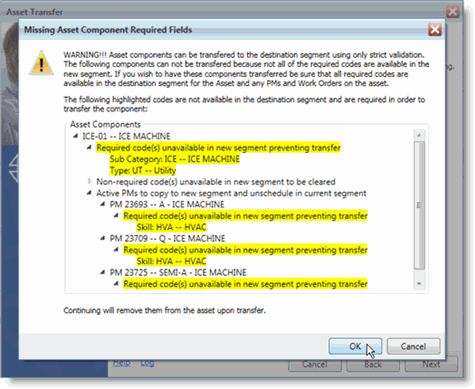
The wizard will validate the asset and its components, if any. If there are codes on the asset or asset components that do not exist in the target segment, you will be notified. You can choose to click OK and proceed, which will remove the codes from the affected record, or click Cancel to stop the transfer completely, taking you out of the Asset Transfer wizard.
-
Click OK and then Yes in the confirmation dialog box.
-
If your asset component did not pass validation, click Next again to proceed without it.
-
On the Asset Required Fields screen, you can verify the required fields and their values. If there is a code that doesn't exist in the target segment, the field will be blank, and you will need to choose a new value.
-
Click Next.
-
On the next screen, if there are unscheduled PMs on the asset record, they will be listed. In this case, there are not, so click Next.
-
Next, the asset's active PM schedules are listed. If there are any that you do not want to transfer, clear the check boxes.
-
Click Next.
-
The wizard will perform another validation. If there are fields on any of the selected PM schedules that do not have matching codes in the target segment, you will be asked to select new values.
-
Click OK to proceed.
-
On the Copy Active Work Orders screen, if there are active work orders associated with the asset record, they will be listed. Click Next to proceed.
-
Once the final validation has been performed, you will be shown a confirmation screen. Verify the information that is listed. If there is information that needs to be changed, click Back to return to one of the previous screens to correct it. Otherwise, click Move Asset to complete the transfer.
-
Once the transfer is complete, you will receive a second confirmation screen, confirming the transfer. If you would like to see all of the items that were transferred, click the Log link. Otherwise, click Close.
The Asset Transfer Log
If you need to see a log of all assets that have been transferred, and the information on each record that was affected, with the Asset Transfer wizard open (whether you're in the process of transferring an asset, have just finished transferring an asset, or you just want to view the log), click the Log link at the bottom of the window.