Requisitions Defaults
Using the Defaults Editor via the Setup module, you can establish what reports TMS uses to display query results and for the Quick Print function, and what form TMS will use on the New, Edit, and Query screens for the given module. You can also establish how TMS populates some of the fields in the Requisition New screen.
Set Module-wide Defaults
The first procedure we will cover will establish the Query Results Report, Quick Print Report, and Default Form you want TMS to use as the default for this module.
-
In the Setup menu, go to Requisitions > Defaults.
(missing or bad snippet)
-
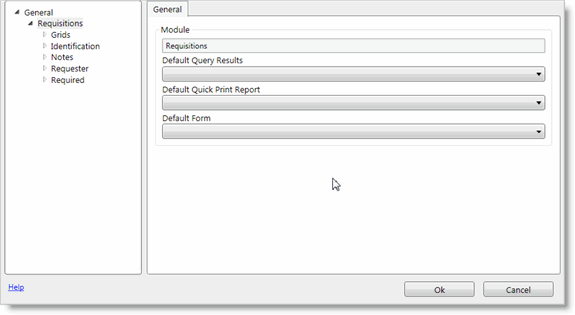
Only the General and Requisitions branches of the tree should be expanded. We want to establish defaults for the whole Requisitions module, so we will click the Requisitions branch to highlight it.
-
Select a report from the Default Query Results drop-down menu.
-
Select a report from the Default Quick Print Report drop-down menu.
-
Select a form from the Default Form drop-down menu.
-
Click OK to save your changes and exit the Defaults Editor.
-
A Confirm Override pop-up window opens, select Yes to overwrite all previous settings for individual Groups and Users, or No to save the new settings on the segment-level but not overwrite previous settings on the group- and user-level.
User-level defaults override any group-level defaults, and group-level defaults override any segment-level defaults.
Set Field-level Defaults
If you're not already in the Defaults Editor, follow steps 1 - 3 above, before proceeding to the steps below. To establish a custom label and a default value for a field, follow these steps.
-
As in the procedure above, only the General and Requisitions branches of the tree should be expanded. Because we want to set defaults for an individual field, we will expand the field group in which the field we want to configure is included.
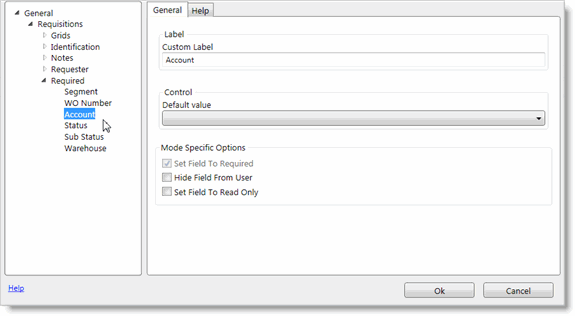
For this example, we will expand the Required field group and click the Account field in the list to highlight it.
-
When a field is selected, the pane on the right will change to display a Custom Label field and Default Value drop-down menu, on the General tab. (The Help tab allows you to view and modify the built-in field-level help for this field.) Begin by changing the Custom Label for the Account field to read "Department".
-
Next, select a Default Value from the drop-down menu.
-
Below these fields, you will see three option check boxes:
-
Set Field To Required - Checking this option will make this field required in order for a purchase order record to be saved. This box is checked and disabled for all standard required fields, like the Account field.
-
Hide Field From User - If you want to set a default value for a field and then hide it on all forms, check this option. In the event that you enable this option, the Default Value drop-down menu will become required, and you must select a value.
-
Set Field to Read Only - If you want to set a default value for a field and keep users from changing the value, but still allow the field to be visible on forms, check this option. As with the option above, in the event that you enable this option, the Default Value drop-down menu will become required.
-
-
Enable any of these options as might be necessary.
-
When you are done, click the OK button to save you changes and exit the Defaults Editor.
-
If a Confirm Override pop-up window opens, select Yes to overwrite all previous settings for individual Groups and Users, or No to save the new settings on the segment-level but not overwrite previous settings on the group- and user-level.