Create Work Orders with the Main Tab
When you click the Dispatch (MAIN) form's Main tab directly, without double-clicking on a work order record on the Queue tab first, you are shown the screen below.
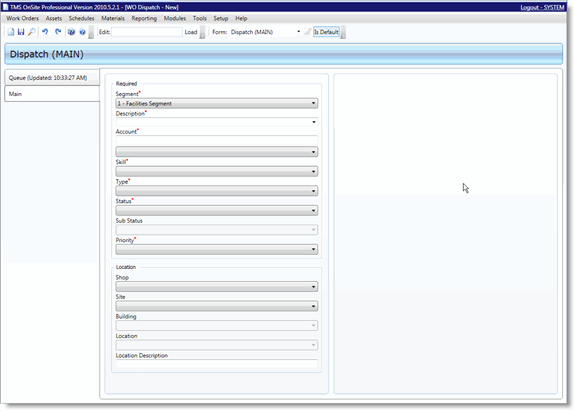
The left pane shows the required work order fields and the Location field group. The right side of the screen is blank in Create mode. In Edit mode, the Assignments grid will be shown.
Creating a new work order is the same as creating a work order in the Work Order New screen. Fill in the required fields and then add additional information into the optional fields.
To create a work order, follow these steps:
-
In the Description field, enter a description of the work that needs to be done
-
Select an account to which time and materials will be charged from the Account drop-down menu
-
Select the skill that this work order applies to from the Skill drop-down menu
-
Select the work order type from the Type drop-down menu
-
Select the work order's status from the Status drop-down menu
-
Select the work order's sub status from the Sub Status drop-down menu
-
Select the priority for this work order from the Priority drop-down menu
-
In the Location field group, if you know what Shop will need to do the work on this work order, select it from the drop-down menu
-
If you know the Site where this work is needed, select the appropriate code from the Site drop-down menu
-
If you entered a Site code, select the appropriate Building code for the location and then select the appropriate Location code
-
If you want to further qualify the location for this work order, enter additional location information into the Location Description field
-
Click the Save button once you're finished entering information for this work order
-
The Main tab changes from Create mode to Edit mode.
About Requesters
If the form you're using has the Requester field, and the Work Orders module option WO Requester Source is set to "Active Directory", you will see a text field rather than a drop-down menu. You can enter an Active Directory user in this field and have the AD record populate the requester fields. This is provided that the user's AD record has data in the Work Phone and/or Email fields.