Bucket Administation: Deleted Register
Roles Required:
-
View Deleted Register - Bucket Administrator
-
Manage Deleted register (Purge artefacts etc) - Deletion Administrator
What's in this article:
- What is the Deleted Register?
- Accessing the Deleted Register
- The Deleted Register Interface
- Actions Menu
The Deleted Register is how RedEyeDMS manages the removal of artefacts from your Bucket. This article explains the functions of the Deleted Register and how to operate it.
Important Distinctions in Terminology:
-
Delete: Refers to 'hiding' data from user access in Search and is recoverable. Binary duplicate checks in Upload tool still match against deleted file hash.
-
Purge: Data is permanently removed from RedEyeDMS bucket and is not recoverable.
What is the Deleted Register?
When an artefact is deleted in RedEye DMS, it isn't immediately removed - it is given a state of "Hidden" so that it is unavailable to users in Search and other tools like Bulk CSV. Bucket Administrators can access these artefacts in the Deleted Artefacts Register for your bucket.
Think of the Deleted Register like the recycle bin on your desktop computer, but much more powerful. Some of the key features are:
- Traceability, so you can easily see who deleted an artefact, when it was deleted and the reason why it was deleted
- Restoring artefacts, so you can bring an artefact back from the Deleted Register if it was deleted in error
- Purging artefacts, so you can completely remove an artefact from RedEye.
- Remove Files - so you can purge the contents of artefacts yet maintain the audit details of the deletion
Using the Deleted Artefacts Register
Accessing the Deleted Register
If you're a Bucket Administrator, you can find the Deleted Register in the Bucket Management area
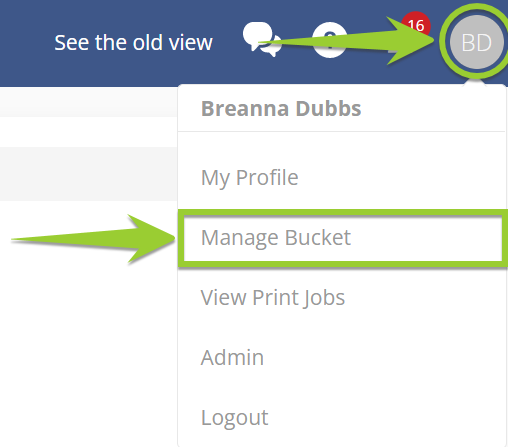
- Click on your profile pic at top right of page and select Manage Bucket.
- In the Bucket Management tools, click on Deleted Register:
The Deleted Register Interface
The Filter Panel
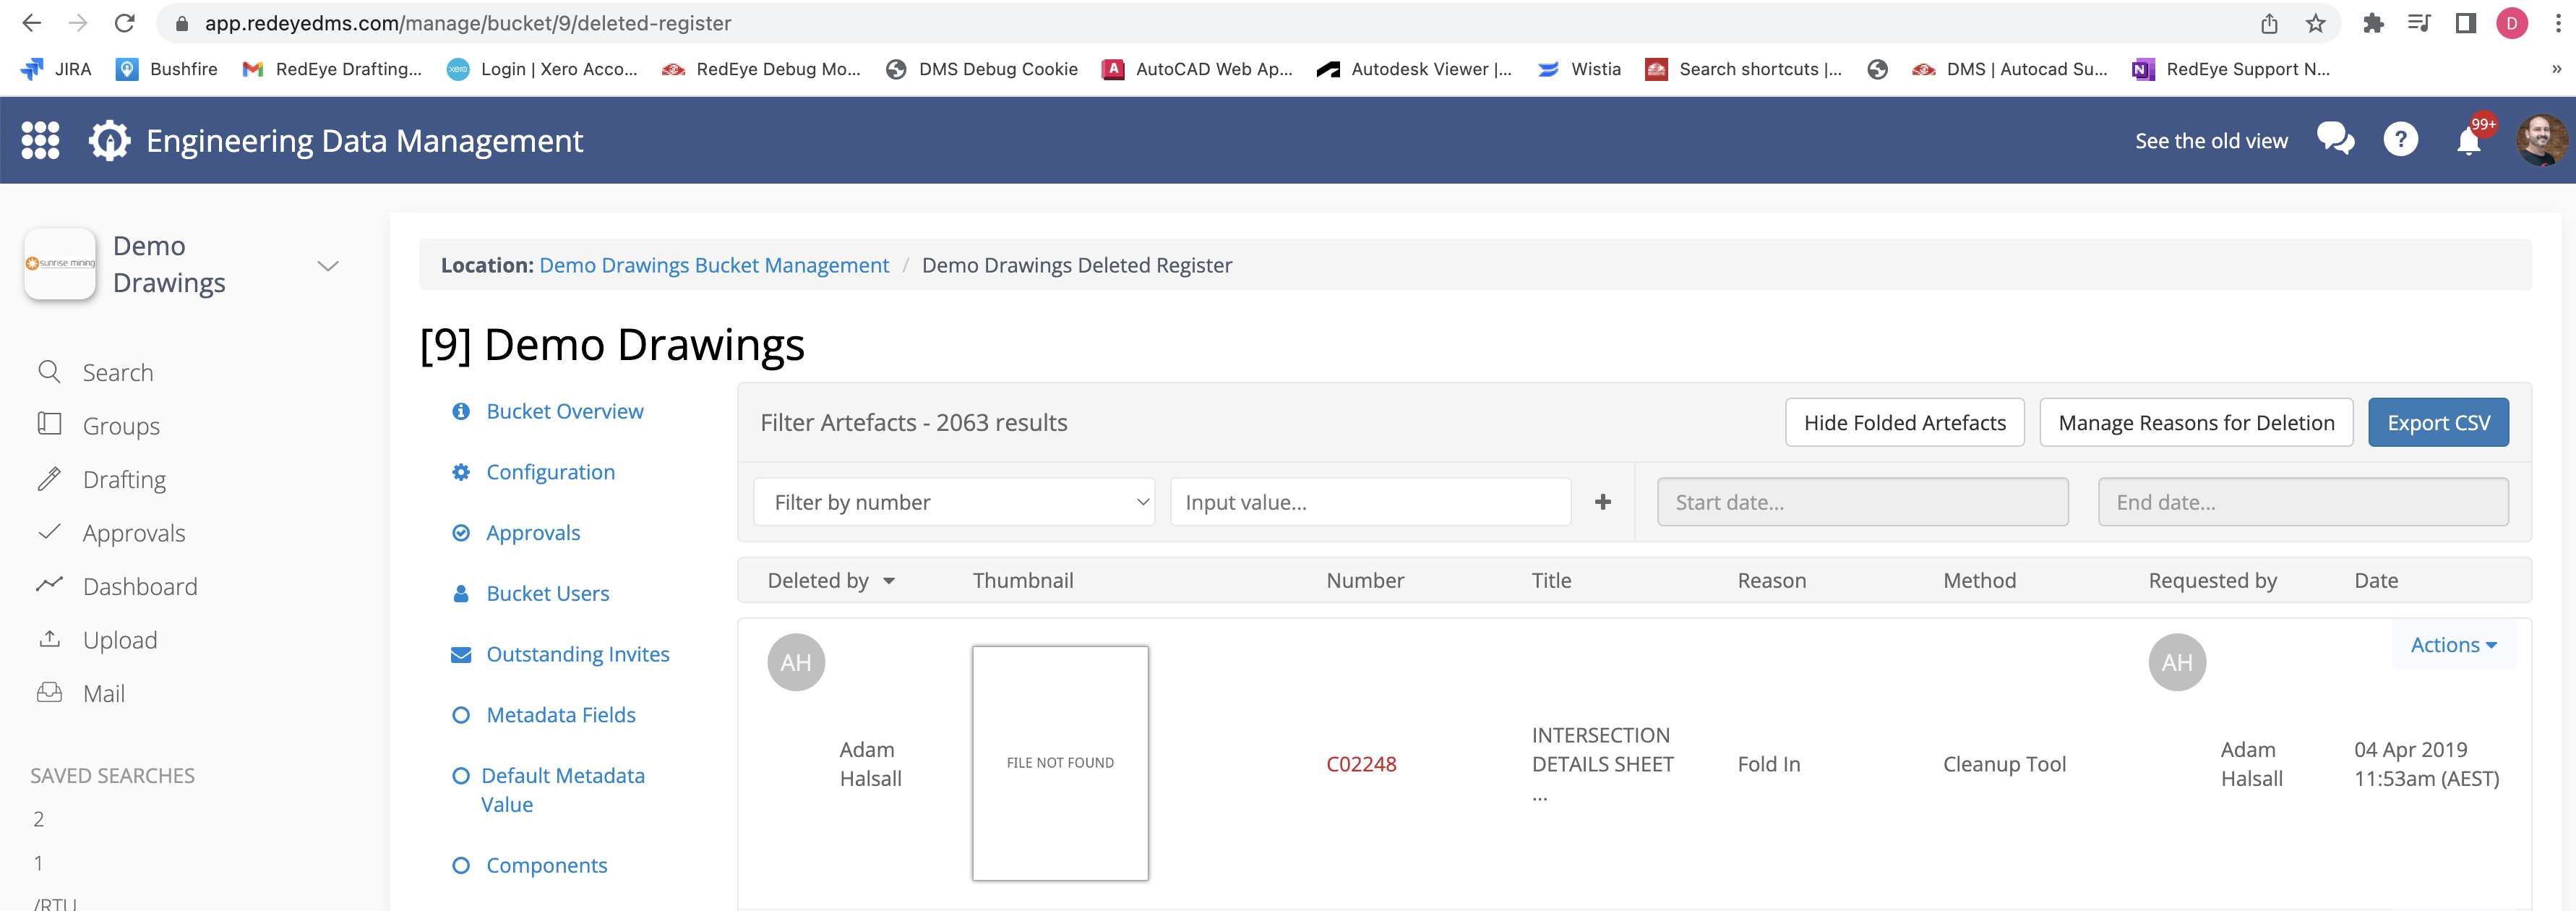
The Deleted Register has controls that allow filtering of entries and management of Reasons for Deletion (preset options for selection during deletion process) A total number of entries in the register is displayed.
Show/Hide Folded Artefacts (Default=Show)
Artefacts that are 'system' deleted during Cleanup Tool activities are also placed in the Deleted register. This button can be toggled to hide/show them from the filtered list so that only User actioned deletions are visible.
Manage Reasons for Deletion
Selectable Options that fit your business requirements (eg. Retention policies) are offered during the single artefact deletion process. Use this interface to add/remove options you want as repeatable items that can be filtered in the register.
Export CSV
The total number of entries in the Deleted Register can be exported to a CSV file for external use.
'Filter By' Pick List
Use this pick list to filter what column item you wish to filter in the display
Input Value
Add the keyword that the Filter By selection requires so that you can filter precisely eg. a specific Artefact Number (default is By Number)
+ (add filter)
Combine specific Filter By options by adding a value with the + icon, then add a new Filter by option/value to build a filter set
e.g. To get a list of a certain number set that was deleted from artefact page, Filter By :
By Number = Demo-003168 +
By Method = Artefact Page
Start/End Date Filters
Simply select a date range of the date of deletion using these calendar pickers
Column Headers
Each column header can be clicked to present an arrow to change sort between Ascending/Descending. Sort is alphabetical.
The Method column refers to the technique used to delete the artefact - Artefact Page (single), Project (bulk, group), Cleanup Tool etc
Actions Menu
The Actions menu provides options to process the entry in the Deleted Register. If you are a Bucket Administrator and don't also hold a concurrent Deletion Administrator role, Remove Files and Purge options will be greyed out until you have been invited to that role.
Restore
This function allows Bucket and Deletion Administrators to restore a deleted artefact and its metadata back to 'live' status in the bucket. the artefact will once again be searchable and visible in tools such as Bulk CSV, and is removed from the Deleted Register.
Remove Files
This option is available to Deletion Administrators and purges only the artefact data content from the bucket. The artefact details and deletion data is retained in the Deleted Register for auditing purposes. Export CSV output retains entries for Removed Artefacts.
The purged data is not recoverable however - the artefact detail is replaced with a placeholder image File Not Found
Purge Files
The Purge files option permanently removes artefact data from the bucket and removes all entries pertaining to it from the Deleted Register.
Once purged, binary duplicate checking is no longer affected by the purged artefact.
NB. As at 2 Sept 2022 the Purge option is only available on a single entry basis. For bulk purge requests contact your Customer Success Manager (CSM) until further notice
if you wish to purge an artefact from your bucket in RedEye DMS, a user must have the Deletion Administrator bucket level role. This role can only be granted to users by a Bucket Administrator.
How to grant a role
- Navigate to Bucket Management by clicking your user icon. Then select 'Manage Bucket' from the drop-down
- Click the 'Bucket Users' tab on the Bucket Management screen
- Select the Invite Bucket Users button. You will need to select the 'Deletion Administrator' field under the Role header, enter the desired user's email address, and click Invite User. Note that the selected user also requires the Bucket Administrator role to perform this action.
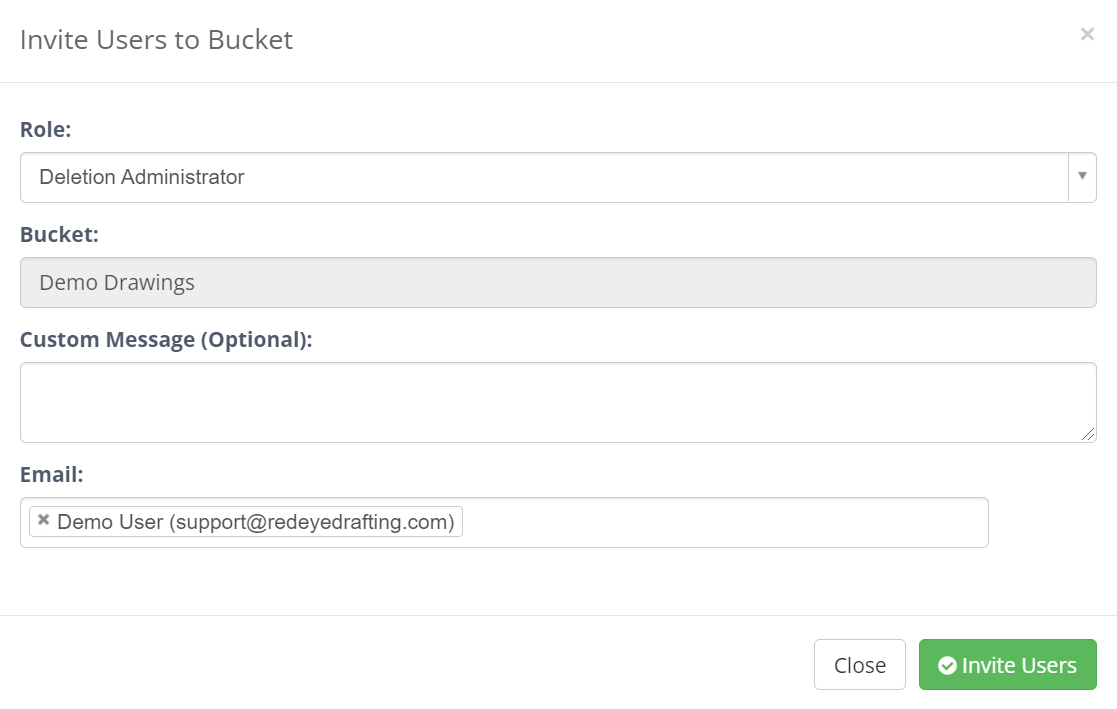
Once the user accepts their invitation to the Deletion Administrator role, they are free to purge deleted artefacts from the 'Deleted Register'.