Create, Edit and Configure Metadata Fields
Bucket Administrators can add new Metadata Fields for users to populate with relevant data. These fields are managed through the Manage Bucket page.
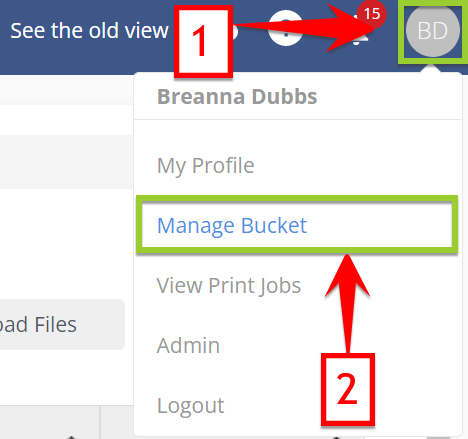
To access the page, click on your icon in the top-right corner and select Manage Bucket from the drop-down menu.
Next select Metadata Fields from the left navigation bar.
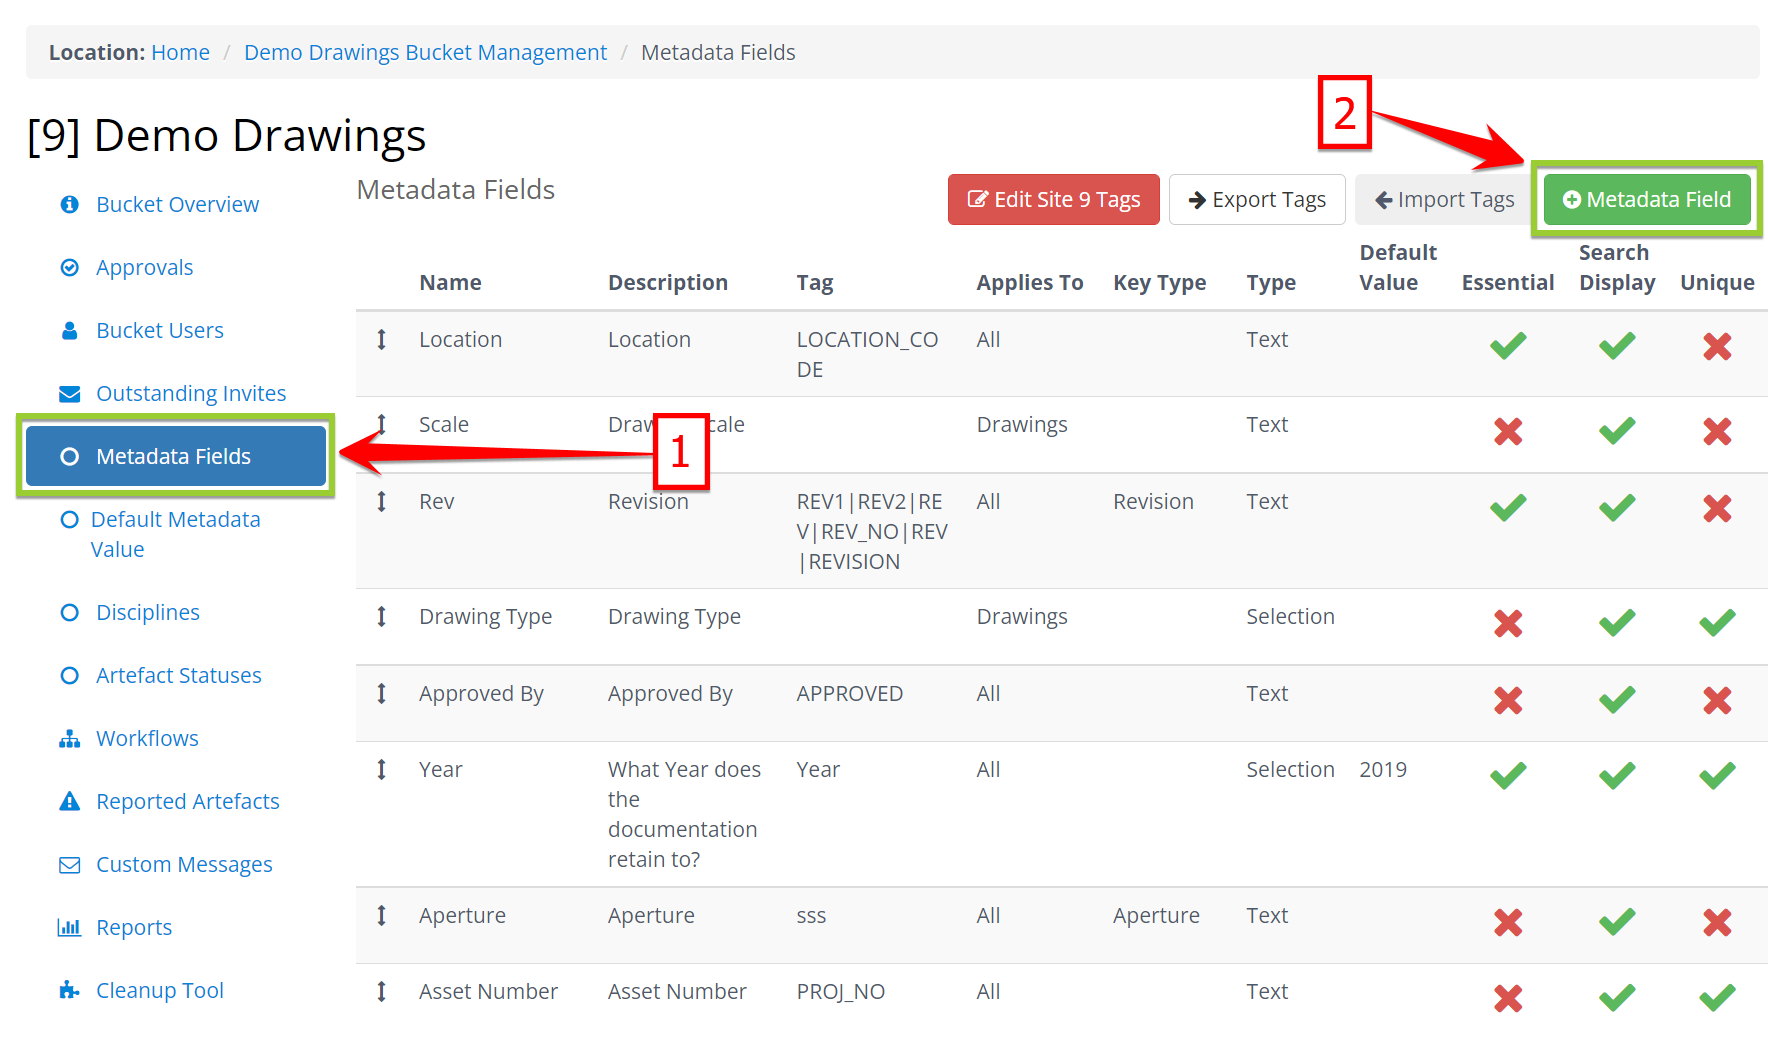
From here, you can add new Metadata Fields by clicking the green Add Metadata Field button, and inputting details on the pop-up form. Should you choose to add values for a 'selection' type metadata, you can do so at this time.
Configure Metadata Fields
Existing fields may be edited to adjust the following configuration items (except TYPE) by clicking the Edit button beside each field. if metadata is set as Conditional some options may be greyed out - contact your Support team if this is the case.
Configure New Metadata Field Attributes
First you must configure the new metadata field with the appropriate settings that govern its behaviour, look and feel.

-
Name: The Name will be what the user sees in search for the metadata field filters
-
Description: The Description provides an overview of the purpose of the field to other admins
-
Tag (optional): CAD tag attributes may be mapped to a metadata field to allow automatic value extraction and populating of the field. eg. Revision. CAD tag extractions occur at artefact creation or workflow approvals of CAD files.
-
Applies To: Metadata can be applied to specific artefact types, or All(default). ie. Drawing, Document, Media.
-
Key Type: This is a system setting that allows automated extraction of metadata detail from file contents etc. It is configured by RedEye personnel and partners only as the correct Key Type is critical in certain scenarios, such as establishing integrations, extracting image XIF data etc.
-
Type (Important!): This setting determines if the field is Free Text input or by a pre-populated Selection list. This option can ONLY be set at Metadata field creation - consider carefully the design and purpose of the metadata field before saving as it cannot be edited to change type later. Conditional (dependant) metadata must use Selection type
-
Default Value (optional): A Default value may be entered so that new entries on an artefact always has something in it, if desired
Configure New Metadata Field Flags:
The on/off status of these checkboxes will be indicated by a green tick or a red cross in the corresponding columns against the configured field on the main Metadata Fields page, for ease of reference
-
Essential: When metadata is set to essential, it's default present in the artefact page even if it's not populated. It's also flagged in the artefact page to encourage users to populate important data. ie. it is NOT Mandatory metadata
-
Unique:Only one value is allowed for the metadata field at a time. Adding a value to a populated unique field will overwrite the existing value with the new value
-
Hidden*: Removes the field from the Artefact Details page for users and it will only be shown if there is populated data in it. Hidden metadata may still be exported in Bulk CSV tool for Admin editing by default (see Exclude from Bulk CSV)
-
Exclude from Bulk CSV: Hidden Metadata will not be exported for editing in Bulk CSV reports
-
Editable: In order for a metadata field to show even when there is no value, the Metadata field needs to be configured with Editable enabled AND not be set to Hidden.
-
If a metadata field is enabled Editable it means that field is available in the list for an eligible user to add to the Artefact Details Page (Blue plus sign)
-
If a metadata field is disabled Editable it means that field is NOT available in the list for a user to add to the Artefact Details Page. Admins can still edit content for existing populated metadata
-
-
Conditional (as required): This is not a user configurable switch - it will appear greyed out and selected if the metadata field is a Dependant type.
*Hidden metadata characteristics
When metadata fields are hidden they will not be displayed and cannot be used in the user interface.
Once a metadata field is hidden, automated upload processes (such as DWG tags extraction, Image content extraction and EXIF data extraction) will ignore hidden metadata fields.
Hiding metadata fields impact saved searches; users are presented with a message advising them that the hidden metadata field has been excluded from the search.

Hidden metadata fields will still be displayed/used in the pages and tools listed below:
-
Bulk CSV Export
-
Bulk CSV Import
-
Artefact Status Report
-
Group Artefact Audit List
-
Group Artefact List
-
Metadata Changes Report
Note that the Exclude from Bulk CSV option needs to be checked if the metadata fields need to be excluded from Bulk CSV; simply hiding a metadata field won’t exclude it from Bulk CSV.
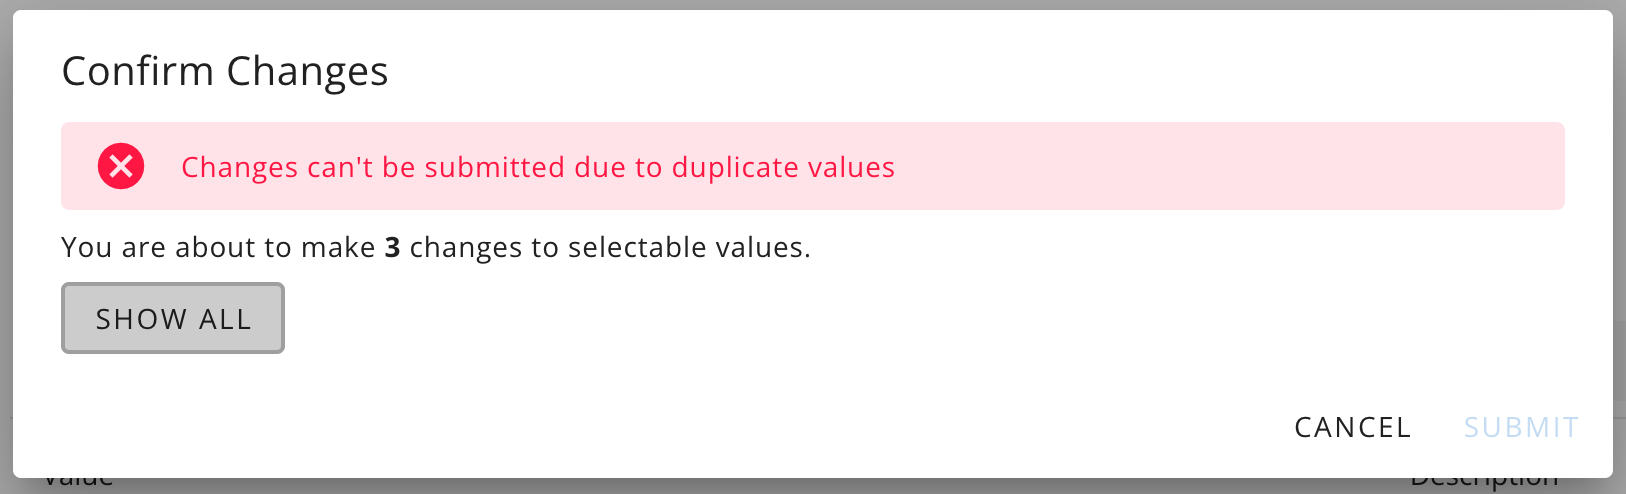
Metadata values can't be identical/duplicated. RedEye uses the underlying ID of the value entry to populate metadata, not the text/description used front end, and will only populate the duplicate value with the lowest ID, regardless of the which duplicate value is clicked in the UI. If you try to add new duplicate values you will be blocked from saving the changes.
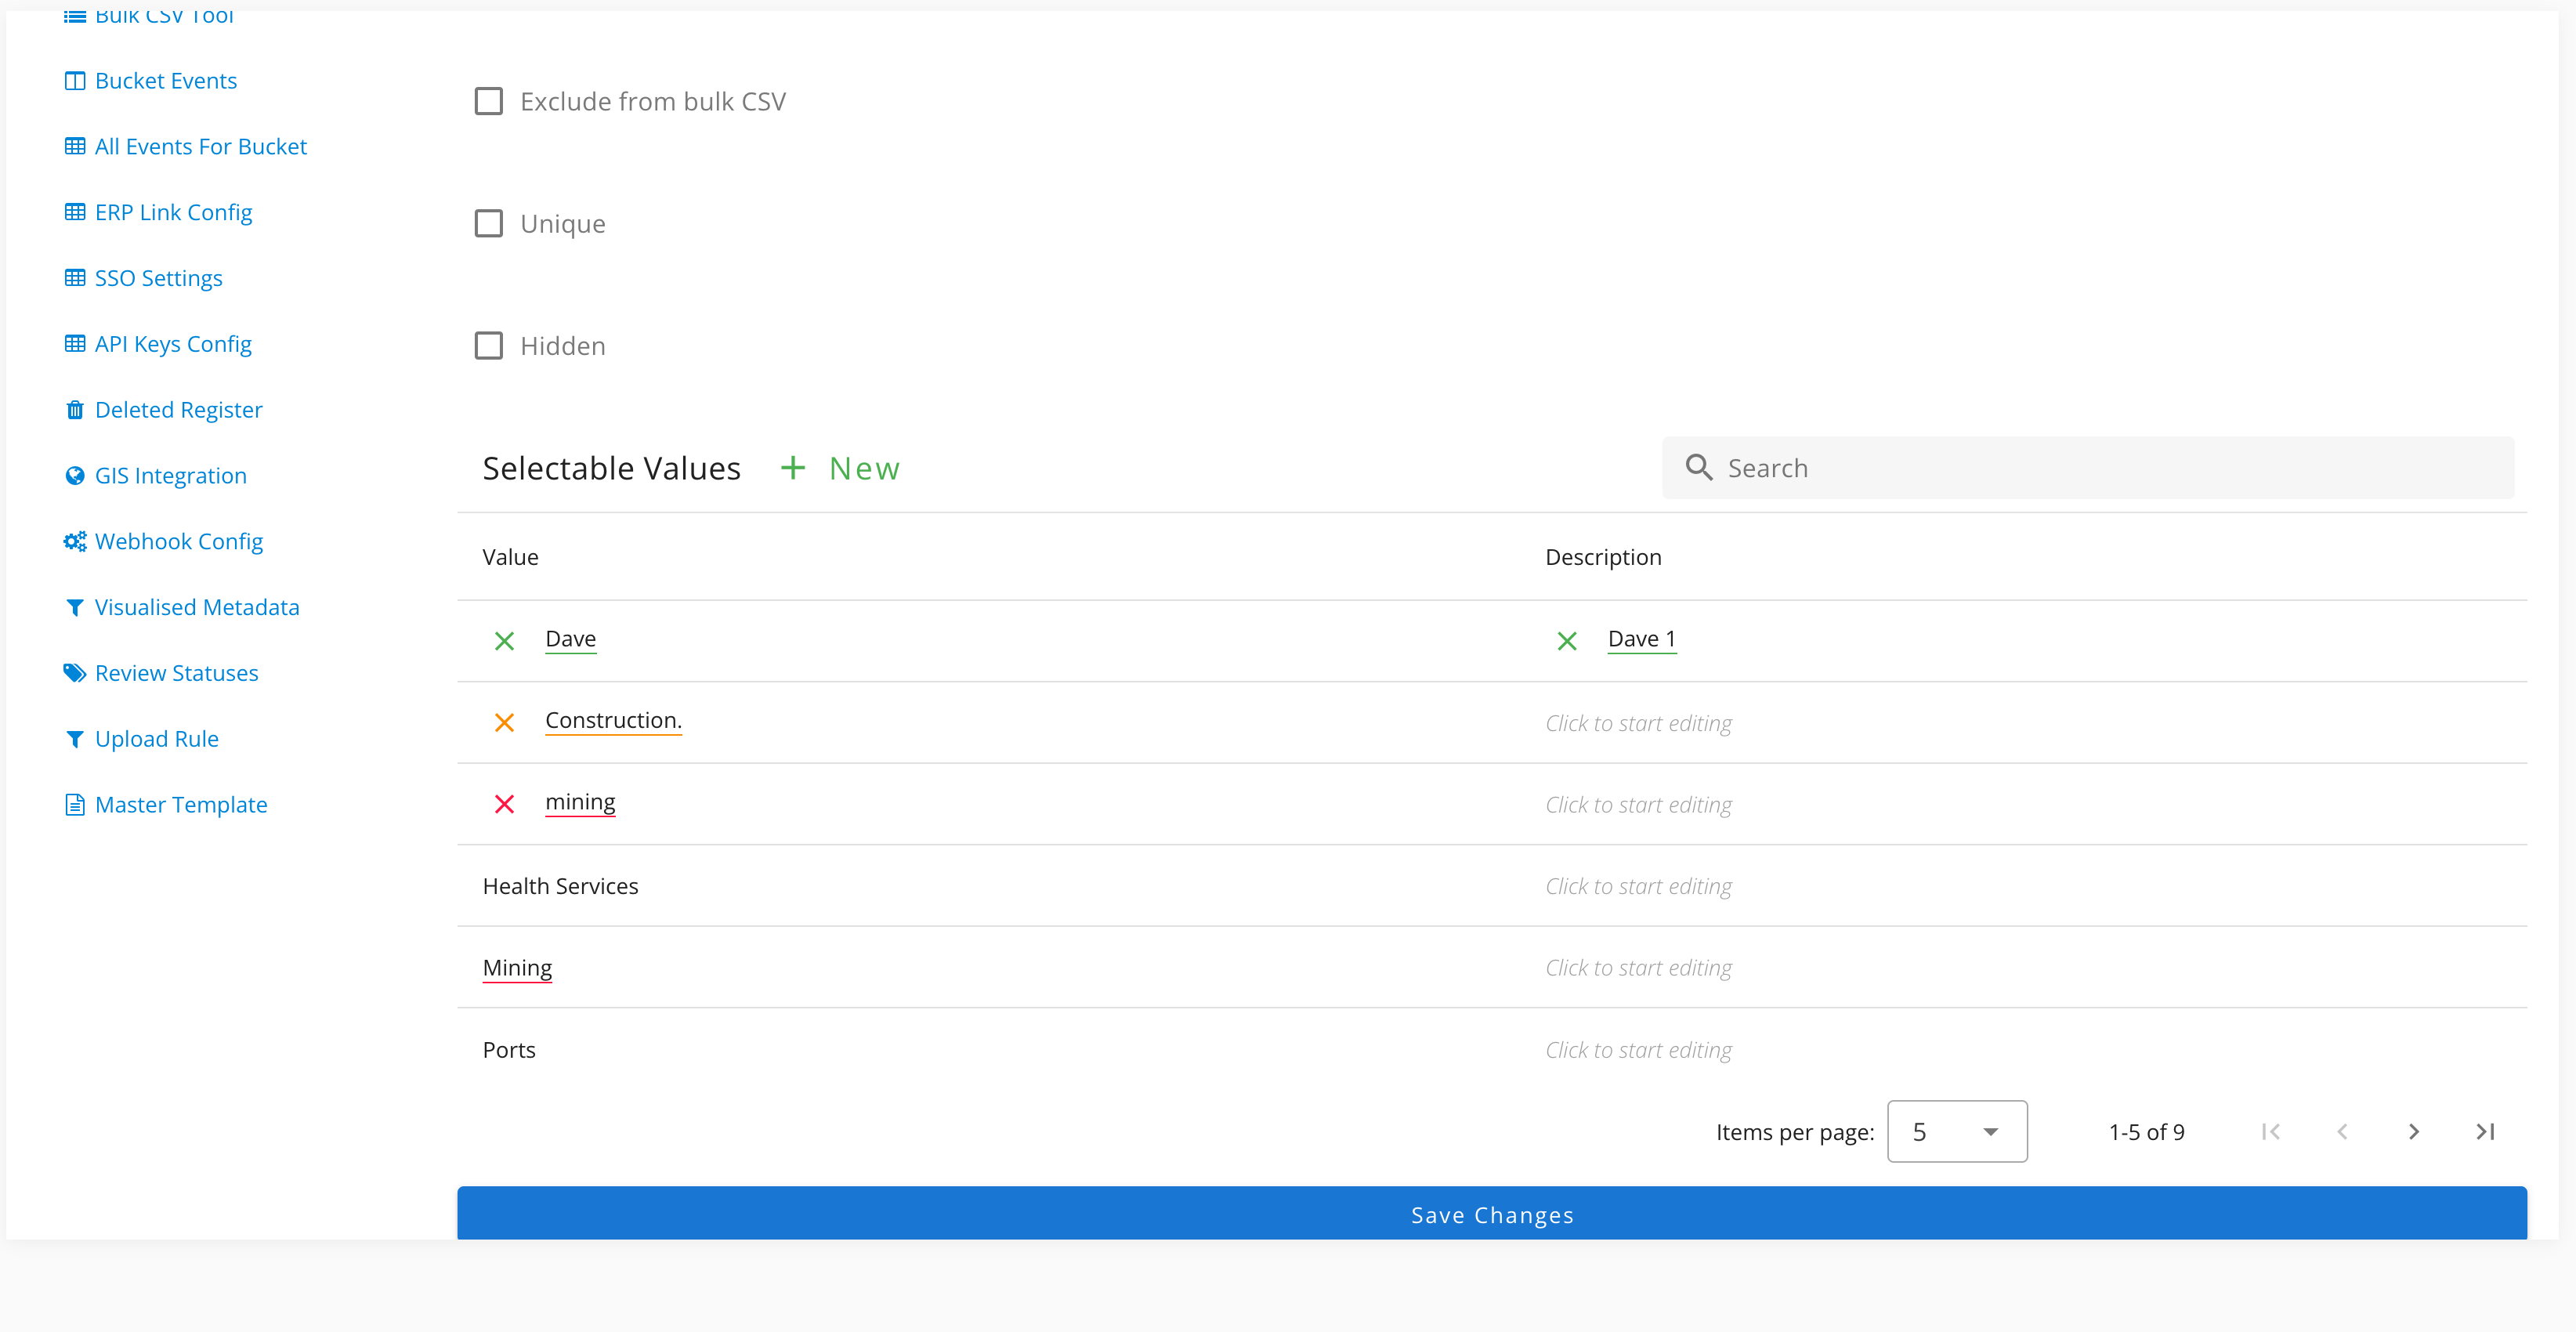
Add and EDIT Selection Metadata Values
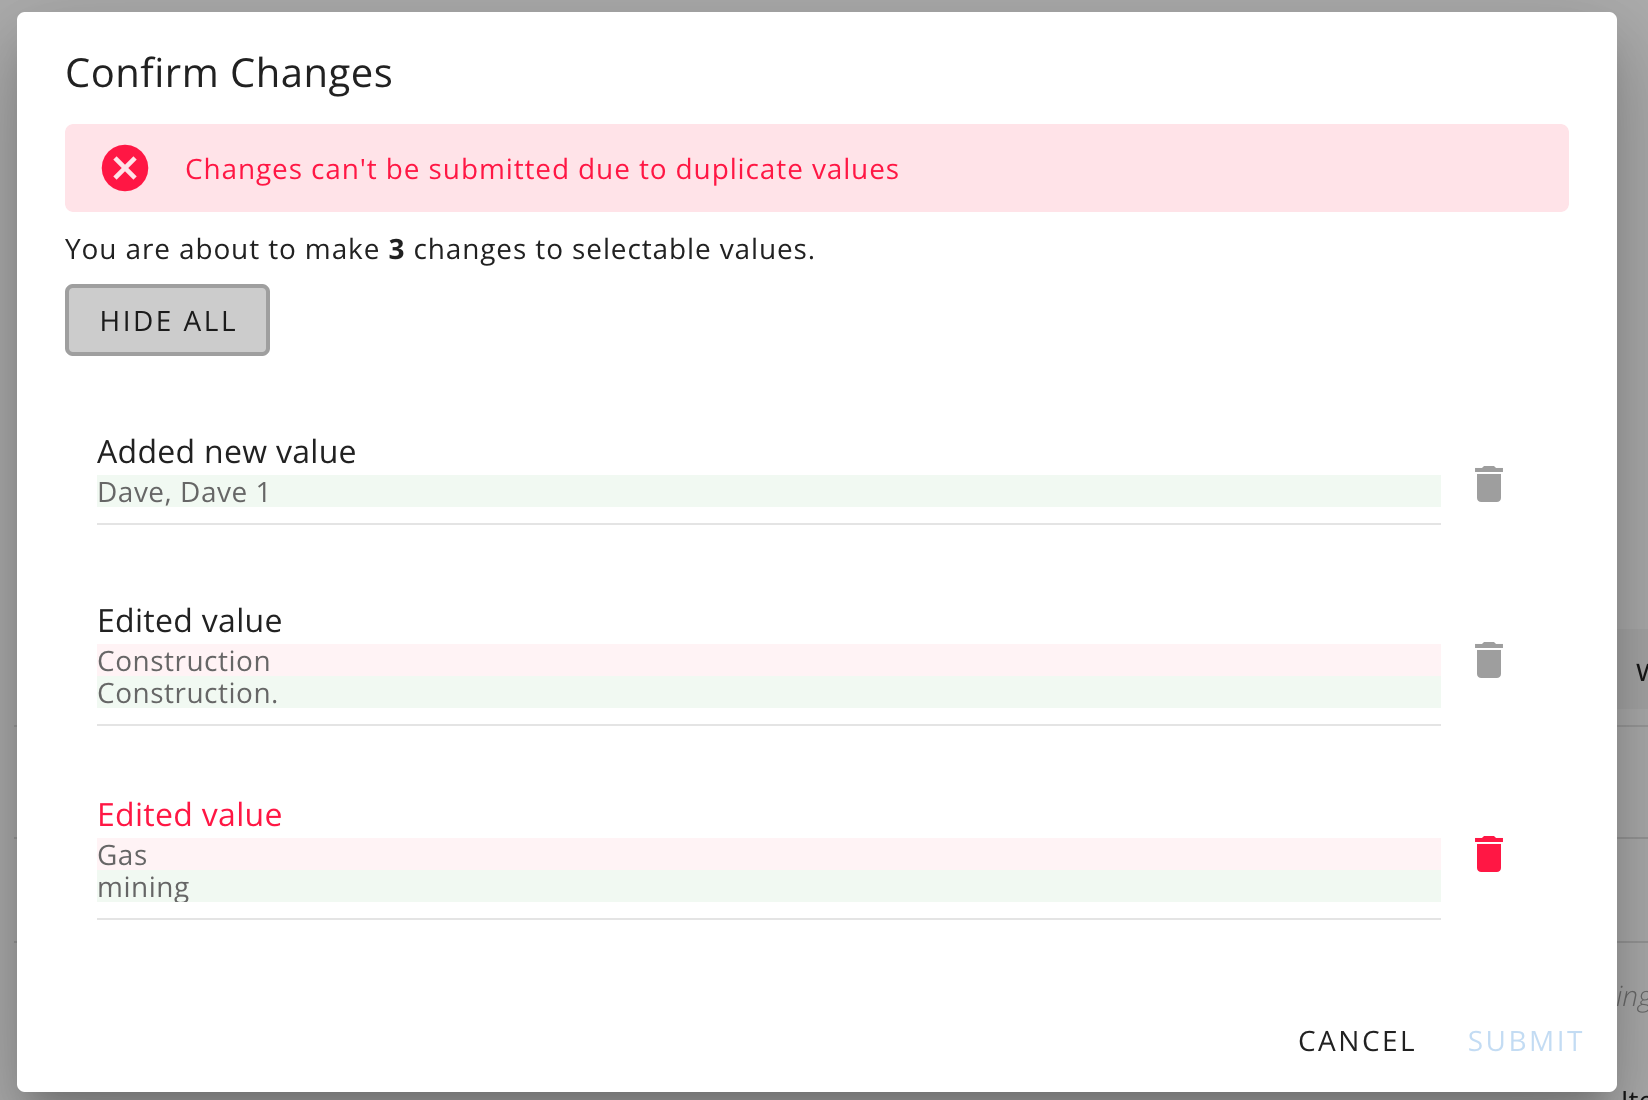
As metadata lists can be enormous, pagination of values into manageable pages with a Search bar to enable quick filtering within multiple pages is provided. Also, Colour cues are used to help prevent errors when adding or editing metadata.
Updated pending values will have a coloured X beside them (click x to remove before final Save Changes) and be underlined in the same colour.
-
Green = New value (add)
-
Yellow = Change to existing value (edit)
-
Red = Invalid change to existing value (duplicate value to existing)
A final confirmation modal will be presented at time of Saving Changes so that final checks can be made and any red conflicts corrected or deleted. Click Show All to reveal individual entries.
Add New Selection Metadata Values
Adding new Selection Values in a metadata field is as easy as clicking the green + New button to open the add Value/Description pop up and begin adding new values and descriptions. Click Add to add the new value to the pending list.
Any pending New value added will show at the top of the pagination of existing values until changes are committed. Note the green X indicates acceptable value - if Red it indicates a conflict with an existing value.
Once all new metadata is added click Save Changes to review the changes and submit.
You can add new values and edit existing values in the same activity
Edit Existing Selection Metadata Values
Important Edit Notes:
-
Metadata Field 'Type' cannot be edited once field is created ie. Selection or Text
-
Metadata that is set Conditional (Dependant metadata) will not allow editing by a user here and will require a Project Request ticket to have our Development team update in the back end for you.
Use the Search bar immediately above the values to search for the existing Value/Description across all pages and find the value that you wish to edit. The search will filter results to matching values/Descriptions - Simply click the value for editing and change the details as you need. Don't worry if you then navigate to another page to edit others and no longer see the last edit line - you will be asked to confirm all edits at time of submission.
Note that any New values awaiting submission will remain at the top of the paginated list when you search and present existing values to edit
Once all your edits have been made click the Blue Save Changes button. You will be presented with the modal that will give you the opportunity to do final checks, and notify you if you have made an invalid edit - such as trying to duplicate an existing value.
You will then have the opportunity to correct or remove the edit from the edit set and submit the changes.
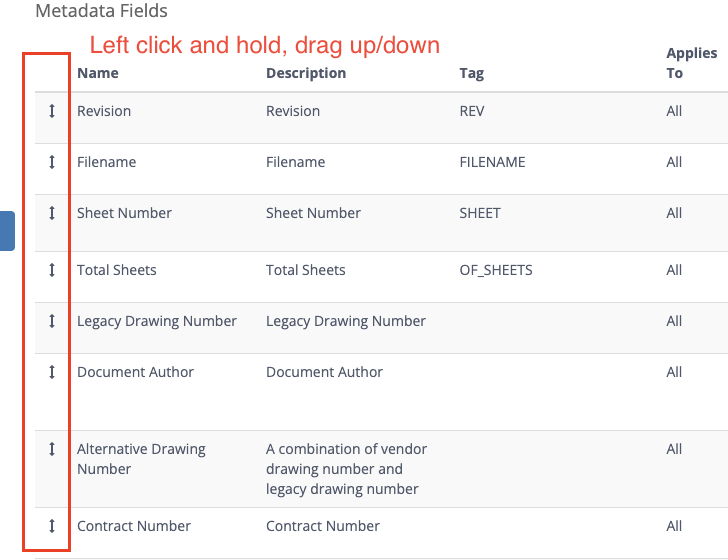
Adjust Metadata placement when listed on Artefact Page
To manually control the order that metadata will appear in the Metadata tab on the Artefact page (default is by Field ID), simply click the arrow on the left of the field listing and slide up and down to reposition the field order. This will reflect in the order they appear on the Artefact page.