To view the full Lucernex Online Help, sign in to Lucernex and click Help > Online Help. If you do not have your organization's Lucernex link, contact your Administrator.
Accruent Lucernex 25.02 Release Notes
We're delivering this automatic upgrade to UAT (TRAIN) environments on January 17, 2025 and to production environments on January 31, 2025, with these highlights:
-
Zero Bid Award Lines: Configure Lucernex to include all bid budget line items in the purchase order.
-
Bid award approval workflow: New line items display in award workflow following bid rejection and resubmission.
-
Vendor Sites: Added to and improved Vendor Sites introduced in Lucernex 24.12.
-
Secure File Transfer Protocols (SFTP): Enhanced SFTP protocols for file transfers.
-
Database schema changes: Added fields to the database schema for enhancements in this release.
Zero Bid Award Lines
LUC-13617
When you create purchase orders, only the awarded and non $0.00 lines from the bid are included.
Now you can configure Lucernex to include all bid budget line items in the purchase order. You can then create change orders against the purchase order with line items that did not originally have a bid amount without adding all those lines manually. This eases integration with third party products such as SAP.
Administrators can enable this by selecting the new Auto-populate zero bid award lines option in the budget impacting custom list:
-
In the System Administrator Dashboard, click Manage Custom Lists.
-
In the row of the custom list you want to change, click edit.
-
Select Auto-populate bid award lines.
-
Select Auto-populate zero bid award lines.
This excludes parent budget line items from the workflow process. Only child records display in the custom list.
-
Select Conditioned Amounts and/or Submitted Amounts.
If you select a value for both, you must select a different value for each.
-
Click Update Layout.
You can export the form containing this layout and import it to another firm and the Auto-populate zero bid award lines value is retained.
Bid award approval workflow
Case 01398492
When a bid is rejected and the contractor is asked to add value to a new line item, the new line items display in the award workflow after resubmission.
When the first bid is rejected and the second bid is moved to the top for approval, the submitted and conditioned amounts from the first bid no longer incorrectly persist in the work flow.
If a bid is rejected and sent out for conditioning, the updated conditioned amount now populates correctly in the workflow. The old conditioned amount no longer displays.
Vendor Sites
We've added to and improved Vendor Sites introduced in Lucernex 24.12, which you can use to manage multiple sites within a single vendor profile by associating Employers of type Vendor with site records.
-
Vendor Sites List Layout: Default Employer List Layout now includes the Vendor Sites List Layout.
-
Employers: Editing Company Type of employer with child records associated with it is prevented.
-
Cost tracking: Add Vendor Site ID and Vendor Site to Cost Tracking form types
-
Import: Import vendor sites using the new Employer sites import template.
-
Export: Export vendor site information using the API.
-
Deactivate: Confirmation dialog now indicates deactivating a vendor also deactivates its vendor sites.
-
Reportable fields: Generate reports with vendor site fields.
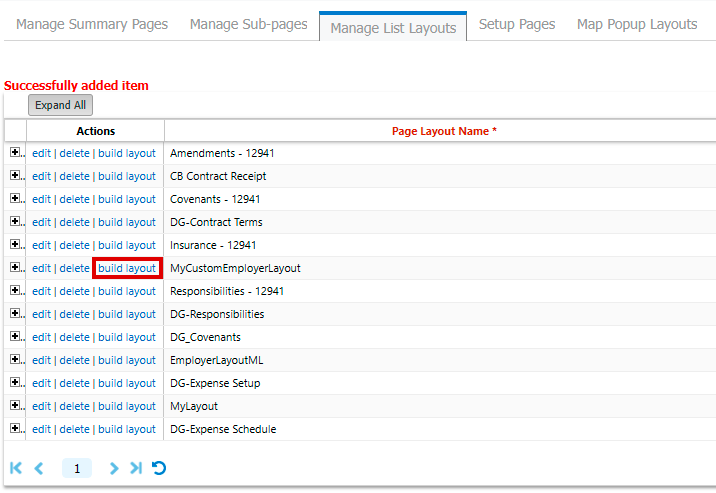
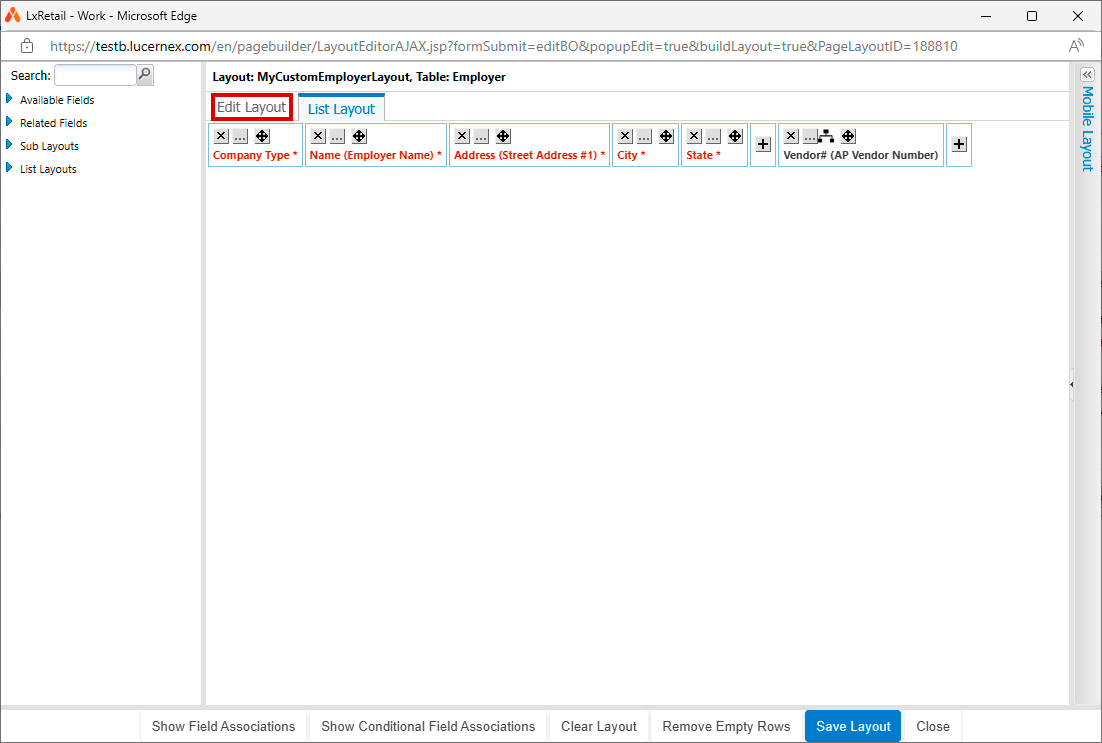
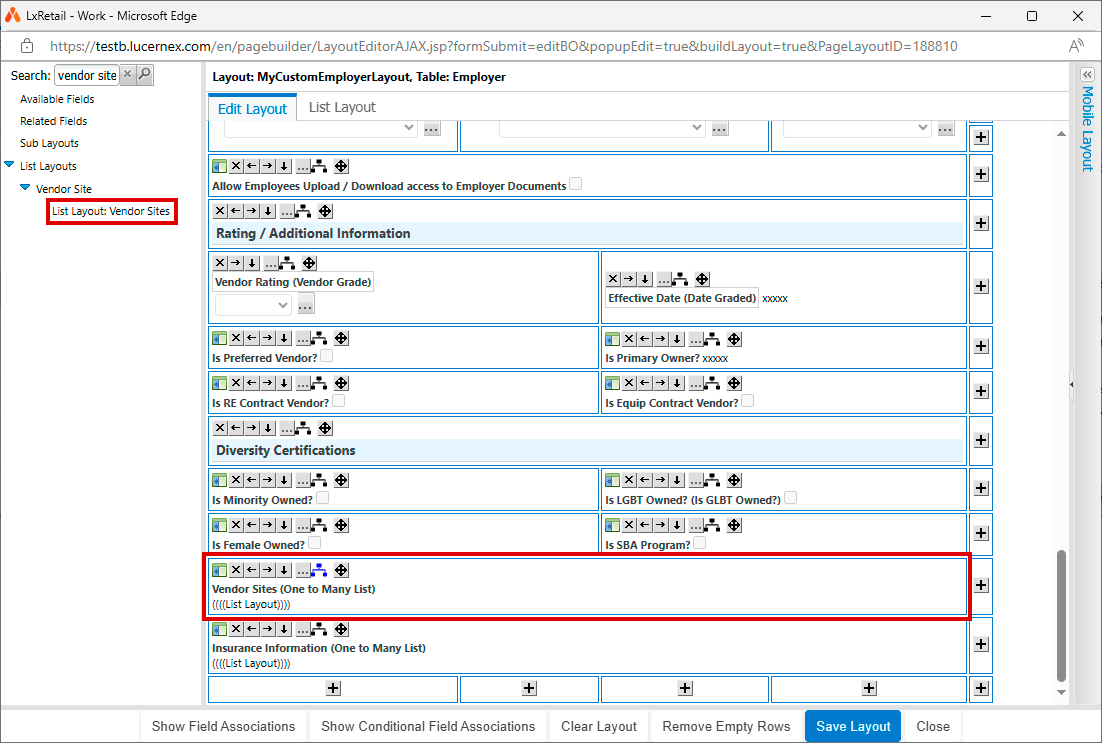
Add Vendor Sites List Layout to custom Employer List Layout
The default Employer List Layout now includes the Vendor Sites List Layout. This means that when you edit an existing employer of type Vendor or change an existing Employer to type Vendor, you can add, edit, and delete Vendor Sites using the Edit Employer dialog. To do so, any custom layout you select on the Manage Employers page must have the Vendor Sites List Layout. If your firm has existing custom Employer List Layouts, you must add the Vendor Sites List Layout to each custom Employer List Layout where you want to add and edit vendor sites.
If you edit an existing employer and change the type to Vendor, the Vendor Sites Layout displays and once you add a vendor site, the type change to Vendor is saved regardless of whether you click update on the dialog.
-
In the System Administrator Dashboard, click Manage Page Layouts.
-
Click Manage List Layouts.
-
Click build layout in the Actions column of the layout.
-
Click Edit Layout.
-
Search for the Vendor Sites List Layout and add it to your layout.
-
Click Save Layout.
Employers
If you edit the Company Type of an Employer and that Employer has child records associated with it including Vendor Sites, Parts, Part Packages, Assets, Insurance, Budget Columns, or Allocations, the action is prevented when you click Update. An error message displays instructing you to deactivate the Employer and create a new one with the type you want.
Cost tracking
You can add the Vendor to Cost Tracking type forms such as Purchase Order, Change Order and Payment Application. For example, a vendor who the purchase order is submitted to, or a vendor who raised a change order or pay app. You can now add Vendor Site ID and Vendor Site to Cost Tracking form types. You must do so for each form where you want to use the functionality that follows.
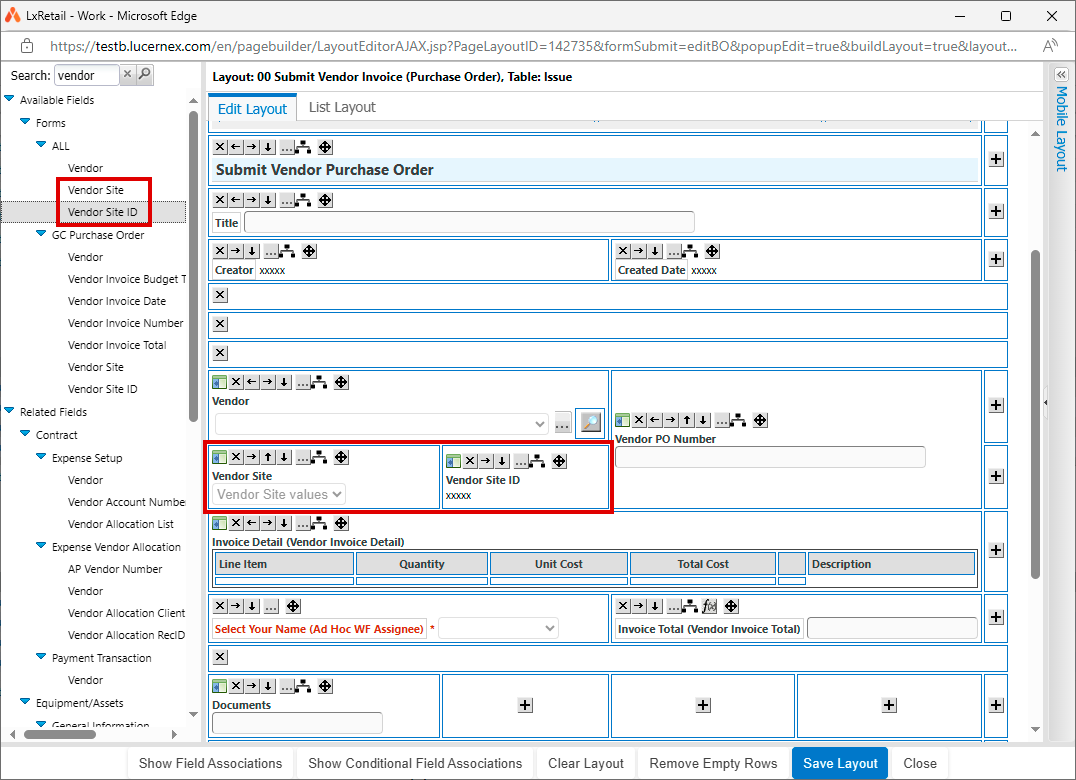
When you include the field on a Cost Tracking type form, and a Vendor, is selected, the available Vendor Sites are only those associated with the selected Vendor. This ensures the person completing the form only views sites related to their vendor.

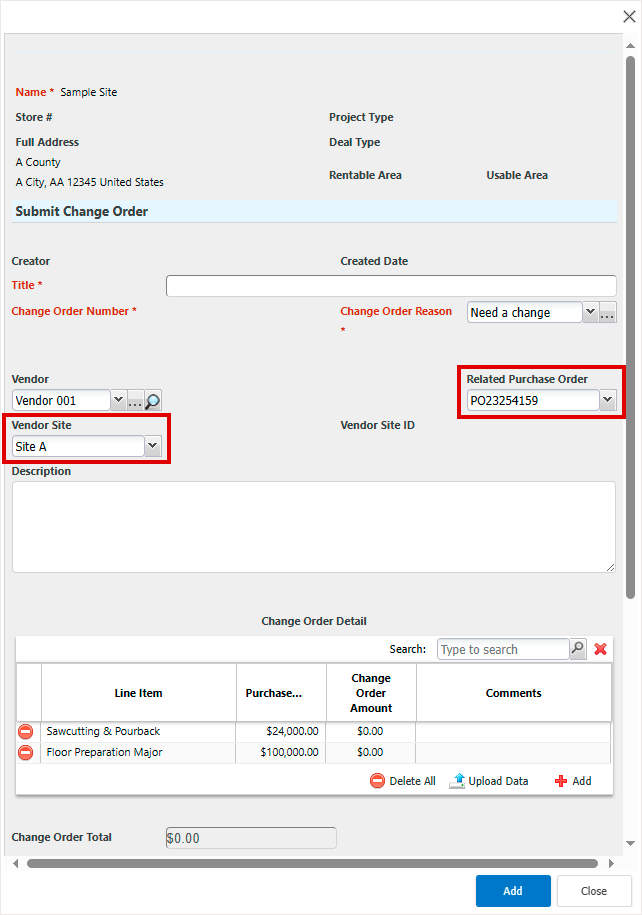
When you select a related Purchase Order on a Change Order or Pay App form, the Vendor Site automatically populates with the Vendor Site from the chosen Purchase Order. You can also change the Vendor Site.
When you select a Related Purchase Order on a Change Order or Pay App form, the Vendor Site automatically populates with the Vendor Site from the chosen Purchase Order. You can then change the Vendor Site if this has changed during the course of the project.
Import Vendor sites
You can now import vendor sites using the new Employer Site import template. Before importing vendor sites, the vendors to which they relate must exist. You can use the Employer import template to import the vendors you want.
-
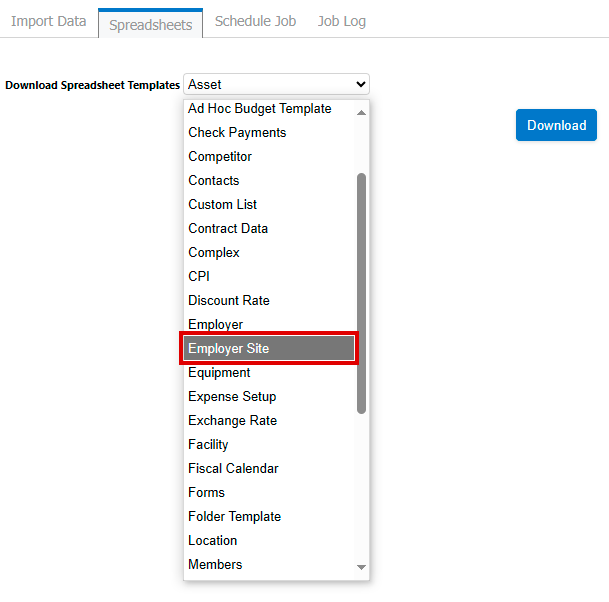
On the System Administrator Dashboard, click Import Data > Spreadsheets.
-
In Download Spreadsheet Templates, select Employer, then click Download.
-
In Download Spreadsheet Templates, select Employer Site, then click Download.
-
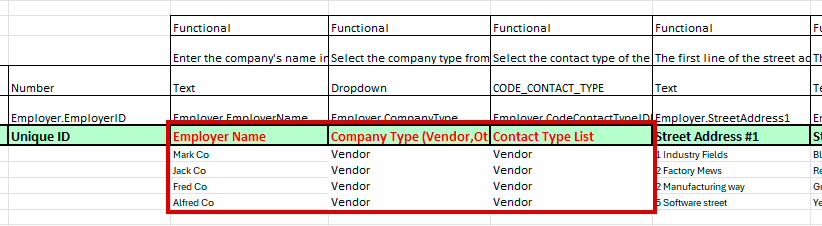
Open the downloaded Employer template in Excel and complete these mandatory columns for each record you want to add:
-
Employer Name
-
Company Type: Enter Vendor for this column.
-
Contact Type List: Enter Vendor for this column.
-
-
Optionally, complete columns that you want to add data for, then save and close the template.
-
Click Import Data tab and import the vendor data using the Employer template you edited.
-
Open the Employer Sites template you downloaded in Excel and complete these mandatory columns for the vendor sites you want to add:
-
Employer: This is the Employer Name of the vendor that the vendor site is to belong to.
-
Vendor Site ID: ID you want for the vendor site. This must be unique to the vendor.
-
Vendor Site Name: Name you want for the vendor site. This must be unique to the vendor.
If the Vendor Site ID and Vendor Site Name are not unique to the vendor (Employer), the vendor site is not created and an error displays for that record.

-
-
Optionally, complete the columns you want to add data for then save and close the template.
-
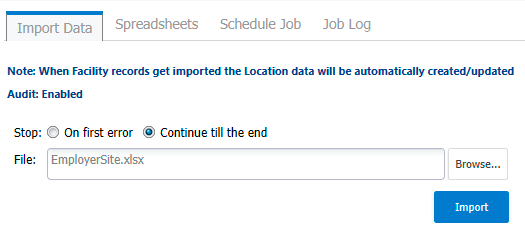
Click Import Data tab, select the Employer template you edited, then click Import.

-
Click Reset.
-
Select the Employer Site template you edited, then click Import.
If any failures occur, check that the Vendor Site ID and Vendor Site Name are unique to the specified vendor (Employer).
Export Vendor Sites
You can export vendor site information using API GET calls to EmployerSite if you know the lxID or ClientID of the employer site.
Review our Swagger documentation for more information or try it out:
-
On the System Administrator Dashboard under Data/PS Tools, click RESTful WebService Docs.
-
In Types enter EmployerSite then click Load.
-
Click GET next to /businessObject/EmployerSite/lxID/{lxID} or /businessObject/EmployerSite/clientID/{clientID} then click Try it out.
-
In Primary Key, enter an lxID or a clientID then click Execute.
Deactivate Vendors
If you deactivate a vendor with active vendor sites, those vendor sites are deactivated. In this scenario, a confirmation dialog now displays indicating that deactivating the vendor also deactivates the vendor sites associated with it.
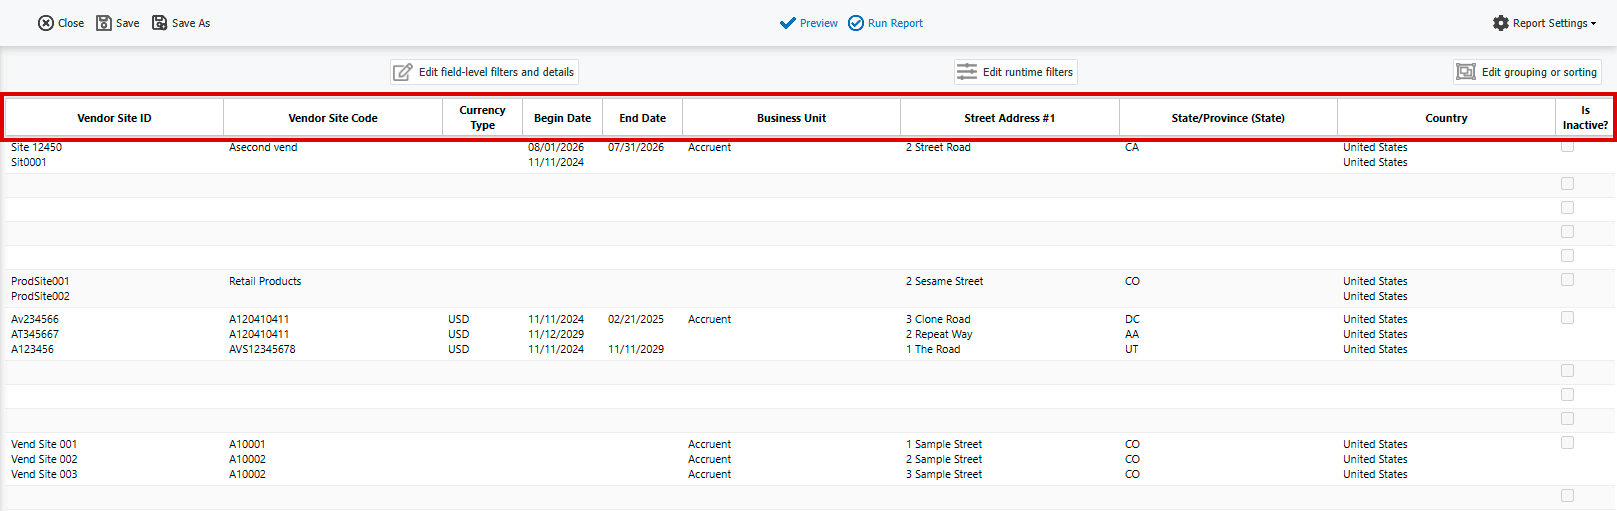
Reportable Vendor Site Fields
You can now generate reports in the xml, flat file, excel, and native excel outputs with these vendor site fields:
-
Vendor Site ID
-
Vendor Site Code
-
Currency
-
Begin Date
-
End Date
-
Business Unit
-
Address
-
State/Provence
-
Country
-
Is Inactive?
Secure File Transfer Protocols (SFTP)
As part of our Lucernex security enhancements, we are changing the SFTP protocols that Lucernex uses for file transfers.
From the end of February 2025, Lucernex only supports the protocols that follow. We recommend that you work with your internal IT department to update your systems and once the updates are complete, contact Accruent Support to enable the protocols in Lucernex.
-
SFTP (versions 0-6): SSHD supports all SFTP protocol versions from 0 to 6, providing more features, such as extended file attributes, better error handling, and improved file management operations.
Ciphers in Apache Mina SSHD
- AES (128-bit, 192-bit, 256-bit): Symmetric encryption.
- Blowfish: Supported, though less commonly used today.
- Triple DES (3DES): Less secure.
- ChaCha20/Poly1305: Modern and secure.
- ECDSA/ECDH: Enables faster key exchange and authentication.
- RSA (up to 4096-bit): Supported for key exchange and authentication.
- Curve25519: Provides a modern and faster elliptic curve algorithm for key exchange.
Message Authentication Codes (MACS)
- HMAC-SHA1
- HMAC-SHA256: More secure than SHA1.
- HMAC-SHA512: Supported for even higher security.
- HMAC-MD5: Supported, but considered insecure and generally avoided in modern deployments.
Compression
-
zlib: Supported with more flexible configurations.
-
none: If compression is not required, it can be disabled to improve performance.
Database schema changes
We've added fields to the database schema for enhancements in this release.
Issue
We've added these fields to Issue so that you can add Vendor Site ID and Vendor Site fields to Cost Tracking forms to support Vendor Management.
|
Field Name |
Type |
UI Label |
Description |
|---|---|---|---|
|
EmployerSiteID |
Vendor Site ID |
Vendor Site |
Vendor Site linked to this record. |
|
VendorSiteID |
Text |
Vendor Site ID |
ID associated with the Vendor Site linked to this record. |
Improvements and issues fixed
|
Summary |
Reference # / Case |
|
|---|---|---|
|
ASC 842 Rent Schedule |
When you navigate to the ASC 842 Rent Schedule tab of a contract and Approved or Straight Line Summary ClientID is included in the layout, an incorrect error message no longer displays. |
LUC-13435 01636172 |
|
Form reply email |
Form reply emails no longer contain duplicated recipients. Recipients are listed once in To or CC. |
LUC-12591 01590116 |
|
Documents |
Document count is now correct when you sign in to Lucernex as a user with document folder permission level Upload Only and upload files. |
LUC-12573 01588581 |
|
Google Maps |
When you click View on Google Maps from the Facility Summary page, or click a map pin on that page, the map location now opens on a new browser tab. |
LUC-9723 01338592 |
|
Binders |
When you generate a PDF from a binder, and leave Include Page numbers cleared, the resulting PDF now correctly excludes page numbers. |
LUC-10512 01410982 |
|
Budget and line item descriptions |
The Suspicious content found message no longer displays when you enter special characters such as % in Description fields of Budgets and Budget Line Items. For example:
|
LUC-13287 01626814 |
|
Reports |
When you run a report on forms using a Start and End date of today, the report now returns values when there are forms with created dates that match today's date. |
LUC-13408 01636449 |
|
Workflow |
When you select a document within a workflow to view it, the document is no longer automatically checked out. The Download option in a document list is relabeled Download and Checkout to indicate that clicking the Download icon also checks out the document. |
LUC-13456 LUC-13647 01637812 |
|
Customization |
The custom list for annual sales and income is no longer cleared when users with the security type L_AB_US save changes to the Facility TJX page layout. |
LUC-12783 01599496 |
|
Binders |
When you generate a binder with Include Page Numbers cleared, the text Page# no longer obscures important financial data in the center of the first page. Page numbers now display depending on the options you select in the Binder Generation dialog that opens when you click Generate in a binder:
|
LUC-13645 01410982 |
|
Members/Contacts |
Name field in Members/Contacts tab now defaults to the value for the Employer if the field is empty in the same way as it did Lucernex 24.10. |
LUC-13711 01669593 |
|
Scheduled job |
PGP encrypted scheduled jobs now run successfully without the Failed to Decrypt file error. |
LUC-13601 01647176 |
|
Delete folders in Contracts |
Deletion of folders with default folder security now works correctly. |
LUC-13572 01646259 |
|
Reports |
If you click a custom run report action added to your page layout on the Contract Details Summary page, the spreadsheet associated with that report now downloads correctly instead of loading the content into a new window. |
LUC-13546 01644949 |
|
Export Schedules |
When you click Export MSProject on the Project Details Schedule page, the schedule file is downloaded to your browser's download folder in XML format. |
LUC-13511 01640976 |
|
Global Search |
When you search for a record with special characters such as +, the records that contain those characters now display in the search results. |
LUC-13260 01626575 |
|
Work Flow / Forms |
When viewing fields in Work Flow forms in Read Only mode, the totals now align correctly with the value in Check Out mode. For example, Total Requested Amount in Read Only mode now matches the value Check Out mode. This resolves issues with forms where a rule requires the Total Requested Amount to equal the Total Approved Amount before the approver can approve the form. |
LUC-12491 01552229 01665375
|
|
Import |
When creating projects in bulk using the import template with or without folder template information, the import now completes more quickly. |
LUC-13730 01668632 |
|
Language support |
Download and Checkout on the Contract > Abstract Info > Covenants page now translates correctly to supported languages. |
LUC-13757 |
|
Upload documents |
When you upload a ZIP file containing multiple documents on the Documents tab, and enter a Description with a special character such as %, that character is now included in the description. |
LUC-13612 |
|
Forms |
Custom list data now saves correctly on forms when there are when there are multiple custom lists on a layout. |
LUC-13582 |
|
Manage Fields |
When the user Language is set to LxPrefixed, and you edit the label for Covenant Template using these steps, the label now updates correctly:
|
LUC-13509 |