Cost Tracking Templates
If you are a Lucernex Administrator, you can create, edit and delete cost tracking templates on the Manage Cost Tracking Templates page and make them available in the modules, portfolios, and capital programs you want. With cost tracking templates, you can specify which fields the data comes from in the Cost Tracking Summary and Vendor Breakdown panes on the Cost Tracking tab. You can also specify the way in which Variance is calculated.
To view your cost tracking templates:
-
Click
 Admin in the toolbar.
The System Administrator Dashboard opens.
-
In the Company Administration pane, under Cost Management, click Manage Cost Tracking Templates.
The Manage Cost Tracking Templates page opens.
-
Click + in the row of the template that you want to view.
The entities the template is available for are listed.
Add a template
-
Click Add Cost Tracking Template in the Actions menu.
The Add Cost Tracking Template window opens.
-
Enter a Name and a Description for the template.
-
Select the field you want to use for each column on the Cost Tracking Summary page:
-
Estimate Column: Estimated Cost
-
PO Column: Purchase Orders
-
Approved CO Column: Change Order
-
Outstanding CO Column: Change Order
-
Invoice Column: Payment Apps and Invoices
-
-
Click Set Cost Tracking Summary Variance, then enter the formula to calculate variance. For example, to get the outstanding balance, enter the formula (PO Column + Approved CO Column) - Invoice Column:
-
Click (.
-
Select PO Column, then click >>.
-
Click +.
-
Select Approved CO Column, then click >>.
-
Click ).
-
Click -.
-
Select Invoice Column, then click >>.
-
click ).
The window now shows the formula.

-
Click Save.
-
-
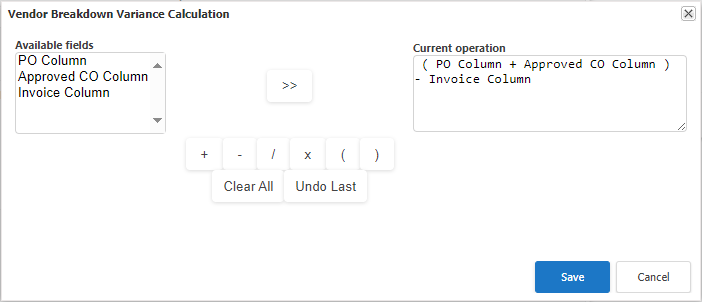
Click Set Vendor Breakdown Variance, then enter the formula to calculate variance. For example, to get the difference between the purchase orders plus change orders against the invoices received from a vendor, enter the formula (PO Column + Approved CO Column) - Invoice Column:
-
Click (.
-
Select PO Column, then click >>.
-
Click +.
-
Select Approved CO Column, then click >>.
-
Click ).
-
Click -.
-
Select Invoice Column, then click >>.
-
click ).
The window now shows the formula.
-
Click Save.
-
-
Select the check box of each entity that the template is to be available in.
-
Enter Notes to describe the template.
-
Select the Portfolios and Capital Programs that the template is to be available in.
-
Click Add.
Edit a template
-
In the row of the template you want to change, click Edit in the Actions column.
-
In the Manage Cost Tracking Templates page that opens, edit the fields you want.
-
Click Update.
Delete a template
You can delete templates that are not currently in use.
-
On the Manage Cost Tracking Templates page Actions column, click Delete link in the row of the template that you want to delete.
-
In the confirmation window that opens, click Yes.