You can create custom drop-down fields for use in your firm. To add a custom drop-down field to a page or form, you must first create a data field for the drop-down field.
To navigate to the Client Drop Downs page:
-
Select Admin in the toolbar in the upper-right corner of the window.
The System Administrator Dashboard page opens.
-
Click Client Drop Downs link in the Company Administration column.
The Client Drop Downs page opens.
-
Follow a procedure below.
 Add a Custom Drop-Down Field
To add a custom field to a page or form, you must first create a data field for the field.
To add a custom drop-down field:
-
Click Add Custom Drop Down in the lower-right corner of the Custom Drop Downs table.
The Add Custom Drop Down window opens.
-
Enter the name of your drop-down field in the Custom Drop Down Name field.
-
If you would like this drop-down field to hold values dependent upon the values of another drop-down field, select the parent drop-down field from the Smart List Parent Drop Down field.
This functionality can be seen in the screen shots below. In the first screen shot, there is no value selected in the Group field. When there is no value selected in the Group field, all available options appear in the Type field.
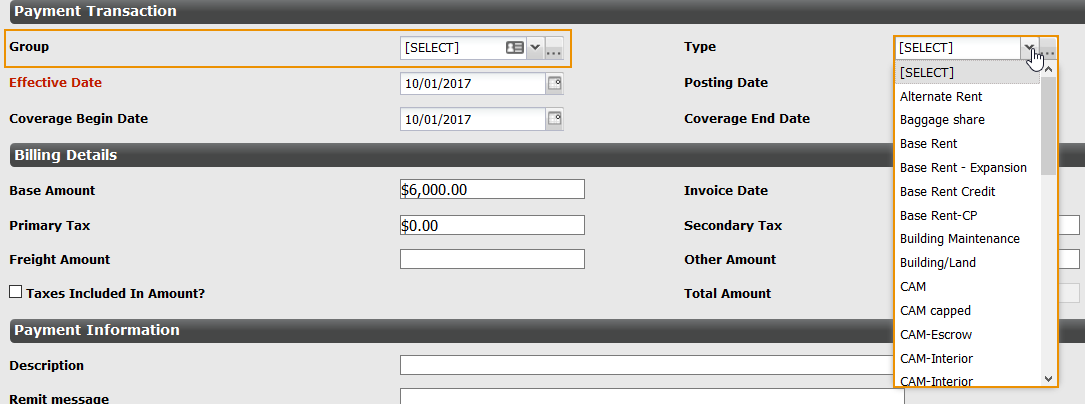
However, once a value is selected in the Group field—in this instance, the Baggage Rent group—only the values that are related to the Baggage Rent group appear in the Type field.

If you select a parent field in this step, there will be an additional step in the Add a Value to a Custom field procedures you must follow.
-
Enter a description of the field in the Description field.
Add descriptions to every template, layout, or field you create in Lucernex, so future administrators understand the purpose and context of each item.
-
Select Add.
The window closes. Your new field appears in the Custom Drop Downs table.
-
Follow the Add a Value to a Custom Drop-Down Field procedures below.
Edit a Custom Drop-Down Field
To edit a custom drop-down field:
-
Find the drop-down field you want to edit.
-
Select Edit in the Actions column of the record.
The Edit Custom Drop Down window opens.
-
Make your changes.
-
Select Update.
The window closes. Your changes are saved.
Delete a Custom Drop-Down Field
To delete a custom drop-down field:
-
Find the drop-down field you want to delete.
-
Select Delete in the Actions column of the record.
A dialog opens, asking you to confirm your choice.
-
Select Yes.
The dialog box closes. The custom drop-down field is deleted.
Add a Value to a Custom Drop-Down Field
Once you have created your drop-down field, you will need to create the values which appear in the drop-down field.
-
Find the drop-down field you want to edit.
-
Select Edit in the Actions column of the record.
The Edit Custom Drop Down window opens.
-
Click Add Custom Field.
The Add Custom Field window opens.
-
Do one of the following:
-
If you assigned a parent field in Step 4 of the Add a Custom field procedures above:
-
Enter a name for the field value in the Name field.
-
Enter a description for the field value in the Description field.
-
Select the parent field value you want this value to be associated with from the Smart Parent Value field.
You can have multiple child values associated with the same parent value.
-
Select the portfolio you want this value to be available for from the Available for the following Portfolios / Capital Programs field.
All Portfolios / Capital Programs is the default. Multiple options are available.
-
Select Add.
The window closes. The new value appears in the table in the Edit Custom Drop Down window.
-
-
If you did not assign a parent field, follow the Add a Group procedures.
-
-
Repeat step 5 to add additional values to your drop-down field.
-
Select Update.
The window closes. Your changes are saved.
Edit a Value in a Custom Drop-Down Field
To edit a value in a custom drop-down field:
-
Find the drop-down field you want to edit.
-
Select Edit in the Actions column of the record.
The Edit Custom Drop Down window opens.
-
Select Edit in the Actions column of the record.
The Edit Custom Field window opens.
-
Make your changes.
-
Select Update.
The Edit Custom Field window closes.
-
Select Update.
The Edit Custom Drop Down window closes.
Delete a Value from a Custom Drop-Down Field
To delete a value from a custom drop-down field:
-
Find the drop-down field whose value you want to delete.
-
Select Edit in the Actions column of the record.
The Edit Custom Drop Down window opens.
-
Select Delete in the Actions column of the record.
A dialog opens, asking you to confirm your choice.
-
Select Yes.
The dialog box closes, and the value is deleted.
-
Select Update.
The Edit Custom Drop Down window closes.
Activate / Deactivate Drop-Down Field Option
To activate or deactivate a drop-down field option:
-
Find the drop-down field whose option you want to deactivate.
-
Select Edit in the Actions column of the record.
A window opens.
-
Find the option you want to deactivate.
-
Select Edit in the Actions column of the record.
An Edit Item window opens.
-
Do one of the following:
-
Select the Inactive check box to deactivate the option.
-
Clear the Inactive check box to reactivate the option.
-
-
Select Update.
Your changes are saved.
If a drop-down field option is in use by a record and a user marks the option as inactive, the system does not notify the user that the option is in use.