These are generic procedures that are common across all or multiple areas of Lucernex. As such, these procedures do not call out specific navigation to the page.
The Lucernex document viewer supports all major file types, and allows users to easily collaborate and mark up documents. Please see the sections below to learn more.
If you upload a new version of your document, your existing markup will be deleted.
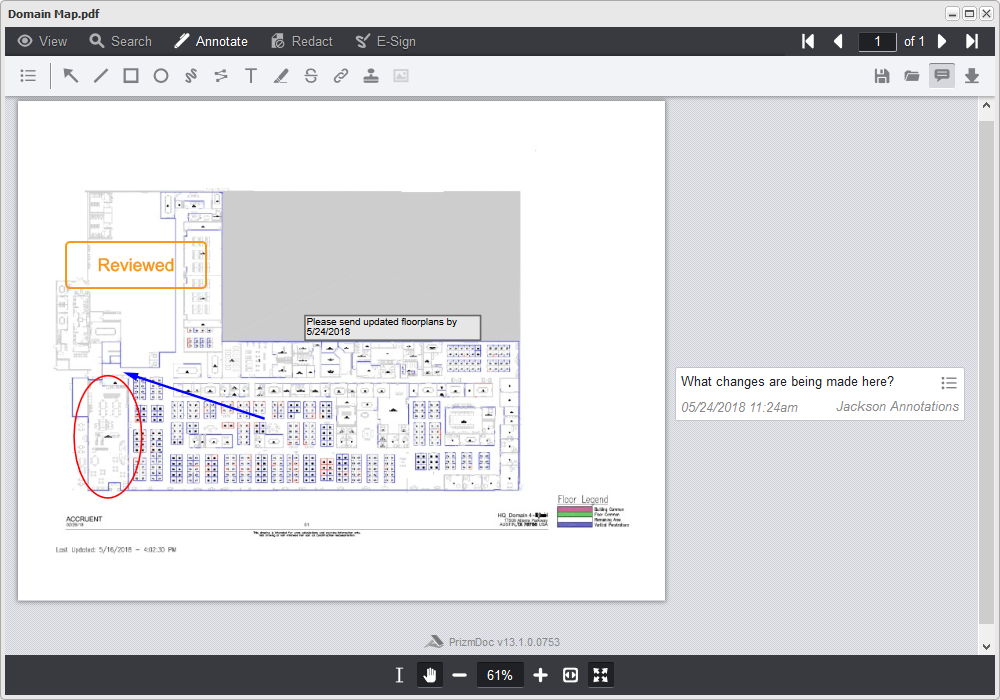
Pictured below is a screen shot of the Document Viewer. An AutoCAD document is opened. There is an orange Reviewed stamp on the document, a red circle, and a blue arrow. The user has also added a comment which reads, "What changes are being made here?". Another user has inserted a text box which contains the text, "Please send updated floorplans by 5/24/2018".
Supported Document Types
The Lucernex Document Viewer supports the following document types:
-
.png,
-
.jpg,
-
.tiff,
-
.gif,
-
.pdf,
-
.dwg,
-
.dwf
-
all Microsoft Office extensions
 Access and Use the Document Viewer
To access and use the document viewer:
-
Navigate to the Documents page of the entity with which you are working.
The Documents page is on the Details sub-tab of all modules.
-
Select the folder where your document is located in the Documents menu.
The document should appear in the Documents pane.
-
Do one of the following:
-
Double-click the file.
The Document Viewer opens.
-
Right-click the file, and select the View from the menu that appears.
The Document Viewer opens.
-
-
Add markup to your document using the tools and procedures described below.
-
Click Save.
This appears in the upper-right corner of the Document Viewer window to ensure that your annotations are saved.
-
Close the Document Viewer window.
The Has Markups column now has a value of YES to indicate that the document has saved markups.
If you upload a new version of your document, your existing markup will be deleted.
Document Viewer User Interface
Tab Bar
The Tab Bar is in the upper-left corner of the Document Viewer. These menus give you access to all the tools you can use to view, search, and edit your document. We will discuss each menu in further detail below.

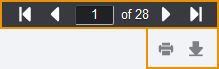
Page Navigation and Other Tools
These tools are in the upper-right corner of the Document Viewer. The arrows allow you to move between different pages of the document. Depending on what Tool menu you have selected, the other tools on this side of the Document Viewer change. The sections below will describe these tools.
Viewing Toolbar
The following table describes each in the viewing toolbar and its function.
|
Icon |
Description |
|---|---|

|
Select Text: Click Select Text to select text on your document. |

|
Pan Tool: Click Pan Tool to use your cursor to click and drag. |

|
Zoom Out: Click Zoom Out to zoom out. |

|
Zoom Percent: The value in this field changes as you zoom in and out. You can also type a specific zoom percentage in this field. |

|
Zoom In: Click Zoom In to zoom in. |

|
Fit Content: Click Fit Content to fit the content of the document to the current size of the document viewer. |

|
Full Screen: Click this to toggle full screen mode. |
View Tools
The View tools give you options for viewing your document. The following table describes each view tool and its function.
|
Icon |
Description |
|---|---|

|
Thumbnail: Click Thumbnail to open a pane on the left side of the viewer that contains thumbnails of the document pages. If you click a thumbnail in this pane, the relevant page will open. |

|
Magnifier Tool: Click Magnifier Tool to activate the Magnifier Tool. Click and drag your cursor over the part of the document you want to magnify. The area you magnify appears in a large box that moves with your cursor. |

|
Rectangle Zoom: Click Rectangle Zoom if you want to select a specific area to zoom in on. Click and drag your cursor to select the area you want to view. Once you release your cursor, the document viewer will zoom in on the selected area. |

|
Rotate Document: Click this to rotate the entire document 90° clockwise. |

|
Rotate Page: Click this to rotate the current page 90° clockwise. |

|
Image Tools: Click this to open the Image Tools menu. The Image Tools menu has three sliding scales to adjust aspects of the document: Sharpening, Gamma, and Line Width. The Sharpening sliding scale makes the document more defined, or “sharp”. The Gamma sliding scale makes the colors of the document more saturated. With the Line Width sliding scale, you can adjust the width of the lines in an AutoCAD (. dwg) file. |

|
Print: Click this to open a Print window. You will be given several options for printing. |

|
Download: Click this to open a Download window. You will be given several options for downloading. |
Email a Document
The size limit for emails out of Lucernex is 10 MB. This limit includes the total of size of the body of the email AND the size of the attachment. If the email exceeds 10 MB, the attachment option will be disabled and the link option will be automatically selected. To configure the size limit, contact Lucernex Support.
To email a document from inside the Lucernex Document Viewer:
-
Click Download
in the upper-right corner of the Lucernex Document Viewer. The Download pane opens on the left side of the Document Viewer.
-
Select the document format you want to send from the Download As field.
-
Click Email.
The Email Document window opens.
-
Do one of the following:
-
If you want to send the email to a member on the entity:
-
Click
 next to the Send To field.
 An Available Members window opens.
-
Click Right Arrow
 next to the name of the person who should receive the email.
 The person’s name moves to the Selected Members field.
-
Click Update Document Recipients.
The window closes. The member appears in the Send To field.
-
-
Enter the email address of the person who should receive the document in the Send To field.
If you want to enter multiple email addresses in the Send To or CC field, separate the email addresses with a semicolon.
-
-
If anyone should be carbon copied on the email, enter the person’s email address in the CC field.
If you want to carbon copy a member on the entity, follow the same procedures outlined in Step 4, bullet 1.
-
If you want to add a custom message to the email, enter your message in the Comments field.
-
Choose at least one option:
-
If you want to include a link to the document in Lucernex, select the Include hyperlink to Document check box.
Link recipients must have active Lucernex credentials to access files. If the recipient of a hyperlinked file is a Lucernex user, but they do not have access to the document in Lucernex, the system will return the message: Sorry, you do not have access to this document.
-
If you want to include the document as an attachment, select the Attach Document check box.
The size limit for emails out of Lucernex is 10 MB. This limit includes the total of size of the body of the email AND the size of the attachment. If the email exceeds 10 MB, the attachment option will be disabled and the link option will be automatically selected. To configure the size limit, contact Lucernex Support.
Check box setting impacts on system behavior
The following table describes the impacts that different setting configurations have on system behavior.
Include Hyperlink
Attach Document
Behavior No
Yes Recipients receive attachment via email but no hyperlink. Yes No
Recipients receive hyperlink via email but no attachment. Yes Yes Recipients receive both hyperlink and attachment via email. No
No
User cannot click Send button until at least one check box is selected.
-
-
Click Send.
A dialog box opens, confirming that the document is sent.
-
Click OK.
The dialog box closes.
Search Tools
The Search tools give you several options for searching your document. The following table describes each search tool and its function.
|
Icon |
Description |
|---|---|

|
Search Options: Click this to open the Search Options pane (see expanding section below). |

|
Match Exact Word or Phrase: Click this to indicate you are searching for an exact word or phrase. |

|
Match Case: Click this to indicate that your search results should match the case of the value you enter in the Search Document field. |

|
Whole Word: Click this to indicate that the word you are searching for is a whole word instead of a partial word. |

|
Begins With: Click this to indicate that the content you are searching for begins with your search criteria. |

|
Ends With: Click this to indicate that the content you are searching for ends with your search criteria. |

|
Use Wildcards: Click this to indicate that you will use wildcards in your search criteria. You can use the asterisk (*) character or a question mark to search for partial values. For example, if you search ra?e, the search results might return “rate”, “rake”, and “race”. |

|
Proximity Search: Click this to search for two words within proximity of one another. For example, if I search for “Accruent ~3 Domain”, the Document Viewer will search for the word Accruent within three words of the word Domain. To use this function, you must type your search terms in this format: Word1 ~n Word2, where n is the number of words between word 1 and word 2. |
Search Options Pane
On the Search Options pane you can view your search results, and narrow your search criteria. Click Search Options to open the Search Options pane.
Search Options Pane – Quick Actions
Click Quick Actions  in the Search Options pane to open the Quick Actions pane.
From the Quick Actions pane, you can choose to redact all instances of a word or phrase.
To redact a word or phrase:
-
Click Redact All to redact the selected items from the document.
The word or phrase is redacted.
-
Select a redaction reason from the Redaction Reason field.
-
Click Done.
Search Options Pane - Filter Pane
You can also filter your search results using the Filter Pane. Click Filter  in the Search Options pane to open the Filter Pane. The following table describes each filter and its function.
|
Icon |
Description |
|---|---|

|
Search in Document: Click this to search the text in the document. |

|
Search in Comments: Click this to search the comments added to the document. |

|
Search in Annotations: Click this to search the annotations added to the document. |

|
Search in Redactions: Click this to search the redactions in the document. |

|
Search in Signatures: Click this to search the signatures in the document. |
Annotate Tools
The Annotate tools give you many options for adding markup to your documents. You can also view annotations from other users who also share access to your documents.
Each user is limited to one annotation layer per document. You can add multiple annotations to your layer. You cannot edit the annotation layer of another user.
You can modify aspects of your annotations such as the color, border thickness, and opacity. See the Annotation Attributes procedures below to learn how.
The following table describes each annotation tool and its function.
|
Icon |
Description |
|---|---|

|
Annotation Layers: Click this to open the Annotation Layers Pane. See the Annotation Layers Pane procedures below to learn more. |
|
|
Arrow: Click this to activate the Arrow Annotation tool. Then, click and drag to draw an arrow. The point on the screen where you release your cursor will be the point of the arrow. |

|
Line: Click this to activate the Line Annotation tool. Then, click and drag to draw a line. |

|
Rectangle: Click this to activate the Rectangle Annotation tool. Then, click and drag to draw a rectangle. |

|
Ellipse: Click this to activate the Ellipse Annotation tool. Then, click and drag to draw an ellipse. |

|
Freehand - Click this to activate the Freehand Annotation tool. Then, click and drag to draw with your cursor. |

|
Polyline - Click this to activate the Polyline Annotation tool. Click your cursor where you want your polyline to begin. Drag your mouse and click to place your next point. Repeat until you have placed all of the points of your polyline. Double-click to exit out of the Polyline Annotation tool. |

|
Text - Click this to activate the Text Annotation tool. Then, click and drag to draw a rectangle where you want your text to be placed. A text box appears on the page. Type your text in the text box. Click outside the text box once you are done adding text. |

|
Highlight - Click this to activate the Highlight Annotation tool. Then, select the text you want to highlight with your cursor. |

|
Strikethrough - Click this to activate the Strikethrough Annotation tool. Then, select the text you want to strike through with your cursor. |

|
Text Hyperlink - Click this to activate the Text Hyperlink Annotation tool. Then, select the text you want to hyperlink. The Link dialog box opens. Enter the hyperlink in the field. Click Check Mark |

|
Stamp: Click this to activate the Stamp Annotation tool. The Annotation Options window opens. Select the color you want to use from the Color field. Select the stamp you want to use from the field. Then, click and drag to place your stamp. |

|
Save: Click this to open the Save Annotation pane. Enter a name for the annotation layer in the Save As field. Then, click Save. The Save Annotation pane closes. A confirmation message appears. If you already have an annotation layer, click this to save your annotations. |

|
Load: Click this to open the Load Annotations pane. Select the annotation layer you want to load from the field. The annotation layer appears on the page. |

|
Comments Pane: Click this to open the Comments Pane. See the Comments procedures below to learn more about the Comments Pane. |
|
|
Download: Click this to open a Download window. You will be given several options for downloading. |
 to save your hyperlink. Click
 Redact Tools
The Redact tools give you several options for removing sensitive information from your documents. The following table describes each redact tool and its function.
|
Icon |
Description |
|---|---|
|
|
Annotation Layers: Click this to open the Annotation Layers Pane. See the Annotation Layers Pane procedures below to learn more. |

|
Filled Rectangle: Click this to activate the Filled Rectangle tool. Then, click and drag to draw a rectangle. |

|
Text Selection Redaction: Click this to activate the Text Selection Redaction tool. Then, select the text you want to redact. |

|
Redact Full Pages: Click this to activate the Redact Full Pages tool. The Redact Full Pages window opens. Use the provided options to select which pages you want to redact. Then, click Redact to redact the pages. The redaction will appear as a dark gray overlay on the page. |

|
Redaction View Mode: Click this to toggle Redaction View Mode on and off. When Redaction View Mode is active, your redactions will appear as transparent dark gray overlays. |
|
|
Save: Click this to open the Save Annotation pane. Enter a name for the annotation layer in the Save As field. Then, click Save. The Save Annotation pane closes. A confirmation message appears. If you already have an annotation layer, click this to save your annotations. |
|
|
Load: Click this to open the Load Annotations pane. Select the annotation layer you want to load from the field. The annotation layer appears on the page. |
|
|
Comments Pane: Click this to open the Comments Pane. See the Comments procedures below to learn more about the Comments Pane. |
|
|
Download: Click this to open a Download window. You will be given several options for downloading. |
E-Sign Tools
The E-Sign tools give you the ability to add custom signatures to a document. The following table describes each e-sign tool and its function.
|
Icon |
Description |
|---|---|
|
|
Manage E-Signatures: Click this to open the Manage E-Signatures window. See the Manage E-Signatures procedures below for more information about this window. |

|
Create Freehand Signature: Click this to open the Create Freehand Signature window. Use your cursor to sign on the provided line. Select whether this signature is a Signature, Initials, or Title from the Category field. Click Save once you are satisfied with your signature. |

|
Create Text Signature: Click this to open the Create Text Signature window. Type your name in the provided field. Several font options appear in the window. Select the font option you want to use. Select whether this signature is a Signature, Initials, or Title from the Category field. Click Save once you are satisfied with your signature. |

|
Place E-Signature: Click this to open the Signatures pane. Your currently selected signature appears in the pane. Click the area of the document where you want your signature to appear. To change your currently selected signature, click the signature in the Signatures pane. All available signatures appear in a window. Select the signature you want to use. Then, click Done. You can move and change attributes of your signature. See the Annotation Attributes procedures below to learn how. |

|
Place Date: Click this to activate the Place Date tool. Click the area of the document where you want the date to appear. You can move and change attributes of the date. See the Annotation Attributes procedures below to learn how. |
|
|
Comments Pane: Click this to open the Comments Pane. See the Comments procedures below to learn more about the Comments Pane. |
|
|
Download: Click this to open a Download window. You will be given several options for downloading. |
Annotation Attributes
When you place or select an annotation, an Annotation Attributes pane appears in the upper-right corner of the window. This pane gives you several options for changing the attributes of an annotation, such as the color, opacity, and border attributes.
Attributes Pane
Pictured below is the Attributes pane for the rectangle tool. This pane has tools which allow you to modify the appearance of the rectangle.
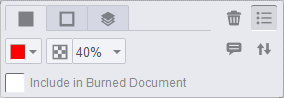
The following table describes each annotation attribute and its function.
|
Icon |
Description |
|---|---|

|
Color: Select this field to open a palette of colors for your annotations. Select the color you want to use.
|

|
Opacity: Select the level of opacity you want to use from the field. |

|
Border Width: Select the width you want for your annotation’s borders. |
|
N/A |
Include in Burned Document: Select this check box to mark an annotation as a permanent part of the file. |
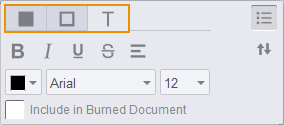
Additionally, some annotation types allow you to change the attributes of the shape and the border. These are distinguished by multiple tabs at the top of the Annotation Attributes pane. Pictured below is the Attributes Pane for the Text Annotation tool, with the tabs at the top of the pane boxed in orange, to make them more visible.
Options Menu
When you first add an annotation to your document or select text in a document, you will see a small rectangular next to your selection.
Pictured below is a screenshot of a red rectangle. A small rectangular with that looks like a bulleted list appears below the rectangle.
If you click this button, a field of common actions will open. The options that appear in this menu differ depending upon the type of annotation you are working with.
Edit an Annotation
To edit an annotation:
-
Select the annotation.
The Annotation Attributes pane opens.
-
To resize the annotation, click and drag the corners of the annotation.
-
To move the annotation, click and drag the center of the annotation.
-
Click Save Annotations
in the toolbar to save your changes.
Delete an Annotation
To delete an annotation:
-
Select the annotation.
The Annotation Attributes pane opens.
-
Click Trash Can
 in the Annotation Attributes pane.
 The annotation is deleted.
Annotation Layers Pane
On the Annotation Layers pane you can perform multiple actions with the annotation layers on a document.
Each user is limited to one annotation layer per document. You can add multiple annotations to your layer. You cannot edit the annotation layer of another user.
To make an annotation layer invisible, click Hide . To make the layer visible again, click the again.
Edit Layer Name
To edit the name of your annotation layer:
-
Click Annotation Layers
in the toolbar of the Annotate tab or the Redact tab. The Annotation Layers pane opens.
-
Click the menu on the My Annotations header bar.
A menu opens.
-
Select Edit Name from the field.
The name of your annotation layer becomes editable.
-
Make your changes.
-
Click elsewhere in the window.
The name of your annotation layer is changed.
Save an Annotation Layer
To save an annotation layer:
-
Click Annotation Layers
in the toolbar of the Annotate tab or the Redact tab. The Annotation Layers pane opens.
-
Click the menu on the My Annotations header bar.
A menu opens.
-
Select Save Annotations from the field.
The Save Annotations pane opens.
-
Enter a name for your annotation layer in the Save As field.
-
Click Save.
The Save Annotations pane closes. Your annotation layer is saved.
Delete Annotation Layer
To delete an annotation layer:
-
Click Annotation Layers
in the toolbar of the Annotate tab or the Redact tab. The Annotation Layers pane opens.
-
Click the menu on the My Annotations header bar.
A menu opens.
-
Select Delete Annotations from the field.
The Delete Annotations pane opens. A message appears in the pane, asking you to confirm your choice.
-
Click Confirm.
The annotation layer is deleted.
Load Annotation Layers
You can load the annotations of other users who have access to your document.
To load annotation layers:
-
Click Annotation Layers
in the toolbar of the Annotate tab or the Redact tab. The Annotation Layers pane opens.
-
Click the menu on the Annotations for Review header bar.
A menu opens.
-
Select Load Annotations from the field.
The Load Annotations pane opens.
-
Select the check box next to the annotation you want to load from the Select annotations for review table.
You can also click Toggle All check box to add all annotations.
-
Click Done.
The annotations you selected appear in the Annotations for Review table.
Merge Annotation Layers
You can merge one or multiple layers of annotations. If you merge the annotations of another user into your annotation layer, you will be able to make changes to the annotations. The other user will still be able to see and make changes to their annotation layer.
You cannot un-merge annotation layers. Do not merge layers unless you are certain you want to merge them.
To merge annotation layers:
-
Click Annotation Layers
in the toolbar of the Annotate tab or the Redact tab. The Annotation Layers pane opens.
-
Click the menu on the Annotations for Review header bar.
A menu opens.
-
Do one of the following:
-
Select Merge All Annotations from the field.
This action cannot be undone, and the system does not confirm whether you want to merge all annotations. Do not select the Merge All Annotations option unless you are certain you want to merge all annotations.
-
To select individual annotation layers to merge:
-
Select Merge Annotations from the field.
A list of the loaded annotations appears.
-
Select the check boxes next to the annotation layers you want to merge.
You can also select the Toggle All check box to select all annotation layers.
-
Click Merge Selected to My Annotations.
The annotation layers merge.
-
-
Comments
In the Comments pane you can add, edit, delete, and reply to comments on your documents.
Add a Comment
To add a comment:
-
Select the attribute to which you want to add a comment.
The Annotation Attributes pane opens.
-
Click Comment
. A Comment dialog box opens.
-
Enter your comment in the field.
-
Click Done.
The comment is saved. It appears in the Comments pane.
Edit a Comment
To edit a comment:
-
Click Comments Pane
in the toolbar to open the Comments Pane. -
Select the comment you want to edit.
-
Hover your cursor over the
in the comment. The Edit and Delete buttons appear.
-
Click Edit
 .
. The comment becomes editable.
-
Make your changes.
-
Click Done.
The comment is updated.
Delete a Comment
To delete a comment:
-
Click Comments Pane
in the toolbar to open the Comments Pane. -
Select the comment you want to delete.
-
Hover your cursor over the
in the comment. The Edit and Delete buttons appear.
-
Click Delete
. The comment is deleted.
Reply to a Comment
To reply to a comment:
-
Click Comments Pane
in the toolbar to open the Comments Pane. -
Select the comment to which you want to reply.
-
Click in the Reply field.
The field becomes editable.
-
Enter your comment.
-
Click Done.
Your comment is saved.
Manage E-Signatures
In the Manage E-Signatures window you can add, download, and delete your saved E-Signatures.
Draw New Signature
To type a new signature from the Manage E-Signatures window:
-
Click Manage E-Signatures
in the toolbar of the E-Sign tab. The Manage E-Signatures window opens.
-
Click Draw New Signature at the bottom of the window.
-
Use your cursor to sign on the provided line.
-
Select whether this signature is a Signature, Initials, or Title from the Category field.
-
Click Save.
Type New Signature
To type a new signature from the Manage E-Signatures window:
-
Click Manage E-Signatures
in the toolbar of the E-Sign tab. The Manage E-Signatures window opens.
-
Click Type New Signature at the bottom of the window.
-
Type your name in the provided field.
Several font options appear in the window.
-
Select the font option you want to use.
-
Select whether this signature is a Signature, Initials, or Title from the Category field.
-
Click Save once you are satisfied with your signature.
The window closes. Your signature is saved.
Delete Signature
The system will not warn you before you delete the signature. Do not delete the signature unless you are certain you want to delete it.
To delete a signature from the Manage E-Signatures window:
-
Click Manage E-Signatures
in the toolbar of the E-Sign tab. The Manage E-Signatures window opens.
-
Click Delete Signature below the signature you want to delete.
The signature is deleted.
Download Signature
To download a signature from the Manage E-Signatures window:
-
Click Manage E-Signatures
in the toolbar of the E-Sign tab. The Manage E-Signatures window opens.
-
Click Download Signature below the signature you want to download.
A download dialog box opens.
-
Download the file.
Use Signature
To use a signature from the Manage E-Signatures window:
-
Click Manage E-Signatures
in the toolbar of the E-Sign tab. The Manage E-Signatures window opens.
-
Click Use Signature of the signature you want to use.
The window closes.
-
Click the area of the document where you want your signature to appear.
Your signature appears on the document.