Authentication for RESTful API Queries
The IWMS RESTful web-service accepts three forms of authentications: basic authentication, JWT bearer token, and cookie. This article explains each method of authentication.
 Basic Authentication
Basic Authentication is the easiest authentication strategy but is also the weakest in terms of security. The Lucernex IWMS follows the industry standard with Basic Authentication in that the client adds the basic authentication token as a HTTP Header in each of their RESTful calls, with the exception that the Username field is overloaded and consists of a concatenation of the IWMS username and firmname separated by the : character:
gregg:qa
In the above example, the username is gregg and the firmname is qa. The password can be plaintext or SHA-1 encrypted, which is a one-way hash. IWMS does not store passwords in plaintext; instead, for security reasons it always stores the SHA-1 encrypted equivalent.
JWT Bearer Token Authentication
Lucernex’s most secure RESTful API authentication option is the JWT (JSON Web Token) option, which uses the Bearer schema and can be digitally signed, optionally encrypted, and set to expire. We often call this a JWT token or Bearer token to distinguish it from the Basic token Lucernex also offers.
The following features are configurable by Accruent on behalf of clients:
-
Digital signatures
-
Encryption
The following feature is directly configurable by clients:
-
Token expiration
Accruent-Configurable: Digital Signatures and Encryption
The following options can only be configured by Accruent staff. Users without appropriate permissions will not be able to see the pages or settings referenced in this section.
To enable digital signatures and encryption:
-
Select Admin in the toolbar in the upper-right corner of the window.
The System Administrator Dashboard page opens.
-
Click Manage Features / Global Properties link in the Data / PS Tools section.
The Manage Features page opens.
-
Click Manage Firm (Lx) Properties tab.
The Manage Firm (Lx) Properties tab opens.
-
Select RESTful from the menu above the table.
The RESTful API configuration options appear.
-
Click Add Global Property in the lower-right portion of the table.
The Add Global Property window opens.
-
Enter Sign in the Key field.
-
Enter true in the Value field.
-
Select Add.
The window closes. The new firm-specific property appears in the table. The digital signature is enabled.
-
Click Add Global Property in the lower-right portion of the table.
The Add Global Property window opens.
-
Enter Encrypt in the Key field.
-
Enter true in the Value field.
-
Select Add.
The window closes. The new firm-specific property appears in the table. Encryption is enabled.
Client-configurable: Token Expiration
The IWMS-generated JWT token can have a limited lifespan if your account is affected by the company password policy. This means that the token's expiration is subject to the Days Until Password Expires setting on in the Password Policy page, unless:
-
the member fetching the token is exempt from the password policy
Once the token expires, you will have to get a new JWT token via the Copy [JWT Bearer Authentication token] to Clipboard.
Getting Basic/Bearer Token from Lucernex UI
You can acquire either a basic or bearer token that represents your account by navigating to the RESTful Webservice Docs page within Lucernex.
To retrieve the Lucernex authentication token:
-
Select Admin in the toolbar in the upper-right corner of the window.
The System Administrator Dashboard page opens.
-
Click RESTful WebService Docs link in the Data / PS Tools section.
The RESTful WebService Docs page opens.
Not all users can see the RESTful WebService Docs link. If you don’t see it, you can access it at the following URL: {{url}}/en/test/RESTful.jsp
-
Do one of the following:
-
Click Copy Basic Authentication token to Clipboard.
Getting your Basic Authentication token has the advantage that the password is SHA-1 encrypted. This improves security because it is impossible to determine the plaintext equivalent password.
-
Click JWT Bearer Authentication token to Clipboard.
The appropriate token is copied to your clipboard.
IWMS-generated JWT tokens are only accepted by the IWMS environment that created said token.
-
-
Paste the authentication token into what ever RESTful client you are developing.
-
Click OK.
The dialog box closes.
Getting JWT Bearer Token via RESTful Call
You can generate a JWT Bearer token via API call with the jwt resource which includes an optional expiresOn parameter. If the expiresOn parameter is omitted, Lucernex enforces the firm-defined password expiration policy as it applies to the user making the call.
In the following procedures, we explain how to get a JWT Bearer token using Postman, a free API development software.
To get a JWT token via a RESTful call in Postman:
-
Click Authorization tab.
-
From the TYPE list, select Basic Auth.
-
In the Username field, enter your username and firm name in the following syntax: username:firmName.
The username is case sensitive. The firm name is not.
-
In the Password field, enter your password.
- Change the method to POST.
-
Add the URL: {{url}}/rest/jwt.
-
If necessary, add the expiresOn parameter with the expiration date and time in the ISO 8601 format.
If you don't provide the optional TZD part of the timestamp, then the provided timestamp is considered to be relative to the IWMS server’s timezone or CT.
Syntax: yyyy-MM-dd'T'HH:mm:ss.sTZD
-
Example without URL encoding: 1997-07-16T19:20:30.45+01:00
-
Example with URL encoding: 1997-07-16T19:20:30.45%2B01:00
Syntax variable definitions Variables
Definition
Limits
Sample
yyyy
4-digit year
N/A
1997
MM
2-digit month in year
01 to 12
07 = July
dd
2-digit day in month
01 to 31
16
T
Time delimiter
N/A
T
HH
2-digit hour in 24-hour day
00 to 23
19
mm
2-digit minute in hour
00 to 59
20
ss
2-digit second in minute
00 to 59
30
S
1 or more digits as a decimal fraction of a second
1 to 9 or
01 to 99 or
001 to 999
45
TZD
Time zone designator
-
Z for UTC time
-
+|-hh:mm for UTC offset
-
+|- = direction of offset
-
hh = hours of offset
-
mm = minutes for offset
-
Z or
+ (encoded as %2B)
- (unencoded)
hh = 00 to 14
mm = 00, 30, 45
%2B01:00
-
-
Click Send.
The response body will contain the token without the Bearer prefix. Copy the token and use it in the following procedures.
Use Bearer Token
Once you have obtained the Bearer token, you can use it to make subsequent calls by passing it as a header parameter.
In the following procedures, we explain how to use a JWT Bearer token in Postman, a free API development software.
To use the bearer token in Postman:
-
Copy the token you received in the previous procedures.
-
Click Authorization tab.
-
From the TYPE list, select No Auth.
-
Click Headers tab.
-
In the Key field, type Authorization.
-
In the Value field, type paste your copied token.
If the token does not start with “Bearer”, add the word Bearer followed by a space to indicate the type of token being sent.
-
Begin making API calls.
Cookie Authentication
Cookie authentication requires the client get a session cookie via the login.jsp page and is generally used by the web ui when it needs to make RESTful calls. There is an advantage with cookie authentication as Lucernex uses load balancers with the sticky session feature enabled. This sticky session is important when working with the /task resource as the asynchronous tasks are only known to the cluster node where the task was created.
To get an IWMS cookie you need to interact with the IWMS login.jsp page. This login process is a series of two POSTs to login.jsp:
-
username and firmname
-
password
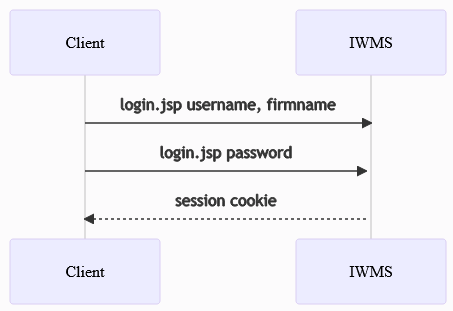
After the 2nd POST to login.jsp you will have an authenticated session and the JSESSIONID cookie from the login.jsp response will represent that new IWMS login session. There is no existing IWMS RESTful call that can perform this cookie authentication sequence, so you have to perform this sequence of POSTs.
To perform cookie authentication via Postman:
-
Import Postman collection.
-
Click Collections button in the menu on the left side of the screen.
-
Click Ellipses button to the right of the Cookies collection.
-
Select Edit from the menu that appears.
The Cookies collection opens.
-
Click Variables tab.
-
Complete these fields:
-
baseURL
-
username
-
firmname
-
password
-
-
Click Save.
-
Click Run.
Postman will then show you what sequence of requests it will perform.
-
Click Run Cookies.
Postman will then show you the results of the run.
The Cookies/Capture Cookie Postman request leverages a Postman feature where you can write Javascript-based tests. This Capture Cookie request does a POST on login.jsp specifying the configured username and firmname.
After Postman runs this request it then executes the Javascript test script which is under the Tests tab. This Javascript executes the 2nd POST against login.jsp providing the password thus completing the authentication sequence.
The Use Captured Cookie request then validates the results of the RESTful call that leveraged the cookie acquired via the Capture Cookie request.