SAML Troubleshooting
(EMS Internal Documentation)
This section provides troubleshooting tips and information about SAML.
- Troubleshooting Steps
- Verify SAML Configuration in EMS Platform Services
- Verify Auth Key Configuration in EMS Platform Services
- SAML Metadata Import Guidelines
- SAML Debugging: Logs and Tools
- Error Messages and Codes
See Also:
- SAML 2.0 Terminology and Process Overview
- SAML Authentication
- Configure Platform Services in the Admin Portal
Troubleshooting Steps
To troubleshoot SAML configuration issues:
- Determine where in the SAML authentication process the error or issue is occurring.
Because SAML uses browser redirects, you can often look at the URL to determine where the problem is occurring. If a problem is occurring while the user is on a URL belonging to the IdP, it is most likely an IdP issue. If a problem is occurring at the EMS Platform Services URL, the issue is most likely on the EMS side.
- Get a copy of the SAML request, or SAML response if the authentication process has progressed far enough.
To get a sample SAML request/response, use a SAML tracer add-on tool, such as Firefox SAML-tracer or SAML Chrome Panel. You can also use the browser DevTools; however, you will obtain better troubleshooting results with a SAML tracer tool, and Firefox SAML-tracer is recommended. Once you've added the SAML tracer tool to your browser, you can access the SAML-tracer through a button in the upper-right of the browser. See Perform a SAML Trace for an example.
- Review the SAML request/response to locate the potential issue, such as:
- Attribute information within the <saml:Assertion> tag in the IdP response. Keep in mind that there may be multiple assertions.
- The case syntax of SAML assertion field names, for example: NameID, Email, FirstName, and LastName are crucial to SSO succeeding and can be quickly identified and modified in a customer's IdP configuration when required.
When sending the SAML output to Dev, if you are unsure which part to provide, send Dev the entire SAML output, along with any other details regarding the issue.
Verify SAML Configuration in EMS Platform Services
Required Information
The following information is needed when configuring SAML for EMS Platform Services (service provider) and the identity provider:
- Service provider requirements to make a request:
- URL to send the user to for sign-on
- Whether to sign the SAML request, and if signing, the key to sign the request with (signing helps the IdP know for certain that EMS Platform Services is the SP making the request)
- Identity provider requirements to process a request:
- Identity of the SP (EMS Platform Services); this is the identifier that we put in our SAML requests that tells who we are
- Once the user has logged in, the IdP needs a URL for returning the user to EMS Platform Services (service provider URL)
- Whether to sign the SAML response, and if signing, the key to sign the response with
- Service provider requirements to process a response:
- IdP (public) key to verify the signature in the IdP response
- Name of the assertion to use to associate users (in other words, which assertion matches the network ID in the EMS WebUser table)
SAML Service Provider Configuration Tips
SAML issues can arise if a customer's SAML configuration information is incomplete or incorrect in the EMS Platform Services Admin UI. To verify SAML configuration, review the information found in the SAML Authentication topic.
When verifying a customer's SAML configuration, keep in mind the following regarding the SAML Configuration fields (found in EMS Platform Services Admin UI):
- Form Post Field Name – Typically, configured to use the default field text, which is SamlResponse.
- User Identity Field – If Attribute is selected from the field, ensure that the Identity Attribute Field has been completed and contains the correct custom assertion attribute name for identifying users.
- Identity Attribute Name – If the Attribute option is selected in the User Identity Field, ensure this field contains an attribute name. Attribute names can be IdP-specific, such as a user ID or email. The best way to determine what goes in this field is to obtain a sample SAML response, review the assertions, and locate the name attribute (which will go in this field).
- Identity Provider Issuer – The IdP issuer can be found within the <saml:issuer> tag in the SAML response that the IdP sends EMS Platform Services. EMS Platform Services will autogenerate the values for the Service Provider Issuer.
- Service Provider Issuer – The SP issuer states who we are, and it can be found within the <saml:issuer> tag in the SAML request that we send to the IdP. The SP issuer must match what is configured on the IdP side. For example, AD FS must be configured with the same SP issuer that we send in our SAML request; otherwise, AD FS will reject the request.
- HTTP Binding Type – Currently, only redirect is supported. See SAML Binding Types for more information.
- Identity Provider URL for Service Provider Redirect – If you have the IdP metadata.xml file, you can upload it through the EMS Platform Services endpoint https://company.platform/api/v1/authentication/saml/metadata/idp. The identity provider certificate will be uploaded for you, as well as the Identity Provider Issuer. The Identity Provider URL for Service Provider Redirect field will be populated for you.
- Service Provider Base URL for IdP Callback – Only use the base URL for EMS Platform Services because EMS Platform Services will autogenerate the rest of the route.
SAML Identity Provider Configuration Tips
Not all IdPs require configuration, but for those that do, errors can occur if the IdPs are not configured with the correct EMS Platform Services information.
For example, AD FS needs to be configured in advance with a URL to send a user back to once the user is authenticated. EMS Platform Services will send this URL in the SAML request; however, AD FS only uses the URL address in the request to verify that the address matches the URL in their system before sending the user back. If the URL is a location that is not configured in AD FS (not a valid location), AD FS will error out.
If an IdP requires configuration of the RelayState parameter, use the EMS Platform Services URL, either the base URL or full URL, depending on the IdP requirements. This EMS Platform Services URL is also used in the Service Provider Base URL for IdP Callback field of EMS Platform Services.
- Base URL – https://mycompany.com/EmsPlatform
- Full URL – https://mycompany.com/EmsPlatform/api/v1/authentication/saml
Verify Auth Key Configuration in EMS Platform Services
After verifying a customer's SAML configuration in the SAML tab of the EMS Platform Services Admin UI, you can set up or verify the Auth Key information in the Auth Keys tab. For information on configuring Auth Keys, see the Auth Keys section.
Auth Key Configuration Tips
When setting up or verifying Auth Key information, keep in mind the following:
- Service provider keys (EMS) and identity provider keys must be configured or added in separately. You can select the provider type from the Purpose field.
- You can autogenerate the SP keys. The SP keys can be self-signed; they do not have to be from a real certificate authority.
- You must format the Public Key and Private Key fields in a specific manner (there is an open ticket to fix this formatting requirement).
- Make sure that you clear out the Not Before and Not After fields. Certificates have their own expirations embedded in them, and EMS Platform Services is using those embedded expiration dates.
- For the SAML Service Provider, you can enter both a Public Key and Private Key.
- For the SAML Identity Provider, you do not need to enter the Private Key from the IdP. This field will be grayed out.
- For hosted customers, we are hosting the service provider, but the customers are hosting their own IdPs.
- The IdP metadata only contains the Public Key.
SAML Metadata Import Guidelines
SAML metadata describes how each side (SP and IdP) is configured and how each side would like their SAML requests/responses to appear. Metadata helps automate the configuration process. You do not have to configure both sides with metadata; you can configure one side manually and the other side automatically through metadata. The XML metadata file contains SAML configuration info, such as the embedded certificate, default Name ID assertion, supported binding type, and location in which to send the user.
EMS does not currently have a UI for importing metadata. To import IdP metadata, use a POST request through Postman (or similar tool), and POST the IdP metadata to the EMS Platform Services endpoint https://company.platform/api/v1/authentication/saml/metadata/idp.
SAML metadata is in XML, but the API for EMS Platform Services is in JSON. To import a SAML metadata file, you will need to create a JSON payload where the only key is XML, and the value is the XML payload.
SAML DebugGing: Logs and Tools
When troubleshooting SAML configuration issues, it is helpful to view the logs found in the EMS Platform Services Admin UI. It is also be helpful to perform a SAML trace, which will allow you to view the SAML requests and responses.
Logs
Logs are available in the Logs tab of the EMS Platform Services PS Admin UI. From the Logs tab, you can view global logs for EMS Platform Services. Viewing the logs in Splunk is useful if the error is on the service provider side (EMS Platform Services). If the issue is on the IdP side, the logs will only show that the user never returned to EMS Platform Services after the first redirect to the IdP.
Perform a SAML Trace
To obtain a sample SAML request/response, you can perform a SAML trace. The following steps explain how to perform a SAML trace using Firefox SAML-tracer.
- Install the SAML-tracer add-on for Firefox.
- In the Firefox browser, open the SAML-tracer tool and then reproduce the SAML issue in the browser. The tool will highlight all of the SAML requests and responses with orange SAML tags on the right side of the trace window.
After installation, if SAML-tracer does not work (trace window is blank during a trace), you may need to update your Firefox browser to the latest version.
- Select a SAML entry in the upper portion of the trace window. Then, in the lower portion of the trace window, click the SAML filter option to view the SAML output.
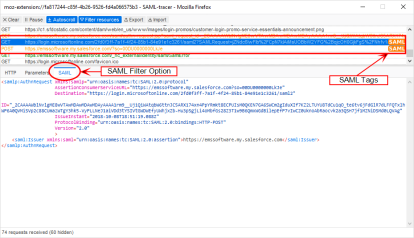
Performing a SAML Trace in Firefox SAML-tracer
- Inspect the filtered SAML information in the tracer window, or save the information by copying and pasting into a text editor or by using the Export button.
When sending the SAML output to Dev, if you are unsure which part to provide, send Dev the entire SAML output, along with any other details regarding the issue.
Error Messages and Codes
The following are SAML error messages and issues that may occur.
To properly troubleshoot SAML issues, you need to understand at what point in the workflow the error or issue is occurring. Try to narrow down the place in the process. For example, if the user has reached the IdP, we know the SAML request made it to the IdP and then failed. See SAML Authentication Process for more information.
The list is does not contain all possible errors and solutions:
Invalid or Missing POST Parameter (Occurs After User Logs Into IdP)
This error can be caused by configuration issues. Try reviewing the SAML response from Firefox SAML-tracer. The following are possible causes:
- Incorrect the binding type. EMS Platform Services might be expecting a redirect binding, but the IdP is sending a POST binding.
- The IdP is sending EMS Platform Services an unexpected parameter.