Exchange Sync Utility
Exchange Sync Utility allows existing bookings in EMS to be synchronized with configured Exchange resource mailboxes. EMS Exchange Room Integration (ERI) will automatically synchronize new bookings once rooms and resources are configured, but existing bookings will not automatically be synchronized. The Exchange Sync Utility can push those existing bookings to the corresponding Exchange resource mailbox.
Existing customers already using Exchange resource mailboxes will need to resolve conflicting Exchange appointments prior to synchronization. Synchronization issues should be resolved in Exchange and conflicts should be checked again until all issues are resolved.
This topic provides an overview of Exchange Sync Utility and how to install the utility.
Install Exchange Sync Utility
The Exchange Sync Utility is installed in the Platform API directory. The utility does not need to be accessed from the directory running Platform Services. The Platform API can be installed locally to utilize Exchange Sync Utility. Users must have write permission to the directory where the utility is being installed for the creation of reports.
-
Open a Command Prompt and navigate to Platform API directory.
-
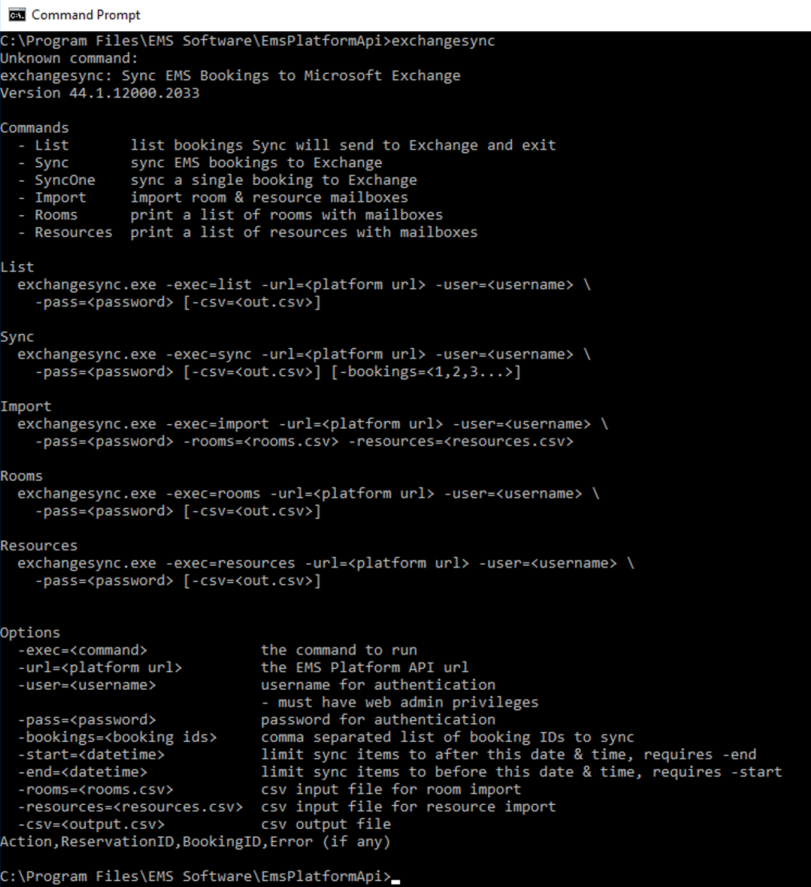
Type exchangesync to see a list of commands.
Commands for Exchange Sync Utility
|
Commands |
|
|---|---|
|
-List |
List the bookings Exchange Sync Utility will send to Exchange before synchronization. This can be written to a .csv file to reference all bookings and potential conflicts. |
|
-Sync |
Synchronize EMS bookings to Exchange. |
|
-SyncOne |
Synchronize a single booking to Exchange. |
|
-Import |
Import room and resource mailboxes into EMS. The format utilizes the ID of the room or resource and the SMTP mail address in exchange. |
|
-Rooms |
View a list of rooms and their configured mailboxes. This can be written to a .csv file to reference the configurations. |
|
-Resources |
View a list of resources and their configured mailboxes. This can be written to a .csv file to reference the configurations. |
Syntax for Exchange Sync Utility
|
Syntax |
|
|---|---|
|
List |
exchangesync.exe -exec=list -url=<platform url> -user=<username> \ -pass=<password> |
|
Sync |
exchangesync.exe -exec=sync -url=<platform url> -user=<username> \ -pass=<password> |
|
Import |
exchangesync.exe -exec=import -url=<platform url> -user=<username> \ -pass=<password> |
|
Rooms |
exchangesync.exe -exec=rooms -url=<platform url> -user=<username> \ -pass=<password> |
|
Resources |
exchangesync.exe -exec=resources -url=<platform url> -user=<username> \ -pass=<password> [-csv=<out.csv>] |
Parameters for Exchange Sync Utility
|
Parameters |
|
|---|---|
|
-exec=<command> -url=<platform url> -user=<username>
|
The command to run The EMS Platform API url Username for authentication Must have web admin privileges. |
|
-pass=<password> -bookings=<booking ids> -start=<datetime>
|
The password for authentication Comma separated list of booking IDs to sync Limit sync items to after this date and time. Requires -end Example: - format 2008-09-08T22:47:31-07:00 |
|
-end=<datetime>
|
Limit sync items to before this date and time. Requires -start Example: - format 2008-09-08T22:47:31-07:00 |
|
-rooms=<rooms.csv> -resources=<resources.csv> -csv=<output.csv> |
CSV input file for room import CSV input file for resource import CSV output file |
The CSV output is generated in the directory where the Exchange Sync Utility is located. Write access is required. The CSV input file should be in the directory where the Exchange Sync Utility is located. Read access is required.
Commands for Exchange Sync Utility in Command Prompt