Configure Email for OAuth
Starting April 30, 2026, Microsoft requires OAuth authentication for SMTP. Basic authentication is no longer supported. To maintain compatibility with external SMTP servers, you must configure email settings in the EMS Desktop Client to use OAuth authentication. Additionally, you need to update your Microsoft Application settings to enable OAuth for SMTP. Please refer to Microsoft's documentation for detailed guidance on these configurations.
Overview
Microsoft is transitioning away from Basic Authentication for SMTP AUTH in Exchange Online, impacting customers using external SMTP servers. To ensure continued email functionality and compliance with Microsoft’s security standards, EMS now supports OAuth authentication for SMTP in the Desktop Client.
Set Global Email Preference to SMTP
-
Configure the global email preference to use SMTP with OAuth:
-
Go to System Administration > Settings > Email Settings.
-
Select Use SMTP.
-
In the Mode list, select OAuth.
-
Enter the SMTP details from your organization’s SMTP or Exchange environment:
-
SMTP Client ID
-
SMTP Client Secret
-
SMTP Token URL
-
-
To verify the configuration, enter a valid SMTP email address in Sender email, and then select Test.
-
A global test email is sent to confirm SMTP connectivity.
-
Set User Email Addresses to Valid SMTP Addresses
All users must have a valid SMTP email address to send email from the Desktop Client after April 30, 2026.
-
Go to System Administration > Security > Users.
-
Select the user whose email you want to configure.
-
In Email address, enter the user's SMTP email address.
-
Select Ok.
Configuration on Microsoft Exchange Side
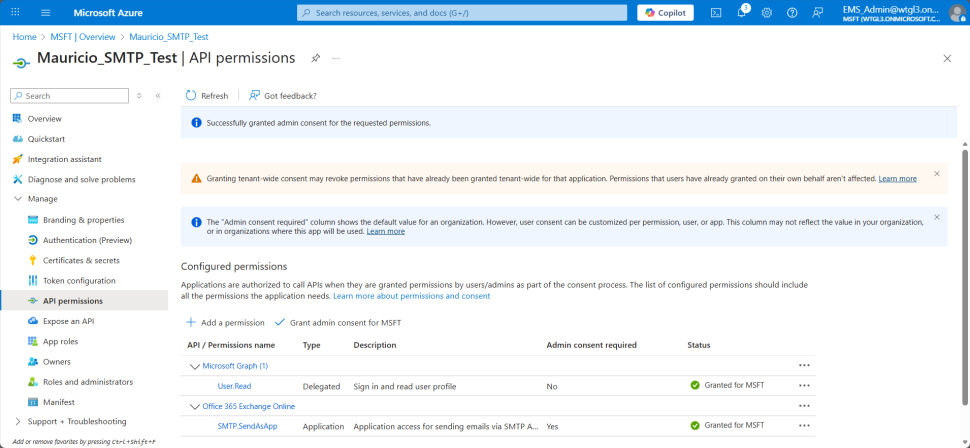
SendAsApp Permission in Microsoft Azure Registered Application:
-
Navigate to Manage > API permissions in your MSFT App.
-
Add SMTP.SendAsApp under Office 365 Exchange Online application permissions.
-
Click Add permissions and Grant admin consent.

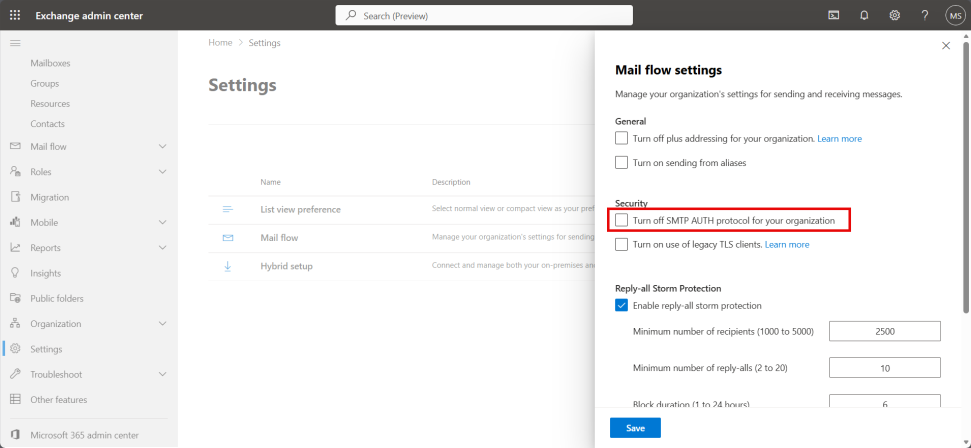
Enable SMTP AUTH Protocol in Exchange Admin Settings
-
Go to admin.exchange.microsoft.com and navigate to Settings > Mail flow.
-
Uncheck Turn off SMTP Auth protocol for your organization and save. Changes may take 30 minutes to 24 hours to propagate.
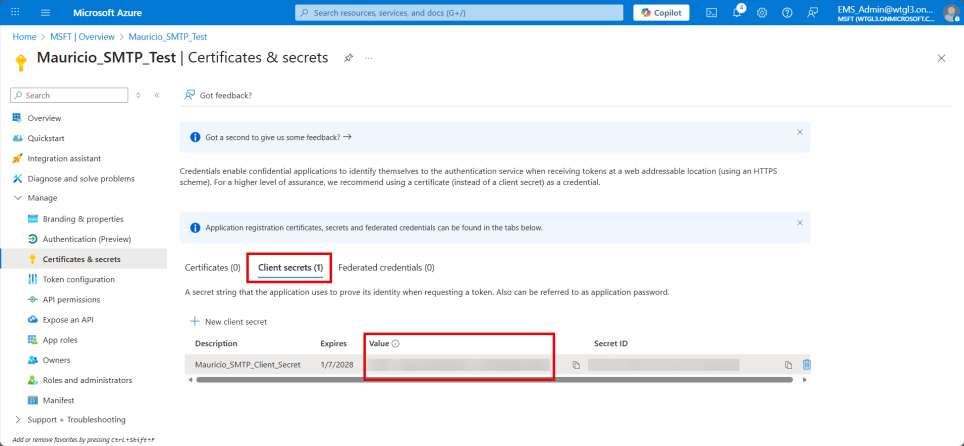
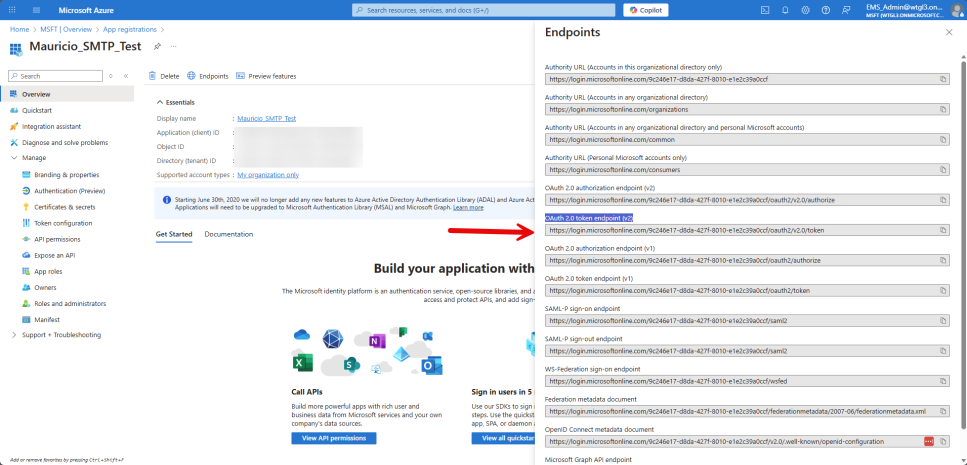
Where to Locate Your Client ID, Client Secret, and Token URL
-
Client ID: Available in your registered application details.
 ID_966x446.png)
-
Client Secret: Under Certificates & Secrets > Client Secrets tab, create a new client secret and note the value.
-
Token URL: Provided in your application registration.
Ensure Mailboxes Can Be Selected from the Azure Active Directory
-
Ensure Mailbox Permission is added to the mailboxes using PowerShell:
-
Example: Add-MailboxPermission -Identity "[email protected]" -User <SERVICE_PRINCIPAL_ID> -AccessRights FullAccess
-