Setting Up Advanced Reassign

The Advanced Reassign feature allows you to create a set of rules to help guide users to make an appropriate reassignment for work requests that they cannot complete. Instead of selecting a reassignment user from a list of all users, they can select a suggested backup user from a short list.

This is done by establishing a set of reassignment rules that are associated with certain properties or regions. These rules allow you to define which users should be primary, secondary, and tertiary backup user for a particular type and/or subType of work.

Once reassignment rules are established, a user can use the Adv Reassign link to select a preferred user to reassign a work order to, instead of selecting a name from the Assigned To drop-down menu.

The Assigned To drop-down menu

When the Adv Reassign link is clicked, a dialog box is displayed listing a set of suggested users to reassign this type of work to. The user can click a name from this list to reassign the work order.
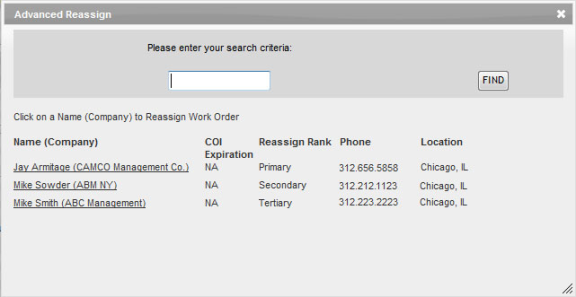
The Advanced Reassign dialog box

This tutorial guides you through the process of setting up the Advanced Reassign feature. This feature can only be set up by a user with Admin security rights. You should (and often must) perform these procedures in the order that they are presented in this tutorial.

ClosedEnable Advanced Reassign

The first step in the process is to enable the advanced reassign feature for the installation. To enable advanced reassign:

  1. Open the Administration Menu page.

  2. Under the LOGBOOK ADMINISTRATION heading, click Configuration Options.

  3. Under the Logbook Settings pane, select Yes from the Adv Reassign Enabled drop-down menu.

  4. Click UPDATE.

ClosedSet the Advanced Reassign Permission for Users

Although the advanced reassign feature is enabled for the entire installation, you may only want to allow a particular set of users to have access to it. Therefore, the ability to use the advanced reassign feature is set on a user-by-user basis. To set up advanced reassign security rights for a user:

  1. Open the Administration Menu page.

  2. Under the ADMINISTRATION heading, click User Security.

  3. Click the SELECT USER button to select the user you want to grant this security right to.

  4. Under the Logbook Security Rightspane, select the Adv Reassign check box.

  5. Scroll down to the bottom of the Security Rights pane and click UPDATE.

You must set this security right for each user you want to have access to the feature.

ClosedCreate Advanced Reassign Rules

The final step in the process is to create the advanced reassign rules. These rules specify the primary, secondary, and tertiary suggested reassignment user for particular types and/or subTypes of work requests. Rules can be established for either a single property or all properties in an entire region. To create advanced reassign rules:

  1. Open the Administration Menu page.

  2. Under the LOGBOOK ADMINISTRATION heading, click Adv Reassign.

  3. Select either the Property or Region where the rules will be in effect by clicking the appropriate Select link.

  4. Click the Create New link to create a new rule.

    The Advanced Reassignment window opens.

  5. In the Type field, select the type of work request you are creating the reassignment rule for.

  6. In the Sub Type field, select the subType of work request you are creating the reassignment rule for.

    If you do not select a subType, the reassignment rule will be established for all subTypes.

  7. In the Reassign to field, select the name of the user you want to add to the reassign list.

  8. In the Reassign Rank field, select Primary, Secondary, or Tertiary to define whether this user is the first, second, or third choice for reassignment.

  9. Click ADD.

All rules you create are displayed in the gray pane.

  • To Edit a Rule – Click the Edit link to the right of the rule.
  • To Delete Rules – Select the check box to the right of each rule you want to delete and click the DELETE button. If you click the check box to the right of the DELETE button, all rules displayed are selected.
  • To Filter the Rules – Select a request type from the Filter by Request Type drop-down menu. This is useful if your set of reassignment rules becomes large.