Complex Allocations
Complex allocations allow space to be allocated to multiple categories, individuals, groups, and functions for defined periods of time. Complex allocations are most often used in higher education, where space is shared by more than one department or its function may change at different times of the year. With complex allocations in place, the system can track how such space is actually being used. For example, complex allocations could indicate that a lab space is shared by the Chemistry and Physics department for classroom teaching during the school year, but allocated to the Biology department for research over the summer.
Complex allocations can be made for spaces only, not for subSpaces. All complex allocations are made for a particular time period and they cannot overlap. When you create a complex allocation, you first name it and provide start and end dates. Once created, you add method layers that indicate the ways in which the space will be allocated.
Space is categorized either by using the drop-down menus in the Categorization pane or by using the Complex Allocation pane. Once you create complex allocations for a space, you cannot revert to simple categorization.
Add a Complex Allocation
To add a complex allocation:
-
On the Edit Space page, click the Add Complex Allocation link.
The Complex Allocation Information page opens.
-
In the Description field, enter a name for the allocation.
-
In the Start Date field, enter the date on which the complex allocation will begin.
-
In the End Date field, enter the date on which the complex allocation will end.
Entering an end date for a complex allocation is not required. If the allocation does not frequently change, you may want to omit the end date. This field defaults to a date one year from the current date. If you do not want to specify an End Date, select the date value and press the Delete key.
If you do not specify an end date and you create a subsequent complex allocation for this space, the system will automatically suggest an end date (equal to the day before the new allocation starts) for any open-ended allocation. A warning message will appear indicating the end date that will be added, allowing you to cancel the new allocation, if needed.
-
Next to the displayed Area, select whether you want to view the area in square feet or square meters.
-
If User Defined Fields (UDFs) are defined for the overall complex allocation, they will appear in separate panes, one for each defined UDF group. Click the pane name to display the fields and enter values.
Some UDF groups may have required fields that must be defined before you can create the allocation.
-
Click CREATE.
The complex allocation is created. An EDIT button appears, allowing you to change the allocation information.
Delete a Complex Allocation
Administrators with security rights to edit complex allocations can delete complex allocations. This is designed to allow you to easily remove complex allocations that were improperly configured.
To delete a complex allocation:
- Access the Edit Space page for the space with the complex allocation you want to delete.
-
Expand the Complex Allocations pane.
All existing complex allocations for the space appear.
-
Click the EDIT button associated with the complex allocation you want to delete.
The Complex Allocation Information page appears.
-
Click the DELETE button.
A dialog box opens asking you to confirm your choice.
-
Click OK.
The entire allocation, including any layers, are permanently deleted.
Define Method Layers
Method layers define how a space is allocated by specifying the type of allocation and the percentage of time the space is allocated in that manner. The following allocation methods can be selected:
-
Space Category – This method allocates the space according the general purpose of the space, for example, administration, laboratory, or classroom.
-
Allocated Individual – This method allocates the space to an individual user.
-
Allocated Group – This method allocates the space to a selected group or department. If department-based security is enabled for an installation, defining an allocated group grants security rights to that space to all users who are affiliated with the specified group or department.
-
Space Function – This method allocates the space according to the function performed there, for example, clinical trials or undergraduate instruction.
Any of these allocation methods can exist concurrently. For example, a space can be categorized as 100% classroom while also being allocated to Dr. Green for 60% of the year and to Dr. Brown 40% of the year.
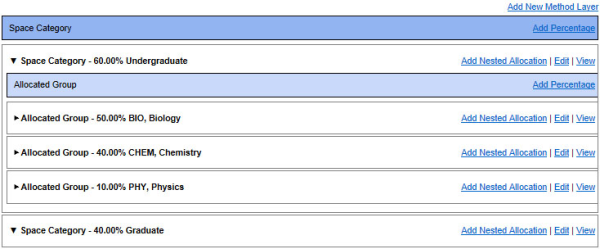
Method layers also be nested beneath one another if further complexity is needed to capture the actual utilization of a space. Extending the above example, Dr. Green's 60% may be split evenly between the Psychology and Neurology departments, while Dr. Brown's 40% may be allocated entirely to Anthropology.
By adding method layers, adding allocation percentages, and nesting allocations, very complicated space utilization policies can be defined.