Bulk Upload Tool
The Bulk Upload Tool allows you to create, modify, delete or migrate data in bulk. This tool simplifies the process for customers who need to upload larger sets of data that would be too time-consuming to update using the user interface. For example, using the Bulk Upload Tool you could add information for a set of new buildings, add numerous new assets to the system, or update existing data sets such as asset models, procedures, or labor rate schedules.
The Bulk Upload Tool allows you to perform the following operations:
- Get – retrieves information in the system and returns it to you on an Excel spreadsheet
- Upload – modifies information in the system by adding new data (Post), modifying existing data (Patch), or deleting data (Delete) from an Excel spreadsheet
If your ultimate goal is to make data updates, you will often perform the following steps:
-
Retrieve data on a properly-formatted an spreadsheet using the Get function.
-
Manipulate the data on the spreadsheet.
-
Upload the modified data on the using the desired Upload function.
To open the Bulk Upload Tool page:
-
Open the Administration Menu page.
-
Under the BULK TOOL ADMIN heading, click Bulk Upload.
 Security Rights
To use the Bulk Upload Tool, you must have the following security rights:
-
Admin Security Rights – You must have System Admin and Bulk Uploader Admin security rights as well as admin security rights to the module you will be working with. For example, to update inventory items, you must have the Inventory Admin security right.
-
Module Security Rights – You must have specific security rights to access and modify the data entities associated with a module. For example, to add assets to the system, a user must have the Create Assets security right.
-
Entity Settings – The rest of your settings, as defined on the User Security page, further define which data entities you can work with. For example, your region or property settings determine which properties you can access; your asset groups settings determine which assets you can access, and your warehouse settings determine which inventory items you can access.
If you do not have the appropriate security rights or settings, the entities you want to update may not be accessible on the Bulk Upload Tool page. Contact your system administrator to make modifications to your security rights.
The GET Operation
The Get operation retrieves existing data from the system and returns it on an Excel spreadsheet. The resulting spreadsheet has one row of data for every entity value and one column for each field associated with that entity. For example, if you performed a Get operation on users, you would obtain a spreadsheet that had a row for every user account, and each row would contain columns for values such as company ID, first name, last name, and title.
To perform the Get operation:
-
In the Select Entity field, choose the entity whose data you want to retrieve.
-
To filter the data retrieved for the selected entity:
-
In Select Criteria , type the field name(s) you would like to retrieve for the chosen entity, for example, ID or AssetNumber.
You can type as many fields related to the entity as needed by separating each field name by a comma (but no spaces). When you run the Get function, data will be retrieved only for field names listed in Select Criteria.
-
In Set Filter(s) type specific field values for which to retrieve data. For example, ID eq 20269 or AssetNumber eq 52043. You can also enter more than one field value using AND, for example, ID eq 20269 AND Asset Number eq 52043.
Here are more examples of Odata operators you can use:
Operator Description Example Logical Operators Eq
Equal /Property?$filter=City eq 'Redmond' Ne Not equal /Property?$filter=City ne 'London' Gt Greater than /Property?$filter=Cost gt 20 Ge Greater than or equal /Property?$filter=Cost ge 10 Lt Less than /Property?$filter=Cost lt 20 Le Less than or equal /Property?$filter=Cost le 100 And Logical and /Property?$filter=Cost le 200 and Building gt 4 Or Logical or /Property?$filter=Cost le 4 or Building gt 200 Not Logical negation /Property?$filter=not endswith(Description,'foundry') Arithmetic Operators Add Addition /Property?$filter=Cost add 5 gt 10 Sub Subtraction /Property?$filter=Cost sub 5 gt 10 Mul Multiplication /Property?$filter=Cost mult 2 gt 2000 Div Division /Property?$filter=Cost div 2 gt 4 Mod Modulo /Property?$filter=Cost mod 2 eq 0 Grouping Operators ( ) Precedence grouping /Property?$filter=(Cost sub 5) gt 10 You can use either Select Criteria or Set Filter(s) to retrieve data, but if you use both, only field names listed in Select Criteria should be used in Set Filter(s). When you run the Get function, data will be retrieved only for the entity items matching the values in Set Filter(s).
-
-
Click the DOWNLOAD button.
A dialog box opens asking whether you want to open or save the Excel spreadsheet. If you select Open, the data is downloaded and the spreadsheet automatically opens. If you select Save, the data is downloaded and the spreadsheet is saved to your browser's download location. The set of results returned depends on both your security rights and your security settings.
For those migrating new data into the system, we recommend using the Get function to download a spreadsheet as a template with which to enter necessary data for the entity being migrated.
Components of the Data Spreadsheet
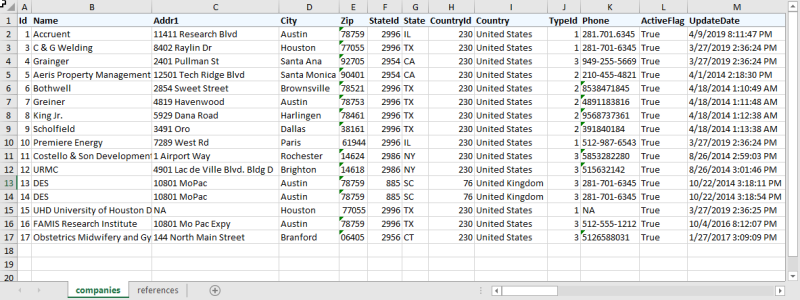
The downloaded Excel spreadsheet looks similar to this example (returned by performing Get Companies) and contains several important components.
-
Header Row – The header row is the first row (light blue in this example) and contains the names of the fields associated with an entity. If you want to update any values associated with this entity, the field names in the header row must be exact. For example, column C, entitled Addr1 contains the first line of the address value associated with the company. If you changed it to Address 1, the update would fail. For most entities, the first column, often named Id, is the unique identifier of a particular row.
-
Data Rows – The data rows (rows 2 through 17 in this example) contain all of the entity values retrieved from the system. If you want to update any values, you can delete all the rows you do not want to change and specify only the values that you want to change. If you want to add values, you can delete all of the returned data rows and specify only the new values.
-
Tab Name - The tab name at the bottom (companies, in this example) indicates the exact name of the entity you have retrieved. If you want to update any values you must not modify the tab name.
References Tab – The references tab at the bottom contains a list of valid references for this entity. Using a reference you can substitute a more readable text value for a numeric value when updating an entity, without having to look up the numeric values associated with these names.
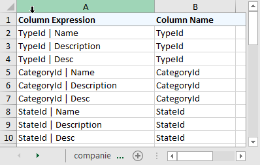
For example, in the spreadsheet at the top of this section, the TypeId value indicates the type of company, but the values are listed by their type ID numbers, not by their type names (where 1 = Property Manager, 2 = Tenant, 3 = Vendor). Since TypeId | Name is listed on the references page as a valid reference for TypeId, you could use that instead when you make your updates by changing the column header field name to TypeId | Name and entering text values instead.
Modify the Data Spreadsheet
Once you have downloaded your data spreadsheet by performing a Get operation, you can manipulate the data before you perform an Upload operation.
-
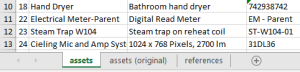
You may want to make a copy of the entity tab on the downloaded spreadsheet. This allows you to retain and examine your original data while you make the required modifications or additions. The Upload process will ignore any tab whose name doesn't exactly match the entity name.
-
Delete all data on the tab that does not directly pertain to the operation you want to perform. This simplifies the process by allowing you to manipulate only data pertinent to the bulk upload.
-
Refer to the references tab in the spreadsheet to input data by Name, Description or Desc (text) rather than by ID (numbers). For example, you can change the TypeId column to TypeId | Name, and then input names into the column rather than looking up the corresponding number.
- You can upload data for multiple entities at once. To do this, your spreadsheet must contain a properly formatted and named tab for each entity that you want to upload. For example, if you want to upload both asset data and asset make data, you could add two tabs named ‘assets’ and ‘assetmakes’.
POST
A post operation allows you to create new entity values. For example, if your company purchases a large quantity of laptops, you can use this operation to add the new asset records in a single upload.
- To prevent creating duplicates, delete all existing data rows or move them to an "original data" tab.
- Do not specify a value for the unique identifier (often named Id) column. The system will create a unique ID for each entity value.
-
Specify the values for the entity fields in each column:
-
System generated fields – Certain fields, such as Updated By, are generated by the system. You should not specify values for these fields.
-
Required fields – Some fields, such as Name or Type, are required to create a new entity value. You must specify unique values for these fields. To determine which fields are required, you can examine the entity’s Create page in the user interface. Required fields have a red square next to them.
-
Optional Fields – These fields, such as Description or Email Address, can be specified if you want to fully define the entity values, but are not required. If you do not enter these values, they can be defined later through the user interface or by performing a Patch operation.
-
PATCH
A patch operation allows you to modify the fields associated with existing data entities. For example, if your company changes the name of a region, you can update all properties in that region in a single upload.
-
The type of a value must match the type in the system, so be careful when modifying dates and numeric values.
-
Do not delete the unique identifier column (usually Id) or any Id values. The Id is used to determine which value to update.
-
Delete all columns except for those that contain the data that needs to be updated and any other columns that help you identify each row. Then, you can update only the columns that need modification.
-
If you delete a column or do not specify a value, that field will be ignored. The system will not delete the existing field value.
DELETE
A delete operation allows you to delete existing data entities from the system. For example, you could use this operation to delete a duplicate set of users that were accidentally created by another administrator. Some entities cannot be deleted. For example, a company that has users associated with it cannot be deleted or an asset associated with a work order cannot be deleted. In these instances, you can instead perform a PATCH operation and make the entity inactive instead of deleting it.
- Do not delete the unique identifier column (usually Id) or any Id values. The Id is used to determine which value to delete.
- You can delete all other data columns aside from those that help you identify which record you are deleting.
-
We strongly recommend that you contact Support or Professional Services for assistance to delete large data sets.
The UPLOAD Operation
To perform the Upload operation:
-
Click the Upload link at the top of the page.
-
In the Choose an action field, select the operation you want to perform.
- POST to create or upload new data
- PATCH to update existing data
- DELETE to delete existing data
-
In the Header Row field, select the row number of the header row in the data spreadsheet.
This should be the row number with column labels, usually row #1.
-
In the Data Row field, select the row number where your data starts.
The tool will pull data from this row and every row beneath it.
-
In the File Name for Output field, enter a name for your output file.
When the operation is complete, success and/or failure workbook files will be created indicating the results of the bulk upload operation. These files will be named according to the value you enter here.
- Click the Browse button to select the data spreadsheet you will use to perform the upload.
-
In the Select Entities to upload list, select the entities you are uploading.
If you are uploading data from multiple tabs on the uploaded spreadsheet, you can select multiple corresponding entities by holding down the Ctrl key and clicking several values.
-
Click the UPLOAD button to upload spreadsheet data to the system according to the chosen action.
The results of the upload will then display, showing which data successfully uploaded and which did not.
-
In the Result pane, select the Download Success Workbook or Download failure Workbook links to view the success or failure logs in an Excel spreadsheet.